Select an option for more information.
Load Paper in the Top Feed
You can load multiple sheets of paper of the same type and size in the top feed.
 For the paper types (Canon genuine paper), size, and weight/thickness that can be used with the printer, see Media Types You Can Use.
If you cut plain paper into small size such as 4" x 6" (10 x 15 cm) or 5" x 7" (13 x 18 cm) to perform trial print, it can cause paper jams.
 We recommend Canon genuine photo paper for printing photos.
You can use general copy paper or Canon Red Label Superior / Canon Océ Office Color Paper.
Print in an environment (temperature and humidity) suitable to the paper in use. For the temperature and humidity conditions of Canon genuine papers, refer to the paper's packaging or the supplied instructions.
-
Align the edges of the paper. If the paper is curled, flatten it.

Align the edges of paper neatly before loading. Loading paper without aligning the edges may cause paper jams.
If paper is curled, hold the curled corners and gently bend them in the opposite direction until the paper becomes completely flat.
When using Photo Paper Plus Semi-gloss, even if the sheet is curled, load one sheet at a time as it is. If you roll up this paper to flatten, this may cause cracks on the surface of the paper and reduce the print quality.
-
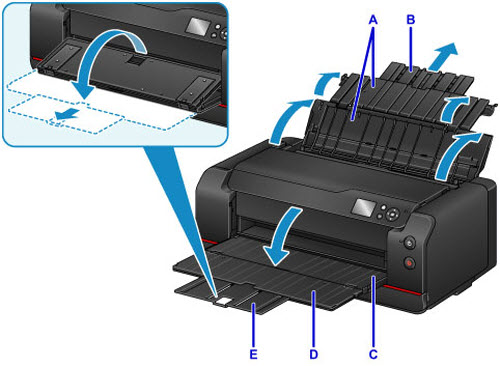
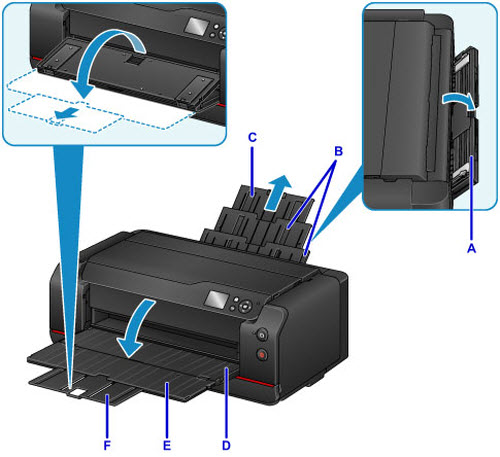
Open the paper support (A) of the top feed, then extend the paper support extension (B).
-
Open the paper output tray (C) gently.
-
Open the output tray extension (D), then pull out the paper output support (E).
-
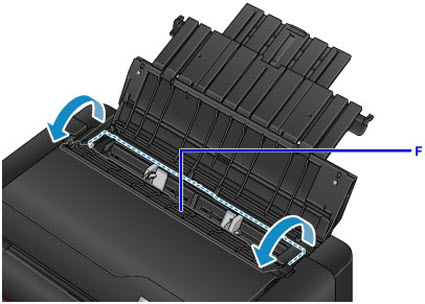
Open the feed slot cover (F).
-
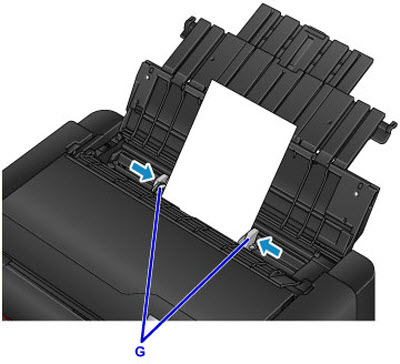
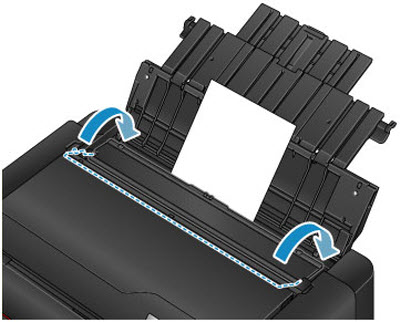
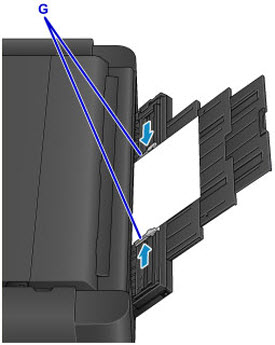
Slide the paper guides (G) to open them, and load the paper in the center of the top feed WITH THE PRINT SIDE FACING YOU.
-
Slide the paper guides (G) to align them with both sides of the paper stack.
Do not slide the paper guides too hard against the paper. The paper may not be fed properly.
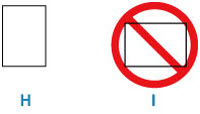
Always load paper (except return postcard) in the portrait orientation (H). Loading paper in the landscape orientation (I) can cause paper jams.
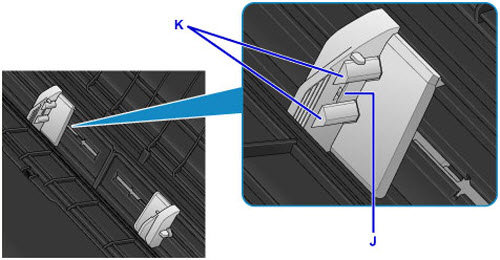
Do not load sheets of paper higher than the load limit mark (J).
The raised parts (K) on the paper guides retract depending on the size of the loaded paper. Do not push these parts down with your finger.
For loading long-length paper, the leading edges of paper are lifted depending on the paper weight and printouts may be misaligned. Prevent the leading edges of paper from lifting by holding the parts protruding from the tray with your hand or other ways.
-
Gently close the feed slot cover.
The paper information registration screen for the top feed is displayed on the LCD.
-
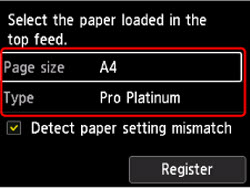
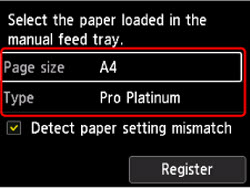
Select the size and type of paper loaded in the top feed at Page size and Type, then select Register.
There are various types of paper, such as paper with a special surface coating for printing photos at optimal quality and paper suitable for documents. Each media type has specific preset settings (how ink is used and sprayed, distance from nozzles, etc.), that allow you to print to that type with optimal image quality. The wrong paper settings may cause poor printout color quality or scratches on the printed surface. If you notice blurring or uneven colors, increase the print quality setting and try printing again.
To prevent incorrect printing, this printer has a function that detects whether the settings for the paper loaded on the top feed matches the paper settings. Before printing, make print settings in accordance with the paper settings. When this function is enabled, an error message is displayed if these settings do not match to prevent incorrect printing. When this error message is displayed, check and correct the paper settings.
For printing on long-length paper, hold ejected paper with your hand or use the printer at the location that paper does not fall. If paper falls, the printed surface may get dirty or be damaged. If you hold paper with your hand, do not pull it forcibly while printing.
Precautions when printing on postcards
This printer cannot print on postcards affixed with photos or stickers.
Borderless printing is not supported for return postcards.
Do not fold the return postcard. If a crease is formed, the printer will not be able to feed the postcard properly, and this condition will cause line shifts or a paper jam.
Depending on the type of postcard, the paper size may not be detected. In that case, set the printer not to detect the paper width.
When printing on postcards or return postcards, load them with the side you want to print facing up and the post code facing down.
When printing on each side of a postcard separately, you will get cleaner printing if you print the message side first and then print the address side.
When holding the postcard, hold it by the edges as much as possible, and avoid touching the printed surface until the ink dries.
We recommend Canon genuine photo paper for printing photos.
Load Paper in the Manual Feed Tray
You can load one sheet of 8" x 10" (20 x 25 cm) size paper or larger in the manual feed tray at a time.
For the paper types (Canon genuine paper), size, and weight/thickness that can be used with the printer, see Media Types You Can Use.
We recommend Canon genuine photo paper for printing photos.
Print in an environment (temperature and humidity) suitable to the paper in use. For the temperature and humidity conditions of Canon genuine papers, refer to the paper's packaging or the supplied instructions.
Plain paper and postcard cannot be fed from the manual feed tray. When printing on plain paper or postcard, load it in the top feed.
-
Prepare paper.
If paper is curled, flatten it.
If paper is curled, hold the curled corners and gently bend them in the opposite direction until the paper becomes completely flat.
When using Photo Paper Plus Semi-gloss, even if the sheet is curled, load one sheet at a time as it is. If you roll up this paper to flatten, this may cause cracks on the surface of the paper and reduce the print quality.
-
Open the manual feed tray (A), then extend the paper support (B) and the paper support extension (C).
-
Open the paper output tray (D) gently.
-
Open the output tray extension (E), then pull out the paper output support (F).
-
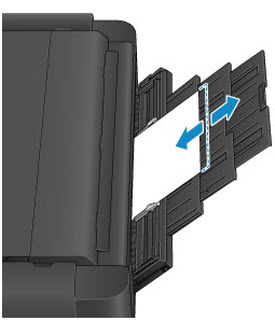
Slide the paper guides (G) to open them, and load ONLY ONE SHEET OF PAPER in the center of the manual feed tray WITH THE PRINT SIDE FACING YOU.
-
Slide the paper guides (G) to align them with both sides of the paper stack.
Do not slide the paper guides too hard against the paper. The paper may not be fed properly.
Always load paper in the portrait orientation (H). Loading paper in the landscape orientation (I) can cause paper jams.

-
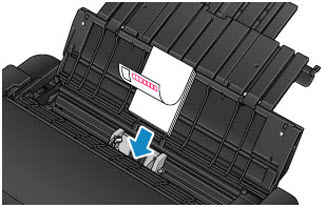
Check if the paper is set properly in the manual feed tray.
Make sure that the paper is set firmly against the bottom of the manual feed tray and against the paper guides by slightly jiggling the paper up and down.
-
Select the size and type of paper loaded in the manual feed tray at Page size and Type, the select Register.
To continue printing from the manual feed tray, wait until printing is complete, then load the next sheet.
There are various types of paper, such as paper with a special surface coating for printing photos at optimal quality and paper suitable for documents. Each media type has specific preset settings (how ink is used and sprayed, distance from nozzles, etc.), that allow you to print to that type with optimal image quality. The wrong paper settings may cause poor printout color quality or scratches on the printed surface. If you notice blurring or uneven colors, increase the print quality setting and try printing again.
To prevent incorrect printing, this printer has a function that detects whether the settings for the paper loaded on the manual feed tray matches the paper settings. Before printing, make print settings in accordance with the paper settings. When this function is enabled, an error message is displayed if these settings do not match to prevent incorrect printing. When this error message is displayed, check and correct the paper settings.
For loading long-length paper, the leading edges of paper are lifted depending on the paper weight and printouts may be misaligned. Prevent the leading edges of paper from lifting by holding the parts protruding from the tray with your hand or other ways.
When printing on long-length paper, hold ejected paper with your hand or use the printer at the location that paper does not fall. If paper falls, the printed surface may get dirty or be damaged. If you hold paper with your hand, do not pull it forcibly while printing.
If your product issue was not resolved after following the steps above, or if you require additional help, please create or log in to your Canon Account to see your technical support options.