
Scan using MP Navigator - MP810 (Mac OS X)
| Article ID: ART127500 | | | Date published: 05/12/2015 | | | Date last updated: 08/14/2015 |
Description
Solution
Scanning using MP Navigator
MP Navigator enables you to scan documents such as photographs and magazines or 35mm film strips or slides .
1. Open the Applications folder on the hard disk on which MP Navigator is installed, then open the Canon Utilities folder and double-click the  MP Navigator 3.0 icon. MP Navigator opens.
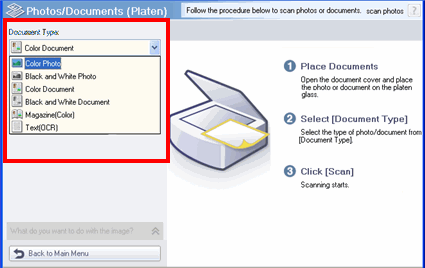
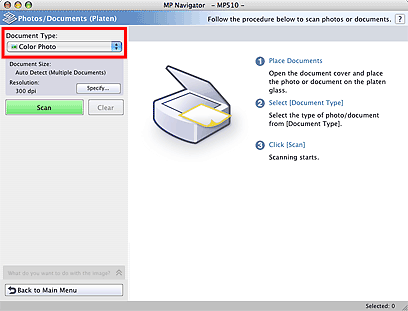
2. Point to Scan/Import and click 'Photos/Documents (Platen)'.

3. Place the document face-down on the platen glass, and select 'Document Type'.
How to place the document and Document Type depends on the document to be scanned.
How to place the document
Allow 3/8 inches (1 cm) or more space between the edges of the platen glass and the document.
Align a corner of the document with the corner at the arrow of the platen.
- When you select Color Photo or Black and White Photo, the position or size of the image may not be scanned correctly if you do not leave 3/8 inches (1 cm) or more space between the edges of the platen glass and the document.
- When you select Color Photo or Black and White Photo, the position or size of the image may not be scanned correctly depending on the document. In such a case, select Document Size such as A4 or Letter according to the document to be scanned.
- When you select Magazine(Color), the Descreen function will be enabled and scanning takes longer than usual. To reset the Descreen function, disable Descreen in the Scan Settings dialog box.
4. Click 'Specify'... and set the preferences as required.
The Scan Settings Dialog Box opens. Specify the Document Size and Scanning Resolution.
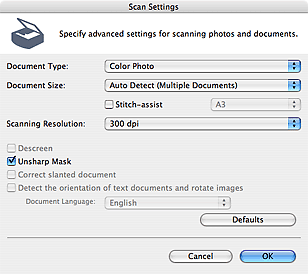
- When Document Size is Auto Detect or Auto Detect(Multiple Documents), the position or size of the image may not be scanned correctly depending on the document. In such a case, select Document Size, such as A4 or Letter according to the document to be scanned.
5. Click 'Scan'.
Scanning will begin.
When the document has been scanned, the scanned image is displayed in the Thumbnail List area.

6. Edit the scanned image as required.
When there are multiple images, first select images to edit. (An orange frame appears around the selected image.)
Note: You can use shift-click or command-click to select multiple images. (An orange frame appears around the selected image.)
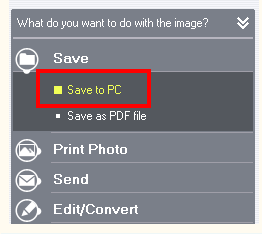
7. Select what to do with the scanned image data.

Save to PC , Save as a PDF file , Print Photo , Send via E-mail , Edit
Scanning Film
MP Navigator allows you to scan 35mm film strips (negative/positive film) and mounted slides (positive film). MP Navigator is compatible with film strips (standard state of developed film, with six frames in each strip) and mounted slides (one frame per mounted slide). Up to twelve frames for film strips and eight frames for mounted slides can be scanned continuously.

1. Place film on the platen glass.
2. On the Windows desktop, double-click  MP Navigator 3.0.
Alternatively, on the Windows taskbar, click 'Start', and point to (All) Programs, Canon Utilities, then MP Navigator 3.0. Then click 'MP Navigator 3.0'.
MP Navigator opens.
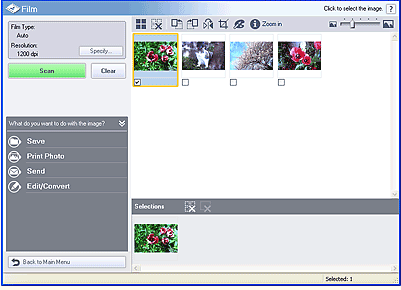
3. Point to Scan/Import and click 'Film'.

4. Click 'Specify'... and set the preferences as required.

TheScan Settings dialog box opens. Specify Film Type and Scanning Resolution.
5. Click Scan.
Preview scan will start, and preview images will be displayed.

Select all Frames : Selects all displayed frames when in thumbnail view. Select all Frames is automatically applied immediately after preview.
Note : To cancel a selection, click to clear the check mark of the frame.
6. Select the image to scan, then click Next.
The scanned image will be displayed in the Thumbnail List area of the Film screen.
7. Edit the scanned image as required.
8. Select what to do with the scanned image data.
Save to PC , Save as a PDF file , Print Photo , Send via E-mail , Edit
Saving
MP Navigator allows you to save the scanned image data in a specified folder.
1. Scan the images into MP Navigator, then select them.
2. Click 'Save', then click 'Save to PC' on the list.
3. Specify the following settings as required:
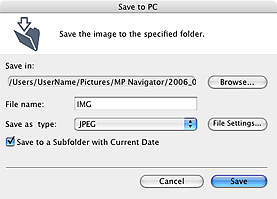
Save in:
Display the destination folder in which to save the scanned image. To change the destination, click 'Browse'... and specify another folder. The MP Navigator folder in the Pictures folder is specified by default.
File name:
Enter the file name of the image to be saved (up to 20 characters). When saving multiple files, 4 digits are appended to each file name.
Note: File name is not displayed when saving images saved on a memory card (MP180, MP460).
Save as type:
Select a file type to save the scanned image. JPEG, TIFF, and PICT are available.
Note: Save as type is not displayed when saving images saved on a memory card (MP180, MP460).
You cannot save images in PICT format, when images are scanned at 4096 pixels or more in a horizontal direction.
You cannot select JPEG when Document Type is Text(OCR). For JPEG images, you can click 'File Settings'... to select a compression type in the resulting dialog box from High(Low Compression), Standard, and Low(High Compression).Save to a Subfolder with Current Date:
Select whether to create a subfolder, in which to save the scanned image, with the current date (for example, "2006_01_01" which indicates "Year_Month_Date").
4. Click 'Save'. The scanned image will be saved as specified.
Saving as a PDF File
1. Scan the images into MP Navigator, then select them.
2. Click 'Save', then click 'Save as a PDF file' on the list.

Note: You cannot select Save as PDF file when a PDF file is included in the selected image files.
3. Specify the following settings as required:

Save as type:
Select a file type to save the scanned image
PDF: When multiple images are selected, save each image as a PDF file.
PDF(Multiple Pages): Save multiple images in one PDF file.
PDF(Add Page): Add selected images to a PDF file. The selected images are added to the last page of the PDF file. You cannot rearrange pages of the PDF file to which images are added.
Note: You can add only the files created by MP Navigator.
Note: PDF(Multiple Pages) is displayed when multiple images are selected.
PDF Settings...
Configure advanced settings for creating a PDF file.
Enable keyword search:
Check this setting to convert characters in a document to text data. This will enable an easy search by keyword.
Document Language:
Select the language of the document to be scanned.
Detect the orientation of text documents and rotate images:
Detects the orientation of the document from the scanned text, and rotates the scanned image to the correct orientation.
Scanning takes longer than usual when you enable Detect the orientation of text documents and rotate images.
This function may not work properly depending on the document language. Only text documents written in languages that can be selected from Document Language are supported
The orientation of the following types of documents may not be corrected, as the text cannot be detected correctly.
- The resolution is outside the range of 300-600 dpi.
- Font size is outside the range of 8-48 points.
- Documents containing special fonts, effects, italics, or hand-written text.
- Documents with patterned backgrounds.
Correct slanted document:
Detects the scanned text and corrects the angle (within -0.1 to -10 degrees or +0.1 to +10 degrees) of the document.
Scanning takes longer than usual when you enable Correct slanted document.
The inclination of the following types of documents may not be corrected, as the text cannot be detected correctly.
- Documents in which the text lines are inclined more than 10 degrees or the angles vary by line.
- Documents containing vertical and horizontal text.
- Documents with extremely large or small fonts.
- Documents with small amount of text.
- Documents containing figures/images or hand-written text.
- Documents containing vertical and horizontal lines (tables).
PDF Compression:
Select a compression type for saving.
The following images can be compressed with high efficiency.
- Images smaller than 10,500 pixels in the vertical direction.
- Images with resolutions of 200-600 dpi. (Example: A4 or Letter-size document scanned at 600 dpi)
Add to:
This setting is available when you select PDF(Add Page) for Save as type and specify the PDF file to which images are added. To change the destination, click 'Browse'... to specify.
You can select only PDF files created by MP Navigator. You cannot select PDF files created by other applications. PDF files edited by other application programs cannot have pages added to them even if they were originally created by MP Navigator.
File name:
Enter the file name of the image to be saved (up to 20 characters). When saving multiple files, 4 digits are appended to each file name.
Save in:
Display the destination folder. To change the destination, click 'Browse'... and specify another folder. The MP Navigator folder in the Pictures folder is specified by default.
Save to a Subfolder with Current Date:
Select whether to create a subfolder, in which to save the scanned image, with the current date (for example, "2006_01_01" which indicates "Year_Month_Date").

4. Click 'Save'.
Print Scanned Photograph Images
You can easily print high-quality images using Easy-PhotoPrint. This application is suited for printing photograph images taken with a digital camera.
1. Select the image and click Print Photo, then click Print Photo on the list.

Easy-PhotoPrint starts.
Note: The Print Photo button is displayed only when Easy-PhotoPrint is installed
2. Configure the Easy-PhotoPrint settings according to preference.
Sending via E-mail
You can send a scanned image by attaching it to an e-mail.
MP Navigator is compatible with the following e-mail software programs:
- Mail (Mac OS standard)
- EUDORA
(If an e-mail software program does not operate properly, check that the program supports file attachments. For details, refer to the instruction manual of the e-mail software program.)
You cannot select images scanned at 5105 pixels or more in the horizontal direction when selecting PDF for Save as type.
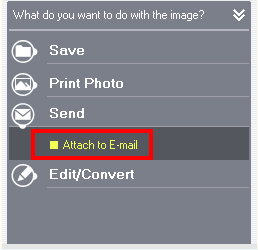
1. Scan the images into MP Navigator, then select them.
2. Click 'Send', then click 'Attach to E-mail' on the list.
3. Specify the following settings as required:

Mail Program:
The e-mail program set up on the Preference dialog box of the main menu screen will be displayed. Specify your e-mail application.
Adjust attachment file size:
When Save as type is JPEG, checking this setting allows you to change the size of the file to be attached. You can select the file size of the image to be attached with Size.
Save in:
Display the destination folder in which to save the attached image. To change the destination, click 'Browse'... and specify another folder. If the image file to be attached is resized, the resized image file is saved. By default, folders are created and named with the current date (for example, "Mail_20060101") under the MP Navigator folder in the Pictures folder.
File name:
Enter the file name of the image to be attached (up to 20 characters). When saving multiple files, 4 digits are appended to each file name.
Save as type:
Select the file type of the image to be attached from JPEG, PDF, and PDF(Multiple Pages).
- Save as type is displayed when the image is scanned with Photos/Documents (Platen).
- PDF(Multiple Pages) is displayed when multiple images are selected.
- For JPEG images, you can click 'File Settings'... to select a compression type in the resulting dialog box from High(Low Compression), Standard, and Low(High Compression).
4. Click 'OK'.
The image file is saved in the folder specified in Save in, and the e-mail software program starts.
5. Specify the recipient, then enter the subject and the e-mail message.
See the operation manual of your e-mail software program for details of e-mail settings.
Edit Photograph Images
You can manipulate images and correct colors using ArcSoft PhotoStudio.
© ArcSoft, Inc. All rights reserved for PhotoStudio.
1. Select the image and click 'Edit/Convert', then click 'Edit photo images' on the list.

ArcSoft PhotoStudio starts.
Note: The Edit photo images button is displayed only when ArcSoft PhotoStudio is installed.
2. Configure the ArcSoft PhotoStudio settings according to preference.
See the ArcSoft PhotoStudio manual for details on the settings available.

Film Type : Select the type of film to be scanned.
Auto : Automatically detects the film type.
Color Negative Film : Scan 35 mm color negative film in color.
Black and White Negative Film : Scan 35 mm black and white negative film in black and white.
Color Positive Film : Scan 35 mm color positive film in color.
Black and White Positive Film : Scan 35 mm black and white positive film in black and white.
Note : If the film is a mounted slide, positive film can be scanned.
When scanning black and white film, it is recommended to select black and white film for Film Type and scan.
The film may not be scanned properly if Auto is selected for Film Type.
In such a case, select the type of film to be scanned in Film Type, and then perform a scan over again.
Preview will not be displayed when other than Auto is selected for Film Type or when the Preview before scanning checkbox is not selected. In such a case, the scanned images will be displayed directly on the Film screen.
Scanning Resolution : Select the resolution at which to scan documents. The following scanning resolution can be specified:
Film: 300/400/600/1200/2400/4800
Unsharp Mask : Check this to emphasize and sharpen the outline of the image.
Preview before scanning : Check this, then perform a scan to display preview images before scanning. On the preview screen, click 'Back' to return to the MP Navigator screen, or click 'Next' to start scanning the selected frames.
Defaults : Click this to restore the factory pre-defined settings.
Return to Film Scan Instructions.
Mounting Films
1. Remove the FAU Protective Sheet from the Document Cover.

2. Remove either the film guides for film strip or slides, according to the type of your original, from the rear of the FAU Protective Sheet.

Mounting a 35 mm Film Strip
1. On the film guide, open the film holder.
Gently squeeze in the edges of the film holder to release it.

(2). Mount the film in the film guide with the front side (the side showing the correct image) face down, with the frame order running from left to right and with the tip of the film set under the tabs of the film guide. Position the film in the film guide so that the white line marks of the film guide do not obscure the film frames.

(3). Squeeze the film holder inward lightly and close it completely.
Note : If the film holder will not close properly, reposition the film so that its perforations are set properly in the film guide slots, and try again.
Make sure that all the protrusions on the outer edges of the film holder fit into the slots in the film guide when closing the film holder. If the film holder does not close completely, press the whole film holder gently downward.

(4) With the ![]() mark on the film guide facing up, align the film guide with the indentations on the right and left sides of the Platen Glass.
mark on the film guide facing up, align the film guide with the indentations on the right and left sides of the Platen Glass.

(5) Confirm that the front side of the film (the side showing the correct image) faces down.
Mounting a film strip that is shorter than the film guide
- When placing film strips that are shorter than the film guide, part of an image near the open area may appear pale. In this case, place black paper over the open area to shield it.
- Labels attached to areas of the film without images may be interpreted as images and be included in the scan.
Return to Film Scan instructions
Mounting 35 mm Slides
1. Load the film guide with its sides to the right and left grooves of the Platen Glass.

2. Mount the slides in the film guide with the front side (the side showing the correct image) face down, the frame order running from left to right, and with the image upside down.
Load the slides in the landscape orientation, making sure they are not loose in the film guide.

Note : Film is scanned in the order from left to right. Mount the slides in the film guide with the upper edge of the photograph towards you to prevent the scanned photographs from being displayed upside down on the LCD. Depending on the model or brand of your camera, the scanning order may differ from the frame order of the film.
scanning order
*1 35mm film strip
*2 35mm slides

Return to Film Scan instructions