You calibrate the camera by looking at a blinking focusing point in the viewfinder and then pressing the shutter button. Your do this for four focusing point while holding the camera horizontally and again while hold the camera vertically. Therefore you have to follow the calibration procedure eight times
There are three calibration channels (CAL 1, 2, 3) which can store different calibration data.
For example you can store calibration data in channel 1 for your naked eye and channel 2 for when you wear glasses or contact lenses. Channel 3 can be used to store calibration data for another user.
- Keep your eye on the viewfinder eyepiece until you complete the calibration procedure
- In the same calibration channel, do the calibration procedure for the horizontal and vertical camera orientations
|
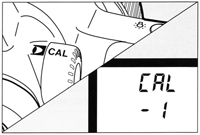
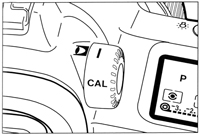
Set the  switch to switch to 
Set the  switch to <CAL> switch to <CAL>
- CAL and the calibration channel No. will be displayed. A blinking channel No. means that no calibration data is stored. If you channel No. does not blink, it means that calibration data has been stored in that channel.
Turn the  dial to select a blinking channel No. dial to select a blinking channel No.
- If there is no blinking channel No. see "Deleting Eye-Control Data"
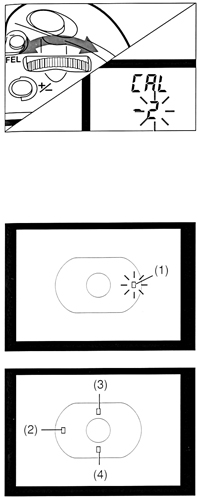
Hold the camera horizontally. The calibration sequence corresponds to the focusing points numbered from (1) to (4) in the figures
Keep looking at the blinking focusing point (1) in the viewfinder then press the shutter button
- The focusing point will stop blinking and stay lit
- Keep looking at the lit focusing point for 1 to 2 seconds until the beeper sounds and the focusing point turn off
After you release the shutter button the next focusing point (2) will start blinking. Repeat the above steps.
Repeat these steps for the remaining points.
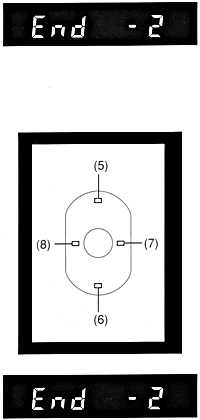
After you complete the calibration procedure, the channel No. stops blinking and stays lit. "END" is also displayed
- if you take too long during the calibration procedure and the blinking focusing point turns off, press the shutter button and start again from step 4
After completing the horizontal calibration procedure, calibrate for the vertical camera orientation. Hold the camera vertically. The calibration sequence corresponds to the focusing points numbered from (5) to (8) in the figures
- When the camera is held vertically with the grip upward or downward, the focusing points will start blinking in the following order top, bottom, right, left
- For this procedure, use the same calibration channel No. you used for the horizontal calibration procedure
Hold the camera vertically and press the shutter button
- Focusing point (5) will start blinking
Following the same steps described above for the remaining points
Set the switch to  to end the calibration procedure to end the calibration procedure
- The viewfinder display returns to normal.
|
If the calibration is not completed properly the beeper will sound and the LCD panel display items will blink. In such a case, press the shutter button again and start again from step 4
