Setting and function of the printer plug-in (Macintosh) Page Setup Sheet
You can use this sheet to set the size of the image to be printed, the media size, and whether to enlarge/reduce the image.
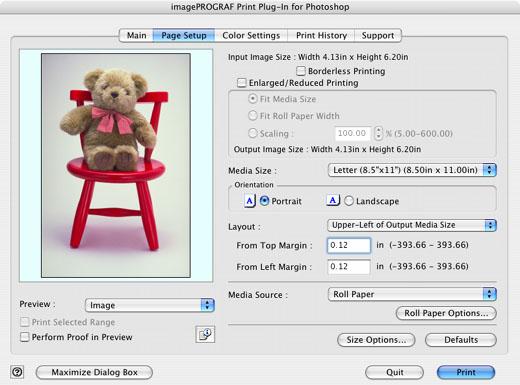
Selected Image Size
The size of the image imported to Print Plug-In is displayed.
Borderless Printing
When you place a checkmark here, the Specify Roll Paper Width dialog box is displayed and you can print an image without borders.
Note
You cannot select this if Manual or Manual (3mm margins) is selected in Media Source.
Enlarged/Reduced Printing
When you place a checkmark here, you can print enlarged/reduced images.
When printing an enlarged/reduced image, select the method for enlargement/reduction. The image size sent to the printer is displayed matching the selected method in Output Image Size.
The following settings are available for enlarged/reduced printing.
| Fit Media Size | This automatically enlarges/reduces the entire image imported to Print Plug-In to match the export media size when printing. |
| Fit Roll Paper Width | This automatically enlarges/reduces the entire image imported to Print Plug-In to match the width of the roll paper with the width of the image when printing. You cannot display this if Manual or Manual (3mm margins) is selected in Media Source. |
| Scaling | This enlarges/reduces the entire image by the specified scaling value. Input the scaling value in numerical characters. You can specify a range between 5-600%. You can change the numbers by clicking either ?? |
Output Image Size
The output image size is displayed up to one place after the decimal point in millimeters.
Note
When Media Size is smaller than Output Image Size, part of the image may not print.
Media Size
You can select the size of the print media.
Note
- The media sizes you can select differ with printers.
- This is not displayed when a checkmark is placed in Borderless Printing.
- This is not displayed when Fit Roll Paper Width is set in Enlarged/Reduced Printing.
- The details of Media Size you have set is saved even when you close Print Plug-In.
Orientation
This selects the print orientation.
The following settings are available for orientation.
| Portrait | Prints the image on the media as it appears on the screen. |
| Landscape | Prints the image on the media rotated 90 degrees. |
Layout
You can select the print position of an image on the media.
The following settings are available for layout.
| Upper-Left of Output Media Size | Prints the image with fitting the top left of the active print area for Media Size. |
| Center of Output Media Size | Prints the center of the image on the center of the selected Media Size. |
| Specify Print Start Position | You can print with specifying the top and left printing start positions in From Top Margin and From Left Margin for Media Size. From Top Margin
Input the margin from the top of the media in numbers.
You can input between -9999 and 9999 mm. From Left Margin
Input the margin from the left of the media in numbers.
You can input between -9999 and 9999 mm. |
| Upper-Left of Roll Paper | Prints the top left of Media Size on the top left of the selected roll paper. |
| Center of Roll Paper | Prints the center of Media Size on the center of the selected roll paper. |
Note
- With any item other than Roll Paper selected under Media Source and Roll Paper Preview selected under Preview, Roll Paper Layout cannot be selected.
- You can specify the print position if you drag the image on the preview display.
- This is not displayed when a checkmark is placed in Borderless Printing.
- This is not displayed when Fit Roll Paper Width is set in Enlarged/Reduced Printing.
- This is not displayed when Fit Media Size is set in Enlarged/Reduced Printing.
- The Layout settings and the actual print product may differ with Media Type and media detailed settings and printer settings.
Media Source
You can select the media source.
The following settings are available for media source.
| Manual | Select for manual paper feed printing. |
| Manual (3mm margins) | Select for manual paper feed printing when you want to minimize the margin at the far end edge of paper. |
| Roll Paper | Select to print on roll paper. |
Note
- The details of Media Source you have set is saved even when you close Print Plug-In.
- When you select Manual (3mm margins) for Media Source, the far end edge of printed image may become defective depending on the paper used. If this happens, select another media source.
Roll Paper Options Button
Click this button to open the Roll Paper Options dialog box, where you can set roll paper width and perform auto cut settings.
Note
You cannot display this if Manual or Manual (3mm margins) is selected in Media Source.
Roll Paper Options Dialog Box
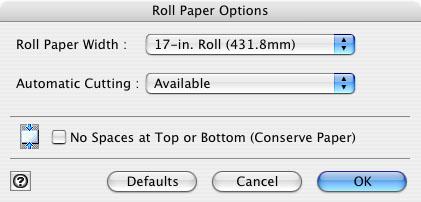
| Roll Paper Width | This selects the width of the roll media set to the printer.
The selectable roll paper widths differ by printer. |
| Automatic Cutting | Available
When printing is complete, the roll media is automatically cut. None
When printing is complete, the roll media is not automatically cut and should be cut by hand. Print Cut Guideline
When printing is complete, the roll media is not automatically cut. Print cut line is printed for cutting by manual. |
| No Spaces at Top or Bottom (Conserve Paper) | When you place a checkmark here, the print data is printed without margins. |
Size Options
Click the Size Options button to open the Size Options dialog box and you can select a media name, size and other settings.
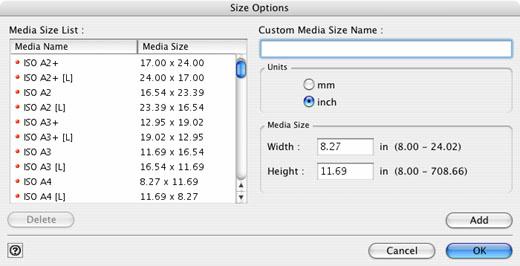
| Media Size List | Displays all the standard sizes and custom media sizes. |
| Custom Media Size Name | You can enter any name up to 63 characters. |
| Units | You can select the units of measure to use when you define custom media size. Switching this setting resets the units of measure for the entire Plug-In. |
| Media Size | Width
Enter the width of the media size. Height
Enter the height of the media size. |
| Add | Registers the contents of the settings. |
Defaults Button
Click this button to return all of the settings on the Page Setup sheet to their defaults.
