Loading Paper in the Rear tray
1. Flatten the four corners of the paper before loading it.

Note : Align the edges of paper neatly before loading. Loading paper without aligning the edges may cause paper jams. If paper is curled, hold the opposing curled corners and gently bend them in the opposite direction until the paper becomes completely flat.
To avoid curling, handle paper as follows.
Put unused paper back into the package and keep them on a level surface.
Take out only the necessary number of sheets from the package, just before printing.
2. Prepare to load paper.
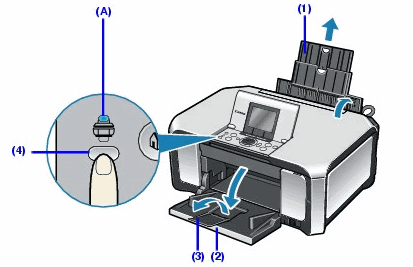
(1) Open the Sheet Feeder Cover and pull out the Paper Support.
(2) Open the Paper Output Tray.
Put your finger on the top of the Paper Output Tray and open it gently.
(3) Open the Output Tray Extension.
(4) Press the Paper Feed Switch so that the Rear tray lamp (A) lights.
Note : You can also select the paper source with the printer driver.
3. Load the paper.
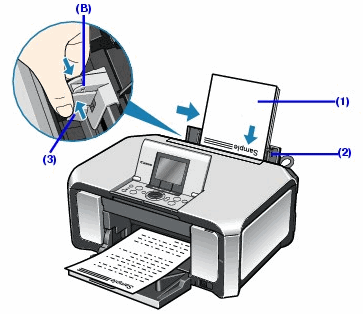
Do not load higher than the Load Limit Mark (A).
(1) Load the paper in the Rear tray with the print side facing UP.
(2) Align the paper stack against the Cover Guide on the right side of the Paper Support.
Note : Make sure that the Cover Guide is set upright when you load paper in the Rear tray.
(3) Pinch the Paper Guide and slide it against the left side of the paper stack.
Note : When performing copy direct printing without using a computer, select the page size selected in Page size in each menu. When using the machine connected to a computer, select the page size of the loaded paper in Page Size in the printer driver.
