|
PIXMA MP640R
|
PIXMA MP980
|
PIXMA MP990
|
PIXMA MG8120
|
|
PIXMA MG8120B
|
PIXMA MG6120
|
PIXMA MG5220
|
PIXMA MG5120
|
|
PIXMA MG4120
|
PIXMA MG3122
|
PIXMA MG3120
|
PIXMA MX7600
|
|
PIXMA MX882
|
PIXMA MX870
|
PIXMA MX860
|
PIXMA MX850
|
|
PIXMA MX700
|
PIXMA MX420
|
PIXMA MX410
|
PIXMA MX350
|
|
PIXMA MX340
|
PIXMA MX330
|
PIXMA MX320
|
PIXMA MX310
|
|
PIXMA MX300
|
|
Creating an Album in Easy-PhotoPrint
| Article ID: ART154293 |
| |
Date published: 06/09/2015 |
| |
Date last updated: 08/17/2015 |
Description
Easy-PhotoPrint EX allows you to create your own personalized photo album.
Solution
Creating an Album
Easy-PhotoPrint EX allows you to create your own personalized photo album.
Note: All the screenshots depicted in this procedure are Windows versions. The procedure to create an Album in Easy-PhotoPrint EX are the same in Windows and Mac.
Steps:
-
-
-
-
-
-
Start Easy-PhotoPrint EX.
- Windows:
From the Start menu, select (All) Programs > Canon Utilities > Easy-PhotoPrint EX > Easy-PhotoPrint EX.
Easy-PhotoPrint EX starts and the Menu appears.
-
Mac:
Open the Applications folder in which Easy-PhotoPrint EX is installed (in Mac OS X v.10.6.x, select Applications from the Go menu in the Finder), then double-click the Canon Utilities folder, Easy-PhotoPrint EX folder, then Easy-PhotoPrint EX icon.
Easy-PhotoPrint EX starts and the Menu appears.
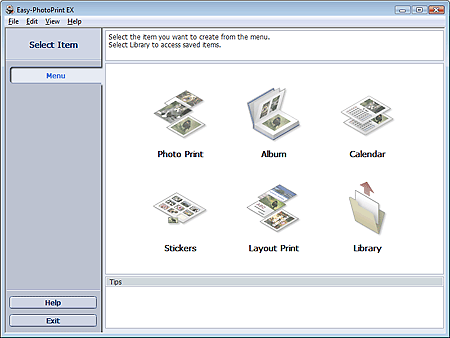
The above screenshot shows a Windows version of Easy-PhotoPrint EX.
- Go to Selecting the Paper and Layout.
- Click 'Album' from Menu.
The Page Setup screen appears.

-
Set the following items in the General Settings section:
Paper Size
Orientation
Cover
Double page album
Page number
Note:
- See Help on the paper size that can be selected.
- You can select whether to display images on the inside of the front and back covers in the Cover Options dialog. To display the Cover Options dialog, select Front or Front & Back for Cover and click Options.
- Select the Double page album checkbox to enable the spread page layout (consisting of two-page master). In a double-page album, you can arrange an image across the left and right pages.
- You can customize the page numbers (position, font size, etc.) in the Page Number Settings dialog. To display the Page Number Settings dialog, select the Page number checkbox and click Settings.
- You can customize the margins of the front cover, inside pages and back cover in the Margin Settings dialog. To display the Margin Settings dialog, click Margins.
- Select the theme you want to use from Theme in Sample Layout.
-
If you want to change the layout, click 'Layout'.
The Change Layout dialog appears.
In the Change Layout dialog, you can change the layout or select whether to print the date (on which the picture was taken) on the photo.
Note:
- The layouts that can be selected may vary depending on the Paper Size, Orientation, Double page album, or the type of page selected (front cover, inside pages or back cover).
- You can customize the date (position, size, color, etc.) in the Date Settings dialog. To display the Date Settings dialog, select the Print date checkbox in the Change Layout dialog and click Date Settings.
- If you want to change the background, click 'Background'.
The Change Background dialog appears.
In the Change Background dialog, you can paint the background in a single color or paste an image file to it.
Note: See Help for details on the Page Setup screen.
- Go to Selecting a Photo.
- Click 'Select Images'.
The Select Images screen appears.

- Select the folder that contains the image you want to print from the folder tree area.
The images in the folder will be displayed as thumbnails (miniatures).
Important: If Easy-PhotoPrint EX is started from another application (MP Navigator EX), the folder tree area will not be displayed.
The images selected in MP Navigator EX will be displayed as thumbnails.
-
Select the image(s) you want to print, and click one of the buttons below.
To print on the front cover, click  (Import to Front Cover). (Import to Front Cover).
To print on the inside pages, click  (Import to Inside Pages). (Import to Inside Pages).
To print on the back cover, click  (Import to Back Cover). (Import to Back Cover).
The selected image(s) are displayed in the selected image area.
You can also select the image(s) you want to print by dragging them into the selected image area.
Note:
- To delete an image in the selected image area, select the image you want to delete and click
 (Delete Imported Image). (Delete Imported Image).
- To delete all images from the selected image area, click
 (Delete All Imported Images). (Delete All Imported Images).
Note: See Help for details on the Select Images screen.
- Go to Editing.
- Click 'Edit'.
The Edit screen appears.

The above illustration will differ by product and operating system.
- Edit your album if necessary.
| Important: |
- The edit information will be discarded if you exit Easy-PhotoPrint EX without saving the edited album. It is recommended that you save the item if you want to edit it again.
The page numbers on the front and back covers of the album are displayed as follows:
- Saving
|
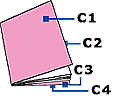 |
C1: Front cover |
|
C2: Inside the front cover
|
|
C3: Inside the back cover
|
|
C4: Back cover
|
- "C2"/"C3" appears only when the Leave the inside of front cover blank/Leave the inside of back cover blank checkbox is selected in the Cover Options dialog.
|
Note: See Help for details on the Edit screen.
- Go to Printing.
- Click 'Print Settings'.
The Print Settings screen appears.
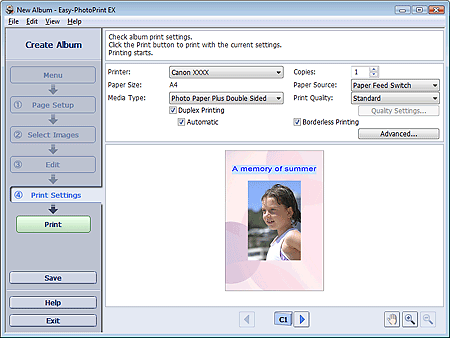
The above illustration will differ by product and operating system.
-
Set the following items according to the printer and paper to be used:
Printer
Media Type
Copies
Paper Source
Print Quality
Borderless Printing
Note:
- The media types and paper source may vary depending on the printer and the paper size.
- Duplex Printing appears if the selected printer and media type support duplex printing. Select this checkbox to print on sides of the paper.
- Automatic appears if you select the Duplex Printing checkbox after selecting a printer that supports automatic duplex printing and media type that supports duplex printing. Select this checkbox to print on sides of the paper automatically.
- The paper sources may vary depending on the printer and the media type.
- You can set a custom print quality level in the Print Quality Settings dialog. To display the Print Quality Settings dialog, select Custom for Print Quality and click Quality Settings.
- Select the Borderless Printing checkbox to print each page of the album on a full page without borders.
- You can specify the print range and the amount of extension for borderless printing in the Print Settings dialog. To display the Print Settings dialog, click Advanced.
- Click 'Print'.
A message appears.
- Click 'OK'.
The Print dialog appears.
- Click 'Print'.
Note: See Help for details on the Print Settings screen.
|
