Cleaning the Machine
If the original is not copied clearly, clean the machine. For high-quality printouts, we recommend cleaning the machine once or twice a month. attention:
- Do not use alcohol, benzene, paint thinner, or other solvents for cleaning. Doing so may result in damage to the plastic parts.
- Do not use tissue paper, paper towels, or similar materials for cleaning; they can stick to the components or generate static charges.
- Disconnect the power cord from the power outlet regularly, and clean the area around the base of the power plug's metal pins and the power outlet with a dry cloth to ensure that all dust and grime is removed. If the power cord is connected for a long period of time in a damp, dusty, or smoky location, dust can build up around the power plug and become damp. This may cause a short circuit and result in a fire.
note:
- You cannot send or receive documents when the main power switch is turned OFF or the power cord is disconnected.
- If the main power switch is turned ON, all jobs waiting in the print queue will be erased.
- Documents received into memory and documents stored for delayed sending will be retained for approximately 60 minutes after the power cord has been disconnected.
Exterior Clean the exterior of the machine.
1. Turn OFF the main power switch and disconnect the power cord.
2. Wipe the machine's exterior with a clean, soft, lint-free cloth dampened with water or diluted dishwashing detergent solution.
3. Wait for the machine to dry, then reconnect the power cord and turn ON the main power switch.
Cleaning the Fixing Unit
If black streaks appear on printed output, the fixing unit may be dirty. Also, you should use the Fixing Unit Cleaning procedure every time the toner cartridge is replaced. Print the cleaning pattern on LTR paper for cleaning the fixing unit.
note:
- As cleaning paper, LTR or A4 paper must be loaded in the paper drawer or the stack bypass tray.
- Cleaning the fixing unit takes approximately 60 seconds.
1. Press

(Main Menu).
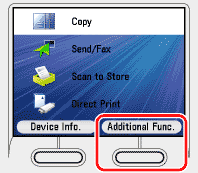
2. Press the right Any key to select <Additional Func.>.
3. Use [  ] , [
] , [  ] or
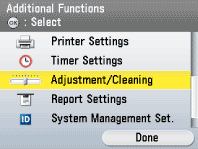
] or  (Scroll Wheel) to select <Adjustment/Cleaning>, then press [OK].
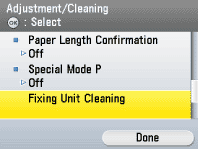
4. Use [ ] , [ ] or (Scroll Wheel) to select <Fixing Unit Cleaning>, then press [OK].
5. Confirm that <Start Cleaning> is displayed, then press [OK]. Printing starts. Discard the cleaning paper after use.
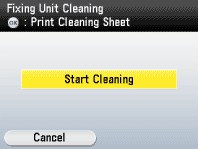
note: The cleaning process cannot be canceled. Please wait until it is completed.
6. Press (Main Menu) to return to the Main Menu screen.
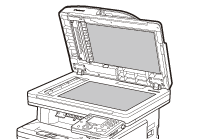
Cleaning the Platen Glass
Clean the platen glass and the underside of the feeder by following the procedure below. attention: When cleaning the machine, turn OFF the main power switch, and then disconnect the power cord. Failure to do so may result in a fire or electrical shock.
1. Open the feeder.

2. Clean the platen glass and the underside of the feeder with a cloth dampened with water. Then, wipe the area with a soft, dry cloth.
note: Do not dampen the cloth too much, as this may tear the document or damage the machine.
3. Close the feeder.
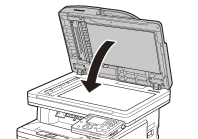
attention: Be careful not to get your fingers caught.
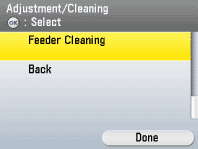
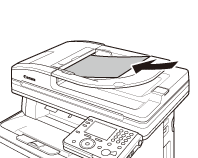
Cleaning the Feeder Automatically
If your originals have black streaks or appear dirty after scanning them through the feeder, clean the rollers of the feeder. note:
- Use LTR or A4 paper as cleaning paper.
- It takes approximately 30 seconds to clean the feeder.
1. Press
(Main Menu).
2. Press the right Any key to select <Additional Func.>.

3. Use [ ] , [ ] or (Scroll Wheel) to select <Adjustment/Cleaning>, then press [OK].

4. Use [ ] , [ ] or (Scroll Wheel) to select <Feeder Cleaning>, then press [OK].
5. Place 10 sheets of blank paper into the feeder.
6. Make sure that <Start> is displayed, then press [OK]. The display returns to the Adjustment/Cleaning screen. Discard the cleaning paper after use.

note: The cleaning process cannot be canceled. Please wait until it is completed.
7. Press (Main Menu) to return to the Main Menu screen.
