Using the Address Book
You must specify the destination to send documents. A maximum of 300 (200 for the Color imageCLASS MF8450c) destinations (including 200 One-touch destinations) can be stored. If you store addresses in the Address Book, you can easily select them.
note:
- To use this feature, you must register destinations in the Address Book beforehand.
- Registering destinations in the Address Book is available only for the Color imageCLASS MF9170c/9150c.
- If you use the imageCLASS MF8450c, register destinations in One-touch.
- If you register a group of destinations in the Address Book or One-touch, you can easily send a document to several destinations.
1. Press

(Main Menu).
2. Use [  ] , [
] , [  ] or
] or  (Scroll Wheel) to select <Send/FAX>, then press [OK].

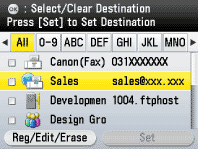
3. Use [ ] , [ ] or (Scroll Wheel) to select <Address Book>, then press[OK].
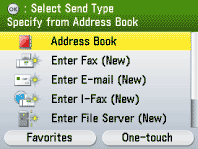
4. Use [ ] , [ ] or (Scroll Wheel) to select the desired destination, then press [OK]. The icons displayed on the Address Book are:
 -Fax
-Fax -E-mail
 -I-Fax
 -File Server
 -Group
You can select multiple destinations at a time.
note:
- You can use [
 ] or [
 ] to restrict the displayed range of destinations.
- If the register name is longer than 10 characters, the first 10 characters are displayed in the name column in the Address Book.
- If the registered destination is longer than 13 characters, the first 13 characters are displayed in the destination column in the Address Book.
- To deselect a destination, select the destination again to clear the check mark.
5. Press the right Any key to select <Set>.

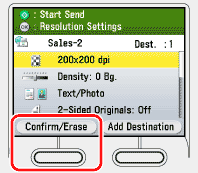
Viewing the Specified Address
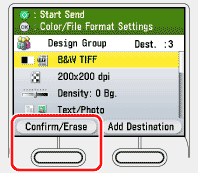
1. Press the left Any key to select <Confirm/Erase>.
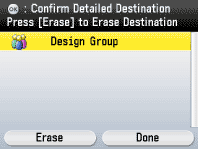
2. Make sure that the destination to be checked is selected, press [OK]. Check the destination. Press the right Any key to select <Done> to return the previous screen.
Clearing the Specified Address
1. Press the left Any key to select <Confirm/Erase>.
2. Make sure that the destination you want to clear is selected, then press the left Any key to select <Erase>.

3. Use [ ] , [ ] or (Scroll Wheel) to select <Yes>, then press [OK].
4. Specify a destination again.

