|
PIXMA MG3122
|
PIXMA MG6120
|
PIXMA MX7600
|
PIXMA MX439
|
|
PIXMA MX860
|
PIXMA MX300
|
PIXMA MX340
|
PIXMA MX350
|
|
PIXMA MP620
|
PIXMA MG8120B
|
PIXMA MX410
|
PIXMA MX850
|
|
PIXMA MP640
|
PIXMA MG2120
|
PIXMA MX892
|
PIXMA MX512
|
|
PIXMA MP560
|
PIXMA MX310
|
PIXMA MX712
|
PIXMA MP495
|
|
PIXMA MP490
|
PIXMA MP499
|
PIXMA MP640R
|
PIXMA MX700
|
|
PIXMA MG3120
|
PIXMA MX372
|
PIXMA MX360
|
PIXMA MG5220
|
|
PIXMA MG6220
|
PIXMA MG8220
|
PIXMA MX432
|
PIXMA MX882
|
|
PIXMA MP480
|
PIXMA MX870
|
|
Scan Settings Dialog (Photos/Documents) - Mac
| Article ID: ART114240 |
| |
Date published: 05/11/2015 |
| |
Date last updated: 08/17/2015 |
Solution
The Scan Settings dialog opens when you click Specify... in the Scan/Import window. In the Scan Settings dialog, you can make advanced scan settings. 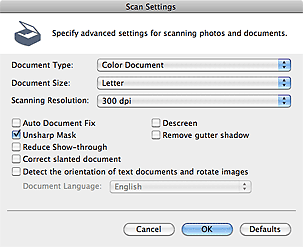 Document Type Select the type of document to be scanned. Scanning photos: Color Photo or Black and White Photo Scanning text documents: Color Document, Black and White Document, or Text(OCR) Scanning magazines: Magazine(Color)  Important Important
Document Size Select the size of the document to be scanned. When you select Custom, a screen in which you can specify the document size appears. Select a Units, then enter the Width and Height and click OK. 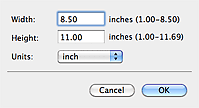
Important When you select Auto Detect, the image may not be scanned at the correct position and size. In that case, change the size to the actual document size (A4, Letter, etc.) and align a corner of the document with the corner at the arrow (alignment mark) of the Platen. You cannot select Auto Detect (Multiple Documents) or Auto Detect when Document Type is Text(OCR).
Scanning Resolution Select the resolution at which to scan documents.  Resolution Resolution
 Note Note Auto Photo Fix / Auto Document Fix The displayed item varies by Document Type. Auto Photo Fix This is displayed when Document Type is Color Photo. Select this checkbox to automatically analyze the captured scene (landscape, night scene, etc.) and apply suitable corrections. Auto Document Fix This is displayed when Document Type is Color Document, Black and White Document, or Magazine(Color). Select this checkbox to sharpen text in a document or magazine for better readability.
Important
When this checkbox is selected, the files can be saved in JPEG/Exif or PDF format only. Scanning may take longer than usual when this checkbox is selected. You cannot select this checkbox when Document Type is Black and White Photo or Text(OCR). You cannot select this checkbox when Compress scanned images when transferring checkbox is selected on the "General Tab" of the Preferences dialog. The color tone may change from the source image due to corrections. In that case, deselect the checkbox and scan.
Descreen Reduce moire patterns. Printed photos and pictures are displayed as a collection of fine dots. "Moire" is a phenomenon where uneven gradation or a stripe pattern appears when such photos or pictures printed with fine dots are scanned. Descreen is the function for reducing this moire effect. Important
Note Unsharp Mask Emphasize the outline of the subjects and sharpen the image. Important
Remove gutter shadow Correct shadows that appear between pages when scanning open booklets. Important
You cannot select this checkbox when Auto Detect, Auto Detect (Multiple Documents) or Stitch Assist is selected for Document Size. You cannot select this checkbox when Compress scanned images when transferring checkbox is selected on the "General Tab" of the Preferences dialog. When scanning, align a corner of the document with the corner at the arrow (alignment mark) of the Platen.
Note
Reduce Show-through Sharpen text in a document or reduce show-through in newspapers. Important Note
Correct slanted document Detect the scanned text and correct the angle (within -0.1 to -10 degrees or +0.1 to +10 degrees) of the document. Important
You cannot select this checkbox when Document Type is Color Photo or Black and White Photo. You cannot select this checkbox when Document Size is Stitch Assist. The inclination of the following types of documents may not be corrected, as the text cannot be detected correctly. - Documents in which the text lines are inclined more than 10 degrees or the angles vary by line - Documents containing vertical and horizontal text - Documents with extremely large or small fonts - Documents with small amount of text - Documents containing figures/images - Hand-written documents - Documents containing vertical and horizontal lines (tables)
Note
Detect the orientation of text documents and rotate images Detect the orientation of the document from the scanned text and rotate the scanned image to the correct orientation. Select the language of the document to be scanned in Document Language. Important
You cannot select this checkbox when Document Type is Color Photo or Black and White Photo. You cannot select this checkbox when Document Size is Stitch Assist. This function may not work properly depending on the document language. Only text documents written in languages that can be selected from Document Language are supported. The orientation of the following types of documents may not be corrected, as the text cannot be detected correctly. In that case, select the scanned image in the Thumbnail window of the "Photos/Documents (Platen) Screen (Scan/Import Window)" and rotate it with Edit Tools. - Resolution is outside the range of 300 dpi to 600 dpi - Font size is outside the range of 8 points to 48 points - Documents containing special fonts, effects, italics, or hand-written text - Documents with patterned backgrounds
Note
Document Language Select the language of the document to be scanned. Important
Defaults Restore the default settings.
|
