Check the Included Items
attention:
Before turning on the machine, remove all orange tape and protective sheets from the inside and outside of the machine.
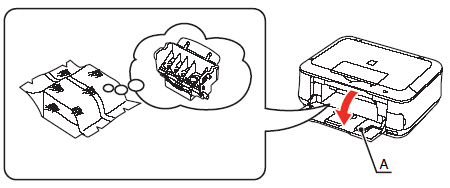
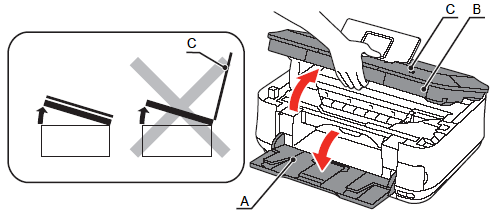
The Print Head is placed inside of the Paper Output Tray (A).
Open the Paper Output Tray and take it out.
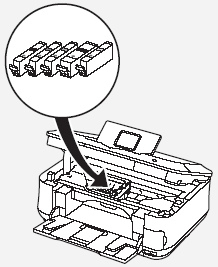
- 5 ink tanks (BK, M, C, PGBK, Y)


- Manuals
- Setup CD-ROM (containing the drivers, applications and on-screen manuals)
- Matte Photo Paper MP-101 (for Automatic Print Head Alignment)
- Warranty
important:
Choosing a Location

- Do not install the machine where an object may fall on it. The object may fall inside the machine, resulting in malfunction.
- Do not place any object on top of the machine. It may fall into the machine when opening covers, resulting in malfunction.
Turn the Power On
1. Plug the power cord into the back left of the machine, then connect the other end to the wall outlet.

important:
- Do NOT connect the USB cable or Ethernet cable at this stage.
- Make sure that the Document Cover (A) is closed.
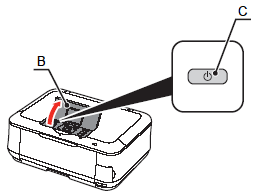
2. Open the Operation Unit (B) and press the ON button (C) to turn on the machine.
note:
The machine may make some operating noises. This is normal operation.
3. Use the  or
or  button (D) on the Operation Panel to select the language for the LCD (E), then press the OK button.
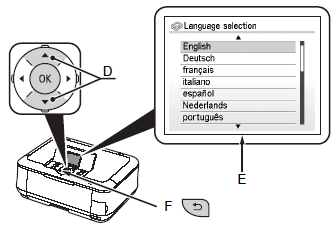
4. When the following screen appears, press the OK button and go to the next step.

important:
If an unintended language is displayed on the LCD, press the Back button (F) to return to the Language selection screen.
Install the Print Head

important:
Handle the Print Head carefully. Do not drop or apply excessive pressure to it.
1. Open the Paper Output Tray (A), then lift the Scanning Unit (Cover) (B) until it stops.
Close the Document Cover (C) and lift it with the Scanning Unit (Cover).
important:
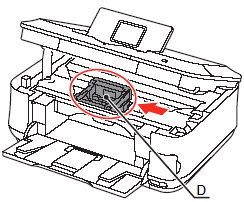
- The Print Head Holder makes a noise as it moves. This is normal operation.
- If the Print Head Holder does not move, make sure that the machine is turned on.
2. Make sure that the Print Head Holder (D) moves to the installation position.
3. Firmly raise the Print Head Lock Lever (E) of the Print Head Holder until it stops.

important:
Do not touch the inside of the Print Head Holder (F). The machine may not print properly if you touch it.
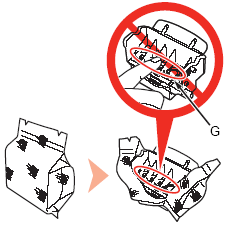
4. Remove the Print Head from the silver package.
important:
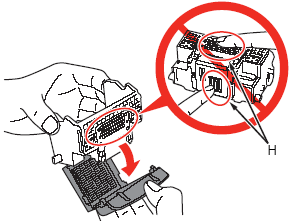
- Do not touch the inside (G) or metal parts (H) of the Print Head. The machine may not print properly if you touch them.
- There may be some transparent or light blue ink on the inside of the bag the Print Head comes in, or the inside of the protective cap - this has no effect on print quality. Be careful not to get ink on yourself when handling these items.
5. Remove the orange protective cap.
6. Tilt the Print Head forward and set it in place as shown.

important:
- Do not knock the Print Head against the sides of the holder.
- Install in a well-lit environment.
7. Lower the Print Head Lock Lever completely.

note:
- Hold the Print Head Lock Lever firmly and lower it gently.
- Once you have installed the Print Head, do not remove it unnecessarily.
Install the Ink Tanks

important:
- Handle the ink tanks carefully. Do not drop or apply excessive pressure to them.
- Be sure to use the supplied ink tanks.
1. Pull the orange tape (1) in the direction of the arrow to peel off the protective film and remove the film (2) completely.
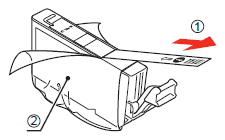
2. While pressing down with your left thumb, twist off the orange protective cap (A) located on the bottom of the ink tank.

important:
- Do not touch the electrical contacts (B) or open ink port (C) on the ink tank. The machine may not print properly if you touch them.
- Do not push the sides of the ink tank; ink may splash.
3. Tilt the ink tank, then insert it under the label and against the back end of the slot.
Make sure that the color of the label matches the ink tank.

important:
Install in a well-lit environment.
4. Press the PUSH mark on the ink tank firmly until it clicks.When the installation is completed properly, the Ink lamp lights red.

5. Install all the other ink tanks in the same way.
Install all the ink tanks.
Make sure all the Ink lamps light red.

important:
Once you have installed the ink tanks, do not remove them unnecessarily.
6. Close the Scanning Unit (Cover) (D).
Make sure the Inner Cover (E) is closed.
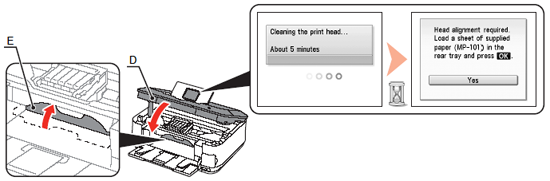
- Wait until the LCD changes as shown in the illustration (about 5 minutes) and go to the next step.
- The machine may make some operating noises when preparing to print. This is normal operation.
important:
If an error message is displayed on the LCD, make sure that the Print Head and the ink tanks are correctly installed.
