Shooting Still Images using Live View.
With your camera, you can shoot photos while viewing the image on the camera's LCD monitor. This is called "Live View shooting."
This page describes how to shoot still photos using the Live View function in default settings.
For details on how to change settings to enable Live View shooting, please refer to the related information.
|
Important:
If you handhold the camera and shoot while viewing the LCD monitor, there are cases in which crisp images cannot be obtained due to camera shake. It is recommended to use a tripod when shooting.
|
1. Set the power switch to <ON>.
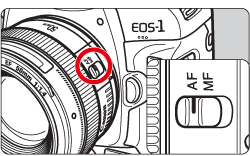
2. Set the lens focus mode switch to <AF>.
3. Press the <MENU> button to display the menu.

4. Turn the <Main Dial> to select the [  ] tab.
You can use <  >(Multi-controller) to set menu options.

5. Turn the <Quick Control Dial> to select [Live View/Movie func. set.], and then press the <SET> button.

6. Select [LV  set.], then press <SET> button.

7. Turn the <Quick Control Dial> to select [Stills], and then press the <SET> button.

8. Press the <MENU> button or press the shutter button halfway to turn off the menu screen.
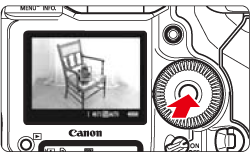
9. When you press the <SET> button, the Live View image will appear on the LCD monitor.
- The displayed image brightness will be close to the actual brightness of the resulting image.
- If the standard exposure has not been obtained, press <
 > button, and then turn the <Main Dial> or <Quick Control Dial>.
10. Press the <MODE> button and turn the <Main Dial> or <Quick Control Dial> to select the shooting mode.


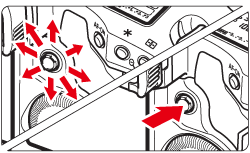
11. Use < >(Multi-controller) to move the AF point to where you want to focus.
- It cannot go to the edges of the picture.
- If you press < > straight down, the AF point will return to the image center.
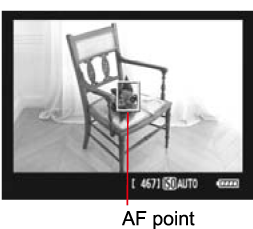
12. Aim the AF point over the subject and press the shutter button halfway. (Keep the shutter pressed.)
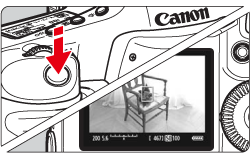
- When focus is achieved, the AF point will turn green and the beeper will sound.
- If focus is not achieved, the AF point will turn orange.
13. Press the shutter button completely.

- The picture will be taken and the captured image is displayed on the LCD monitor.
- After the image review ends, the camera will return to Live View shooting automatically.
14. Press <SET> button to end the Live View shooting.
|
Attention:
During Live View shooting, do not point the lens toward the sun. The sun's heat can damage the camera's components.
|
Note:
- You can also focus by pressing the <AF-ON> button.
- When you press the shutter button completely, the shutter will sound like two shots have been taken, but only one shot will be taken. For flash shots, the reflex mirror and shutter will also make multiple sounds, but only one shot will be taken. During continuous shooting, only the first shot will make two shutter sounds.
|
