
Erasing Shadows/Lines (MF9200 Series)
| Article ID: ART108060 | | | Date published: 05/11/2015 | | | Date last updated: 08/15/2015 |
Description
Solution
Erasing Shadows/Lines
This mode enables you to erase shadows and lines that appear when using various types of originals. The following three Frame Erase modes are available: Original Frame Erase, Book Frame Erase, and Binding Erase.
The default setting is <Off>.
note:
- Combinations of the three Frame Erase modes cannot be set. If you select one of these modes, the previously set mode is canceled.
- Frame Erase modes cannot be used with the ID Card Copy mode.
- Original Frame Erase - This mode erases the dark borders and frame lines that appear around the copy if the original is smaller than the selected paper size. You can also use this mode to create a blank border around the edge of the copy.
- Book Frame Erase - This mode erases the dark borders and the center and contour lines that appear when you copy facing pages in a book or bound original onto a single sheet of paper.
- Binding Erase - This mode erases the shadows that appear on copies from binding holes on originals.
Original Frame Erase
This mode erases the dark borders and frame lines that appear around the copy if the original is smaller than the selected paper size. You can also use this mode to create a blank border around the edge of the copy.
note:
The Original Frame Erase mode cannot be used with the N on 1 mode.
1. Set originals.

2. Press  (Main Menu).
3. Use [  ] , [
] , [  ] or
] or  (Scroll Wheel) to select <Copy>, then press [OK].

4. Use [ ] , [ ] or (Scroll Wheel) to display <Shadow/Frame Erase Settings>, then press [OK].

5. Use [ ] , [ ] or (Scroll Wheel) to select <Original Frame Erase>, then press [OK].

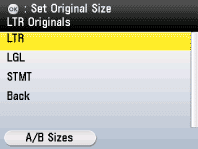
6. Use [ ] , [ ] or (Scroll Wheel) to select the original size, then press [OK].

note:
To switch to the A/B Sizes, press the left Any key to select <A/B Sizes>.
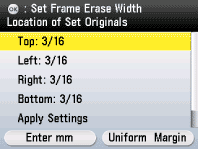
 If you want to set the same width for all four borders:
1. Use [
 note:
note:
- The default setting is <3/16" (6 mm)>. The maximum original frame erase width that you can set is <1 15/16" (50 mm)>.
- To enter values in millimeters, press the left Any key to select <Enter mm>. When entering the value in millimeters, you can also use [ ] , [ ], (Scroll Wheel), and
 -
-  (numeric keys).
 - If you want to change the value, press
 (Clear) before entering the new value.
 - If you enter a value outside the setting range, a message prompting you to enter an appropriate value appears on the screen.
If you want to set the top, left, right, and bottom widths independently:

 note:
note:
To enter values in millimeters, press the left Any key to select <Enter mm>. When entering the value in millimeters, you can also use [
 note:
note:
- The default setting is <3/16" (6 mm)>. The maximum original frame erase width that you can set is <1 15/16" (50 mm)>.
- If you want to change the value, press (Clear) before entering the new value.
- If you enter a value outside the setting range, a message prompting you to enter an appropriate value appears on the screen.
The display will return to the Copy top screen.

7. Use - (numeric keys) to enter the desired copy quantity (1 to 99).

8. Press  (Start).
If you want to copy multiple originals using the platen glass, set an original and press (Start) once for each page.

9. Press (Main Menu) to return to the Main Menu screen.
Book Frame Erase
This mode erases the dark borders and the center and contour lines that appear when you copy facing pages in a book or bound original onto a single sheet of paper.
note:
- The Book Frame Erase mode cannot be used with the N on 1.
- You must place an original on the platen glass when using this function.
1. Set an original on the platen glass.

2. Press (Main Menu).
3. Use [ ] , [ ] or (Scroll Wheel) to select <Copy>, then press [OK].

4. Use [ ] , [ ] or (Scroll Wheel) to display <Shadow/Frame Erase Settings>, then press [OK].

5. Use [ ] , [ ] or (Scroll Wheel) to select <Book Frame Erase>, then press [OK].

6. Use [ ] , [ ] or (Scroll Wheel) to select the original size, then press [OK].
note:
To switch to the A/B Sizes, press the left Any key to select <A/B Sizes>.
7. Enter the each erase width value:
If you want to specify the erase width value for center:
 note:
note:
To enter values in millimeters, press the left Any key to select <Enter mm>.
 note:
note:
- The default setting is <3/8" (10 mm)>. The maximum original frame erase width that you can set is <1 15/16" (50 mm)>.
- When entering the value in millimeters, you can also use [ ] , [ ] , (Scroll Wheel), or - (numeric keys).
- If you want to change the value, press (Clear) before entering the new value.
- If you enter a value outside the setting range, a message prompting you to enter an appropriate value appears on the screen.
If you want to specify the erase width value for all sides:

 note:
note:
The default setting is <3/16" (6 mm)>. The maximum original frame erase width that you can set is <1 15/16" (50 mm)>.
8. Use [ ] , [ ] or (Scroll Wheel) to select <Apply Settings>, then press [OK].

9. Use - (numeric keys) to enter the desired copy quantity (1 to 99).

10. Press (Start).
If you want to copy multiple originals using the platen glass, set an original and press (Start) once for each page.

11. Press (Main Menu) to return to the Main Menu screen.
Binding Erase
This mode erases the shadows that appear on copies from binding holes on originals.
note:
- Do not place originals with binding holes into the feeder, as this may damage the originals.
- The borders you do not select are attenuated when using this function.
- You must place an original on the platen glass when using this function.
1. Set an original on the platen glass.

2. Press (Main Menu).
3. Use [ ] , [ ] or (Scroll Wheel) to select <Copy>, then press [OK].

4. Use [ ] , [ ] or (Scroll Wheel) to display <Shadow/Frame Erase Settings>, then press [OK].

5. Use [ ] , [ ] or (Scroll Wheel) to select <Binding Erase>, then press [OK].

6. Use [ ] , [ ] or (Scroll Wheel) to select the original size, then press [OK].

note:
To switch to the inch sizes, press the left Any key to select <A/B Sizes>.
7. Use [ ] , [ ] or (Scroll Wheel) (Scroll Wheel) to select the hole punch location, then press [OK].

note:
To enter values in millimeters, press the left Any key to select <Enter mm>.
8. Use [ ] , [ ] or (Scroll Wheel) to select the frame erase width, then press [OK].

note:
- The default setting is <3/4" (18 mm)>. The maximum original frame erase width that you can set is <13/16" (20 mm)>.
- If you want to change the value, press (Clear) before entering the new value.
- If you enter a value outside the setting range, a message prompting you to enter an appropriate value appears on the screen.
- When entering the value in millimeters, you can also use [ ] , [ ] or (Scroll Wheel), or - (numeric keys).
9. Use - (numeric keys) to enter the desired copy quantity (1 to 99).

10. Press (Start).
If you want to copy multiple originals using the platen glass, set an original and press (Start) once for each page.

11. Press (Main Menu) to return to the Main Menu screen.