Cancel the job and set the paper size correctly in Paper Settings
Cancel the job and follow the instructions below, to change the paper size in <Paper Settings> menu.
For the Paper Drawer
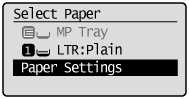
1. Press [  ] (Select Paper/Settings).
2. Select <Paper Settings> using [  ] or [
  ] and press [OK].
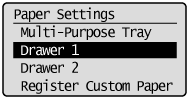
3. Select < Drawer 1> or < Drawer 2> using [ ] or [ ] and press [OK].
- < Drawer 2> is displayed only when the optional paper drawer (Drawer 2) is installed.
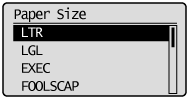
4. Select a paper size using [ ] or [ ] and press [OK].
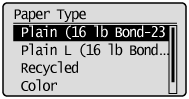
5. Select the paper type using [ ] or [ ] and press [OK].
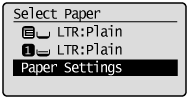
6. Press [ ] (Select Paper/Settings) to close the <Select Paper> screen.
Registering the Default Paper Settings for the Multi-purpose Tray
If you want to always load the same paper in the multi-purpose tray, register the default paper using the following procedure.
note:
If the default paper is registered
- The setting screen is not displayed when paper is loaded.
1. Press [ ] (Select Paper/Settings).
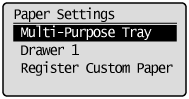
2. Select <Paper Settings> using [ ] or [ ] and press [OK].

3. Select <Multi-Purpose Tray> using [ ] or [ ] and press [OK].
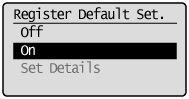
4. Select <On> using [ ] or [ ] and press [OK].
5. Select <Paper Settings> using [ ] or [ ] and press [OK].
6. Select <Multi-Purpose Tray> using [ ] or [ ] and press [OK].

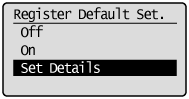
7. Select <Set Details> using [ ] or [ ] and press[OK].
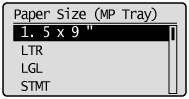
8. Select a paper size using [ ] or [ ] and press [OK].
* To register a custom paper, see Setting a Custom Paper Size.
* The registered custom paper is listed at the top. Select it with [ ].

 If you select <Custom Size>
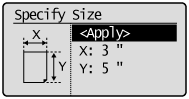
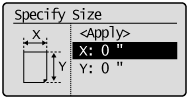
Specifies the size of <X: "> direction and <Y: "> direction of the custom paper.
(1) Select the direction using [ ] or [ ] and press [OK].

(2) Specify the size using [ ] or [ ] and press [OK].
You can also enter values using the numeric keys.

(3) Select <Apply> using [ ] or [ ] and press [OK].
9. Select the paper type using [ ] or [ ] and press [OK].

10. Press [ ] (Select Paper/Settings) to close the <Select Paper> screen.
Setting a Custom Paper Size
You can register sizes and types of frequently used paper.
- When <Register Default Set.> is <Off> (default)
The screen to be displayed when paper is loaded in the multi-purpose tray
- When <Register Default Set.> is <Off>
Paper Size Setting Screen
1. Press [ ] (Select Paper/Settings).
2. Select <Paper Settings> using [ ] or [ ] and press [OK].

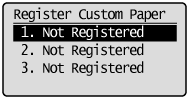
3. Select <Register Custom Paper> using [ ] or [ ] and press [OK].

4. Select <Not Registered> using [ ] or [ ] and press [OK].
When selecting the registered custom paper, you can edit and delete the custom paper.
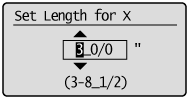
5. Specifies the size of <X: "> direction and <Y: "> direction.
(1) Select the direction using [ ] or [ ] and press [OK].
(2) Specify the size using [ ] or [ ] and press [OK].
You can also enter values using the numeric keys.
(3) Select <Apply> using [ ] or [ and press [OK].

6. Select the paper type using [ ] or [ and press [OK].

7. Press [ ] (Select Paper/Settings) to close the <Select Paper> screen.
