Your PIXMA MX882 can be connected to a wireless LAN using the operation panel via the Easy setup method. This allows you to enter the network information directly into the printer. This is especially helpful if you have had a change in your wireless LAN, such as a new wireless router or a different network passphrase. To connect your PIXMA MX882 to the wireless LAN using the Easy setup method, follow the steps below.
- Press the Setup
 button on the printer.
- Press the right arrow key to select Wireless LAN setup. Press OK.

- Press OK on Easy setup.

- The printer will search for nearby wireless networks.

After the printer has finished searching, a list of wireless networks will appear. Use the up or down arrows to select your network from the list and press OK. If your network is not found, press the function key under Search again.

- If your network has a passphrase, you will come to the following screen. Press OK.

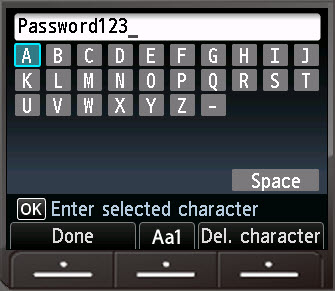
- Use the arrow keys and OK to enter the passphrase for your network. To toggle between upper case letters, lower case letters and numbers / symbols, press the function key under Aa1. To delete a character, press the function key under Del. character. Press the function key under Done when you have finished entering in your network passphrase.
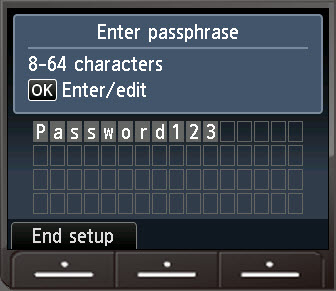
- You will be taken to the previous screen. The passphrase you have entered into the printer will be displayed on the screen. If you have made a mistake and need to make changes to the passphrase you entered, press OK. If the passphrase you have entered in is correct, press the function key under End setup.
- The printer will attempt to connect to the network.

If the printer successfully connects to the network, the following screen will appear.

Press OK on this message. If the printer fails to connect, a warning message will appear. Press OK on the error message and verify that the passphrase has been entered into the printer correctly, then try to connect again.
