Installing and removing the battery on the EOS-1D X Mark II
Article ID: ART174020
|
Date published: 04/23/2019
|
Date last updated: 04/23/2019
Description
Installing and removing the battery on the EOS-1D X Mark II
Solution
If you turn on the power switch and the date/time/zone setting screen appears, set the date/time/zone.
Installing the battery.
1. Remove the battery compartment cap.
2. Insert the battery.
Insert the battery firmly all the way, and turn the battery release handle as shown by the arrow.
When using a battery that has not been used in the camera before, it may take some time for the camera to turn on.
The camera cannot use batteries other than the provided Battery Pack LP-E19 or LP-E4N/LP-E4.
If the battery's rubber lining (to repel water) is dirty, use a moist cotton swab to wipe it clean.
Removing the battery
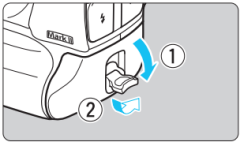
Turn the battery release handle and take out the battery.
Check that the power switch is set to <OFF>.
Flip out the battery release handle, turn it as shown by the arrow, and pull it out.
To prevent short circuiting of the battery contacts, be sure to attach the provided protective cover to the battery.
when not using the camera, attach the battery compartment cap.
Compatible Batteries
The Battery Pack LP-E19 (provided) or the Battery Pack LP-E4N/LP-E4 can be used with the camera. The camera can also use the household power outlet accessories (sold separately).
Note that the maximum continuous shooting speed will vary depending on the battery (power source), shooting conditions (viewfinder shooting or Live View shooting), ISO speed, battery level, battery temperature, etc.