|
|
EOS R6 Mark II: Connecting to EOS Utility
| Article ID: ART182288 |
| |
Date published: 05/11/2023 |
| |
Date last updated: 09/12/2023 |
Description
Connecting to EOS Utility
Solution
|
Connecting to EOS Utility
This section describes how to connect the camera to a computer via Wi-Fi and perform camera operations using EOS software or other dedicated software. Install the latest version of software on the computer before setting up a Wi-Fi connection.
For computer operating instructions, refer to the computer user manual.
Operating the Camera Using EOS Utility
Using EOS Utility (EOS software), you can import images from the camera, control the camera, and perform other operations.
Steps on the camera (1)
-
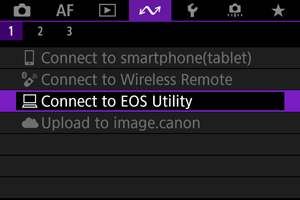
Select [ : :  Connect to EOS Utility]. Connect to EOS Utility].
-
Select [OK].
- This screen is not displayed if the Wi-Fi setting is already set to [Enable].
-
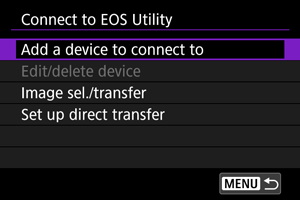
Select [Add a device to connect to].
-
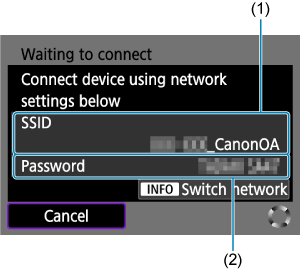
Check the SSID (network name) and password.
- Check the SSID (1) and Password (2) displayed on the camera screen.
- To establish a Wi-Fi connection using an access point, press the
 button. Follow the instructions for the connection method used. button. Follow the instructions for the connection method used.
- Connecting via WPS (, )
- Connecting manually to detected networks ()
- Connecting manually by specifying access point information ()
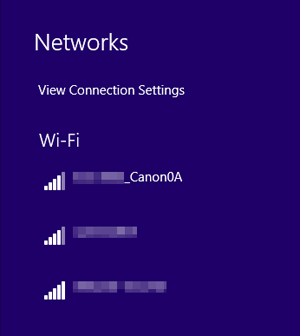
Steps on the computer (1)
-
Select the SSID, then enter the password.
Computer's screen (sample)
Steps on the camera (2)
-
Select [OK].
Steps on the computer (2)
-
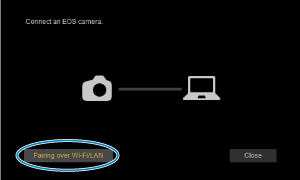
Start EOS Utility.
-
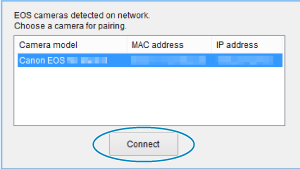
In EOS Utility, click [Pairing over Wi-Fi/LAN].
- If a firewall-related message is displayed, select [Yes].
-
Click [Connect].
- Select the camera to connect to, then click [Connect].
Steps on the camera (3)
-
Establish a Wi-Fi connection.
- Select [OK].
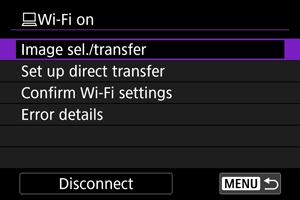
- [Wi-Fi on] is displayed on the camera screen ().
The Wi-Fi connection to a computer is now complete.
[Wi-Fi on] screen
-
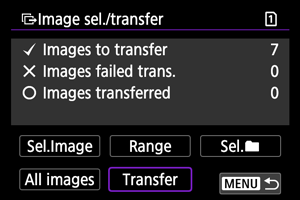
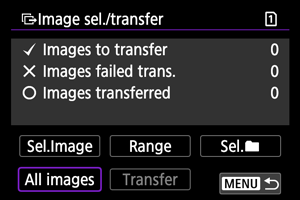
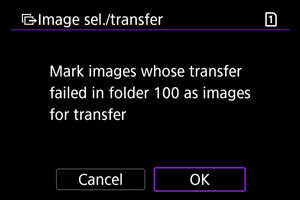
Image sel./transfer
You can use the camera to transfer images to a computer ().
-
Set up direct transfer
You can specify the format of images to transfer to a computer ().
-
Confirm Wi-Fi settings
You can check setting details for Wi-Fi connections.
-
Error details
After any Wi-Fi connection errors, you can check the error details ().
-
Disconnect
Terminates the Wi-Fi connection.
Transferring Images from the Camera to a Computer (Direct Transfer)
With the camera connected to a computer (via Wi-Fi or an interface cable) and the main EOS Utility window displayed, you can use the camera to transfer images to a computer.
If you will transfer many images, consider using a household power outlet accessory (sold separately).
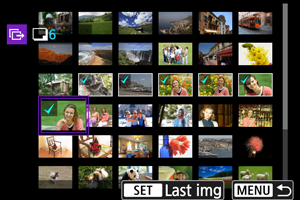
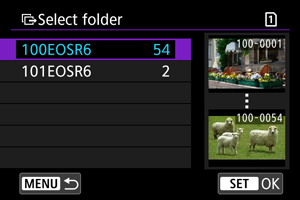
Selecting images to transfer
Transferring RAW+JPEG or RAW+HEIF Images
For RAW+JPEG or RAW+HEIF images, you can specify which image to transfer.
-
Access the [Image sel./transfer] screen.
-
Select [Set up direct transfer].
-
Select the type of images to transfer.
-
RAW+JPEG transfer
Choose from [JPEG only], [RAW only] or [RAW+JPEG].
-
RAW+HEIF transfer
Choose from [HEIF only], [RAW only] or [RAW+HEIF].
Caution
- Some menu items are not available during image transfer.
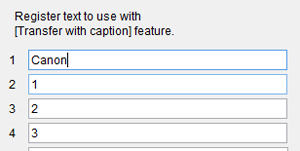
Creating and Registering Captions
You can create captions and register them on the camera to use them as described in Adding a Caption Before Transfer.
-
Start EOS Utility and select [Camera settings].
-
Select [WFT Captions].
-
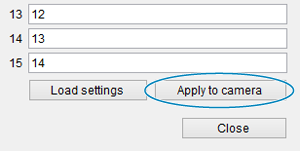
Enter the captions.
- Enter up to 31 characters (in ASCII format).
- To acquire caption data stored on the camera, select [Load settings].
-
Set the captions on the camera.
- Select [Apply to camera] to set your new captions on the camera.
|
SIMS Doc Id
1679063428896548177
|