Setting the Long Document Mode
The length of documents that can be scanned with the scanner is normally 356 mm (14"), but you can scan documents up to 3,000 mm (118.1") long by setting the scanner to the Long Document mode.

Note the following when using the Long Document mode:
- When scanning in the Long Document mode, if the document is placed on the scanner in a skewed position, it may hit the edges of the feeding area and be damaged. Be careful to place the document so that it is not skewed.
- When scanning with the Long Document mode, paper jam detection may react slowly, resulting in damage to the document. Be careful to avoid paper jams.
- When scanning long documents, make sure to set the feed selection lever to the non separation position, and scan the documents one at a time.
- When scanning large-sized documents with the Long Document mode, scanning may be slower. Errors may also occur due to memory shortage and scanning may be disabled.
1 Start Windows and log in as a user with administrator privileges.
2 Click the Start button, and then click [All Programs], [Canon DR-C130], and [Canon imageFORMULA Utility].
imageFORMULA Utility starts.

3 Click [CANON DR-C130 USB] and click [Properties].
Scanner properties are displayed.
4 Select a Long Document mode.
Select [Long Document mode (1,000 mm)] or [Long Document mode (3,000 mm)] depending on the length of the document.
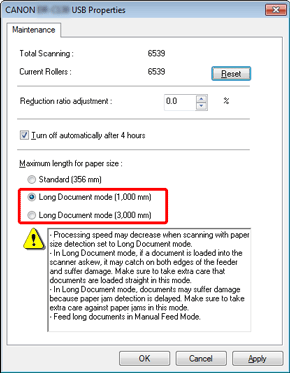
5 Click [OK].
Setting Scanning Conditions
Configure scanning conditions as follows when scanning documents in Long Document mode.
Set [Page Size] to [Match original size] under [Scanner setting].
Set [Page Size] to [Match original size] in the [Basic] tab.
