Installing the Printer Driver (Add Printer Wizard)-Windows 2000
The following is the installation procedures of [Add Printer Wizard], under Windows 2000.
- Log on as an Administrator. The full control access right for the printer is necessary for the installation of CARPS.
- From the [Start] menu, select [Settings], then [Printers]. The Printers folder appears.
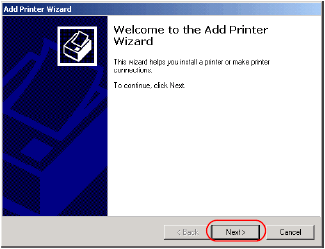
- Double-click the [Add Printer] icon. The [Add Printer Wizard] dialog box appears. Click [Next>].
-
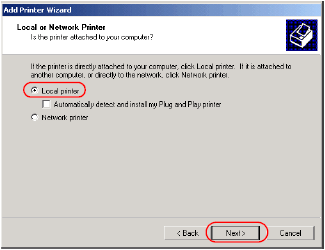
Select [Local Printer] and click [Next>].
 |
Checking on [Automatically detect and install my Plug and Play printer] is not recommended. |
- Select the printer port you want to use, then click [Next>].

- Click [Have Disk...] in the [Manufacturers/Printers] dialog box.

- The [Install From Disk] dialog box appears. Place the CD-ROM into the CD-ROM drive. Use [Browse...] to select the directory or enter the path name that contains the CARPS software, then click [OK].

For example, if you are using the CD-ROM to install CARPS, and your CD-ROM drive is drive "D:", the path name would be "D:\Drivers\us_eng\win2000_xp".
- Select your printer model from the list of printers displayed, and click [Next>].

-
Click [Next>] to accept the default printer name, or enter the name you wish to use, then click [Next>].

 |
If you already have another printer installed, you will be asked whether to use this printer as the default. |
- Select whether this printer is shared with other computers or not, then click [Next>].

- Click [Yes] if you want to print a test page, or [No] if you do not want to print a test page, then click [Next>].

- When the installation is complete, the following dialog box appears. Click [Finish] to close the dialog box.
The [Canon imageCLASS D300] icon is added to the [Printers] folder.

- If you opted to print a test page, the test page is printed after the installation completes, and the following dialog appears. if the test page is printed correctly, click [OK].

