How to set the drive mode on the EOS Digital Rebel.
Article ID: ART159121
|
Date published: 06/09/2015
|
Date last updated: 08/18/2015
Description
How to set the drive mode on the EOS Digital Rebel.
Solution
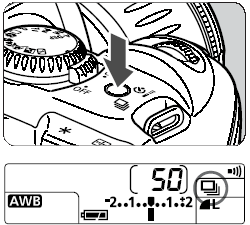
Press the <> button. ()
The button toggles between the two drive modes.
The continuous drive mode can be selected in the Creative Zone modes.
During continuous shooting, the captured images are first stored in the camera's memory and then successively transferred to the CF card. When the memory becomes full during continuous shooting, "" will be displayed on the LCD panel and in the viewfinder and the camera cannot take any more shots. As the captured images are transferred to the CF card, you will be able to capture more images. Press the shutter button halfway to check in the viewfinder the current remaining number of maximum burst ( to ) for continuous shooting. The maximum burst number will not be displayed when there is no CF card in the camera.
If you press the shutter button halfway before all the images in the memory are transferred to the CF card (while the access lamp blinks), the image transfer to the CF card will stop temporarily.
If "" is displayed in the viewfinder and on the LCD panel, wait until the access lamp turns off, then replace the CF card.
The number display "" - "" to the left of the focus confirmation light <> indicates the maximum number of continuous shots (maximum burst) that can be taken.
With white balance bracketing, the four shots can be taken continuously.


 " will be displayed on the LCD panel and in the viewfinder and the camera cannot take any more shots. As the captured images are transferred to the CF card, you will be able to capture more images. Press the shutter button halfway to check in the viewfinder the current remaining number of maximum burst (
 to
to  ) for continuous shooting. The maximum burst number will not be displayed when there is no CF card in the camera.
 > indicates the maximum number of continuous shots (maximum burst) that can be taken.