Using the Optional Lenses and Lens Adapter
The camera supports use of the optional Wide Converter WC-DC52A and Tele-converter TC-DC52B. In order to attach any of these lenses, you also need to use the optional Conversion Lens Adapter LA-DC52E.
Conversion Lens Adapter LA-DC52E and Lens Hood LH-DC20 are included in the separately sold Lens Adapter/Hood Kit LAH-DC10.
|

- When attaching the wide converter or tele-converter, be sure to screw it on securely. If they come loose they may fall from the lens adapter, posing risk of injury from shattered glass.
- Never look into the sun or into strong light through the wide converter, tele-converter or the close-up lens, as this can result in blindness or impairment of vision.
|
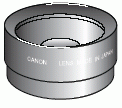
Wide Converter WC-DC52A
Use this converter for taking wide-angle shots. The wide converter changes the focal length of the camera body's lens by a factor of 0.7 (The thread diameter is 52 mm.).
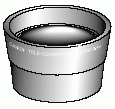
Tele-converter TC-DC52B
This 52 mm-threaded diameter magnifying conversion lens is for taking telephoto shots. The lens changes the focal length of the camera body's lens by a factor of 1.6x.
-
It is not possible to attach a lens hood or filter to the wide converter or tele-converter.
-
If you use the flash when shooting with the wide converter, the outer area of the recorded image (and especially the lower right corner) will come out relatively dark.
-
When using the wide converter, please set the camera to wide angle end.
-
When using the tele-converter, please set the focal length to telephoto end. At other zoom settings, the image will appear as if its corners have been cut off.
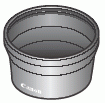
Conversion Lens Adapter LA-DC52E (52 mm)
This optional adapter is required for attaching the wide converter and tele-converter (all optional).
Attaching a Lens
1. Be sure that the camera is turned off.
2. Press the ring release button and hold it down, and turn the ring in the direction of the arrow.

3. When the  marks on the ring and the camera are aligned, lift off the ring.
4. Align the marks on the Conversion Lens Adapter and the camera, and turn the adapter in the direction of the arrows as far as the  mark on the camera.

5. Set the lens on the adapter, and attach it securely by turning it in the indicated direction.

-
Completely remove all dust and dirt from conversion lenses with a lens blower brush before use. The camera may focus on any dirt that remains.
-
Exercise due caution when handling the lenses since it is easy to dirty them with finger prints.
-
Be careful not to drop the camera or adapter when removing the ring.
-
To protect the conversion lens, hold the camera's lens with one had and screw the conversion lens onto the camera with the other hand.
-
You should not shoot images in  mode when using these attachments. Although it is possible to select this mode at the camera, the PhotoStitch software will not be able to stitch the images together at the computer.
-
Once the lens adapter is screwed on the camera, it locks into place. When removing the wide converter or the tele-converter, do so while firmly pressing on the lens adapter with your hand to avoid damage to the lenses.
