Set the Paper Guides correctly when Loading Paper
| Article ID: ART116486 |
| |
Date published: 05/12/2015 |
| |
Date last updated: 08/15/2015 |
Solution
Pull out the cassette from the machine.
Slide the paper guide (A) in front and (B) on the right to open the guides.
Load the paper stack WITH THE PRINT SIDE FACING DOWN, and place it in the center of the cassette.

 Important
 Note
Note
- If paper has print side (front or back), such as photo paper, load it with the whiter side (or glossy side) facing down.
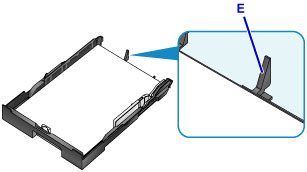
Align the paper stack with the edge of the cassette as shown in the figure below.
If the paper stack is in contact with the protrusion (E), the paper may not be fed properly.
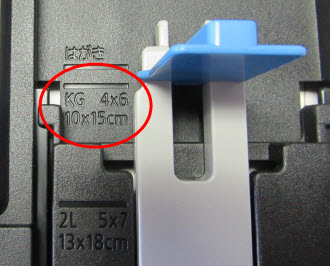
To load 5" x 7" or 4" x 6" size paper , raise the tab (F) of the paper guide**.
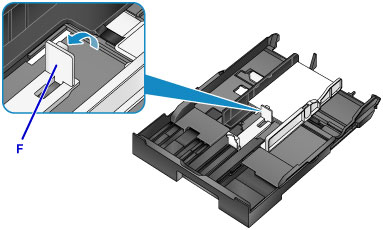
**Be sure the tab is set to the 5 x 7 or 4 x 6 position (see example below for 4 x 6)
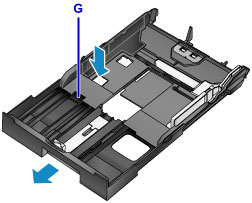
To load paper larger than A4 size in the cassette, press down the lock (G) on the cassette, then extend the cassette all the way out.
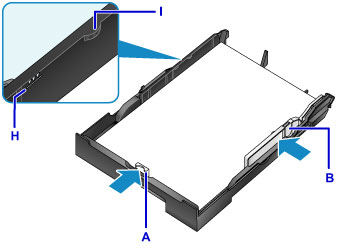
Align the paper guide (A) in front with the paper stack.
For standard sizes, set the paper guide (A) to where it clicks into place.
Slide the paper guide (B) on the right to align the right and left guides with sides of the paper stack.
Do not slide the paper guides too hard against the paper. The paper may not be fed properly.
Note
- Do not load sheets of paper higher than the load limit mark (H).
- Keep the paper stack height below the tabs (I) of the paper guides.
Insert the cassette into the machine.
Push the cassette into the machine until it stops.
After inserting the cassette into the machine, the paper information registration screen for the cassetteis displayed on the touch screen.