|
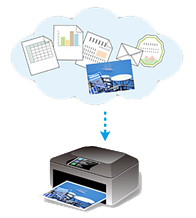
Using the Cloud functionality of the printer, you can print data that is uploaded to the Cloud services (such as Canon iMAGE GATEWAY and Evernote).
To use the Cloud from the printer, follow the procedures explained below.
Checking the printer environment To use the Cloud, the printer needs the following environment.
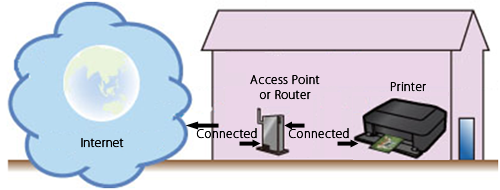
- The printer must be connected to the Internet.
If the printer is connected to a PC only via a USB cable, the Cloud cannot be used.
REFERENCE
Connect the printer to an access point or router that is connected to the Internet, as shown below.
* To use those services on the intranet, open Port 5222 ( on the PCs and the intranet).
Setting up the printer for the Cloud To use Cloud, you need to register the printer. Register your printer in the following procedures:
1. Confirm that the printer is connected to the Internet.
2. In the HOME menu of the printer, tap [ Cloud ]  .
3. The printer will be registered to the server.
When the screen below appears, tap [ OK ].

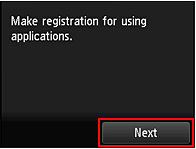
4. At the screen below, tap [ Next ].
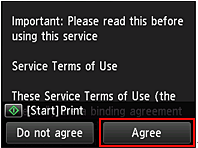
5. Read the "Service Terms of Use" and "Privacy Statement," and tap [ Agree ] to each statement.
< Service Terms of Use >
< Privacy Statement >
REFERENCE
- If you select Disagree, a confirmation screen of canceling the user information registration appears. If you select Yes, the user information registration is canceled, and you return to the Home screen. Even if you select Disagree, you can still use this service by selecting Agree from the registration screen later.
- You can print the displayed information by pressing the Start button.
6. The Time zone screen will be displayed. Set the time closest to the current one, and tap [ Next ].
7. A list of the time zones will be displayed. Select and tap the region that is the nearest to your area.
For some regions, a screen for applying the daylight saving time setting may appear.

REFERENCE
Depending on the selected region, the screen for the Summer Time settings will be displayed.
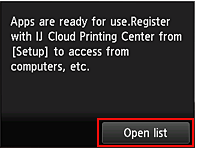
8. The screen below will be displayed, indicating that applications are ready for use. Tap [ Open list ].
Registration of the printer is completed, and a list of available application software will be displayed.
Printing from the Cloud This section introduces the photo printing procedure by using CANON iMAGE GATEWAY as an example.
IMPORTANT
- The available functions differ depending on the app.
- The printing procedure differs depending on the app.
- You need to get the account and register photo and other data beforehand.
- The following file formats can be printed: jpg, jpeg, pdf, docx, doc, xlsx, xls, pptx, ppt, and rtf. The file formats that can be printed differ depending on the app.
- Before you print, check that printer is on and is connected to the network. Then start.
REFERENCE
- You can use CANON iMAGE GATEWAY to print jpg and jpeg file formats.
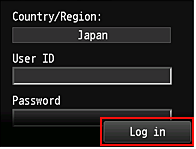
1. In the HOME menu of the printer, tap [ Cloud ]  and [ CANON iMAGE GATEWAY].
2. The screen below will be displayed. Enter your account and tap [ Log in ].
IMPORTANT
- Some apps may not be fully displayed in the display area. If this is the case, scroll up, down, right, and left to change the display area.

 : Visible area
- The Login screen may vary between apps.
- After logging in, you may be asked from an external service to agree to use their app. Agree if you are using the app.
3. A list of albums will be displayed. Tap the album where the photos you would like to print are contained.
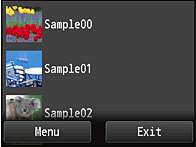
4. In the displayed image list, select the image that you want to print, and then select [ Next ].

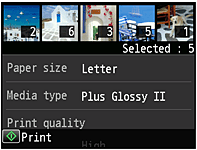
5. Make the print settings as you desire, then press the Color button  of the printer. Printing will start.
6. When printing is finished, the screen below is displayed.
To continue printing, select [ Continue ], and perform the operation from Step 3.
To end the printing, select [ App list ]. The screen returns to the apps list screen.

IMPORTANT
- If a print job is not printed within 24 hours after the print job is issued, the print job will expire and cannot be printed.
- With premium apps that limit the number of print jobs, print jobs that cannot be printed due to expiration and other reasons are also included in the print count.
REFERENCE
- To leave a usage history of this service, from the Home window on the operation panel, select
 [ Setup ] -> [ Setup ] ->  [ Web service setup ] -> [ Web service connection setup ] -> [ IJ Cloud Printing Center setup ] -> [ History setting for this service ] -> [ Save ]. [ Web service setup ] -> [ Web service connection setup ] -> [ IJ Cloud Printing Center setup ] -> [ History setting for this service ] -> [ Save ].
With the initial setting, no data is saved.
|