
Maintenance and Inspections
| Article ID: ART100580 | | | Date published: 05/11/2015 | | | Date last updated: 08/15/2015 |
Description
Maintenance and Inspections
Solution
| Maintenance and Inspections ID
:
8202236000
_
EN
_
1
|
|
| Solution |
Clean this machine periodically. If dust accumulates, the machine may not operate properly. When cleaning, be sure to observe the following.
Exterior Regularly wipe the exterior of the machine, to keep the machine in good condition.
1. Turn OFF the machine, and unplug the power cord from the AC power outlet.
2. Clean the exterior of the machine.

3. Wait for the exterior of machine to dry completely.
4. Reconnect the power cord and turn ON the machine.
Platen Glass Regularly wipe off the dust from the platen glass and the underside of the feeder to prevent smudges to be printed on documents or printouts.
1. Turn OFF the machine, and unplug the power cord from the AC power outlet.
2. Open the feeder.

3. Clean the platen glass and the underside of the feeder.

3-1. Clean the platen glass.
Clean the machine with the glass cleaning sheet included with the machine.
3-2. Clean the underside of the feeder.
Clean the machine with a cloth which is wrung after being dampened in water, and then wipe it clean with a soft, dry cloth.
4. Clean the scanning area (thin glass strip) and the white plate.

4-1. Clean the scanning area.
Clean the machine with the glass cleaning sheet included with the machine.
4-2. Clean the white plate.
Clean the machine with a cloth which is wrung after being dampened in water, and then wipe it clean with a soft, dry cloth.
5. Wait for the cleaned area to dry completely.
6. Gently close the feeder.
7. Reconnect the power cord and turn ON the machine.
Feeder Dust and graphite powder may adhere to the roller inside the feeder and cause smudges to appear on printouts. To clean the feeder, perform the following procedure. To clean the feeder, you need ten sheets of plain A4 or Letter size paper. Set them in the feeder before performing the following procedure. [ Placing Documents ]

1. Tap <Menu>.
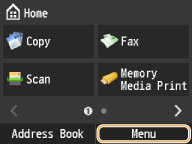
2. Tap <Adjustment/Maintenance>.
3. Tap <Clean Feeder>.
4. Tap <Start>.

 If performing <Clean Feeder> does not solve the problem If performing <Clean Feeder> does not solve the problemUse the following procedure to clean the inside of the feeder.
1. Clean the rollers of the feeder.

1-1. Open the feeder cover.
1-2. Clean the rollers (a total of two places) inside the feeder cover.
2. Clean the inside of the inner cover of the feeder.

2-1. Open the inner cover of the feeder.
2-2. Clean the transparent plastic (a total of two places).
2-3. Close the inner cover of the feeder.
3. Close the feeder cover.
Machine Interior If streaks appear on printed output, or random parts of the printed image are missing, the inside of the main unit may be dirty. In this case, perform automatic cleaning of the inside of the main unit.
1. Tap <Menu>.
2. Tap <Adjustment/Maintenance>
 <Clean Device>. <Clean Device>.
3. Tap <Start>.
When cleaning is complete, try printing again.
Fixing Assembly Dirt may adhere to the fixing assembly inside the machine and cause black streaks to appear on printouts. To clean the fixing assembly, perform the following procedure. Note that you cannot clean the fixing assembly when the machine has documents waiting to be printed. To clean the fixing assembly, you need plain A4 or Letter size paper. Set the paper in the paper drawer or multi-purpose tray ("Loading Paper in the Paper Drawer" "Loading Paper in the Multi-Purpose Tray") before performing the following procedure.
1. Tap <Menu>.
2. Tap <Adjustment/Maintenance>.
3. Tap <Clean Fixing Assembly>.
4. Tap <OK>.

5. Tap <Start>.
6. Open the multi-purpose tray.

7. Load the cleaning sheet into the multi-purpose tray with the printed side facing up, and the arrow pointing toward the machine.

8. Press
 . .
The Dust Proof Glass When white streaks or other print defects occur, the dust proof glass may be dirty. Follow the procedure below to clean the dust proof glass.
1. Open the front cover of the main unit.

2. Remove the dust proof glass cleaner from the rear side of the front cover of the main unit.

3. Hold the dust proof glass cleaner so that the pad on the tip is facing down, insert it in the locations shown on the illustration until it stops, and then move it gently back and forth.
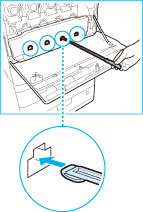
4. When you have finished cleaning the dust proof glass, gently push the dust proof glass cleaner back onto the rear side of the front cover of the main unit.
5. Close the front cover of the main unit.
|
SIMS Doc Id
8202236000