Index printing from the memory card MP130

Article ID: ART159290 | Date published: 06/09/2015 | Date last updated: 08/18/2015
 

Description

Index printing from the memory card MP130

Solution

Index Printing

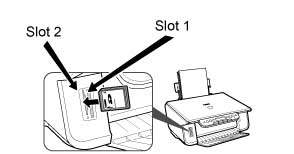
This printing method prints thumbnails of the photographs on a memory card. An index is useful to see small versions of all photographs on a memory card without having to print each photograph individually. When you print an index, an image number is assigned to each thumbnail. You will need to use these image numbers to select the photographs you want to print in a larger format.

(A): Image Number

  1. Power on the machine, and load the correct paper in the Auto Sheet Feeder (ASF).

  2. Insert the memory card.


    Slot 1


    (a) CompactFlash Type I/II
    (b) Microdrive memory card
    (c) xD-Picture Card (inserted into a card adapter)

    Slot 2


    (d) Memory Stick
    (e) MultiMediaCard
    (f) SmartMedia
    (g) SD Secure Digital memory card
    (h) Memory Stick Duo (inserted into a card adapter)
    (i) MiniSD (inserted into a card adpter)

    The following memory cards are inserted into the card slot using a memory card adapter.


    (c) xD-Picture Card *1
    (h) Memory Stick Duo *2
    (i) MiniSD Card *2

    *1 Please purchase the CompactFlash Card adapter for the xD-Picuture card separately.
    *2 Please use the dedicated adapter supplied with the memory card.

    IMPORTANT: When inserting the memory card or the card adapter containing the memory card into the card slot, insert it with its front side (labeled side) facing outside.

  3. Press <PHOTO>.

  4. Press <Menu> until [PHOTO PRINT] appears.


  5. Use [<] or [>] to select [INDEX].


  6. Press <OK>.


  7. Use [<] or [>] to select the paper size.
    Select from the following sizes.
  8. LTR: Letter size
    4"x6": Card size
    5"x7": Card size
    A4: A4 size
  9. Press <OK>.


  10. Use [<] or [>] to select the paper type.
  11. [PLAIN PAPER]: Suitable for plain paper.
    [GLOSSY]: Suitable for Glossy Photo Paper.
    [HIGH RES.]: Suitable for High Resolution Paper.
    [PH PRO]: Suitable for Photo Paper Pro.
    [PH PLUS]: Suitable for Photo Paper Plus Glossy.
    [OTHER]:

    Suitable when using photo paper other than that described

    above (such as Matte Photo Paper), or if you do not know the paper type.

    1. NOTE:
      a. In order to obtain optimal quality print results, when printing photographs, use Canon-recommended Photo Paper Pro or Photo Paper Plus Glossy.
      b. If you selected [4"x6"] or [5"x7"] in step 7, you cannot select [PLAIN PAPER].
      c. We do not recommend using plain paper for photo printing.

  12. Press <OK>.

  13. Select whether to enable date printing or not.

  14. Press <OK>.


  15. Press <Color>.

    NOTE:
    a. To cancel printing, press <Stop/Reset>.

    b. You can only print one index at a time.
    c. The image number assigned to each thumbnail on the index is different from the ID numbers

    assigned by the digital camera.
    d. Pressing <Black> does not start printing.

SIMS Doc Id

0

Rate this Article
Was this article helpful?
Yes, This document is helpful
No, This document needs a clearer explanation
 
Please provide your comments