Protecting Images
Protecting an image prevents it from being erased accidentally
Protecting Images Individually with the < > Button
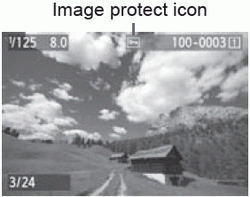 | 1 Select the image to be protected. 2 Protect the image. When you press the <> button, the image will be protected and the < > icon will appear at the top of the screen. > icon will appear at the top of the screen. To cancel the image protection, press the <> button again. The <> icon will disappear. To protect another image, repeat steps 1 and 2.
|
3 Protecting Images Individually with the Menu
 | 1 Select [Protect images]. 2 Select [Select images]. |
 | 3 Protect the image. Turn the < > dial to select the image to be protected, then press < > dial to select the image to be protected, then press < >. >. To cancel the image protection, press <> again. The <> icon will disappear. To protect another image, repeat step 3. Press the <MENU> button to return to the menu.
|
Protecting All Images in a Folder or Card
 | You can protect all the images in a folder or on the card at one time. When you select [All images in folder] or [All images on card] under [ 1: Protect images], all the images in the folder or on a card will be protected. 1: Protect images], all the images in the folder or on a card will be protected. To cancel the image protection, select [Unprotect all images in folder] or [Unprotect all images on card]. |
If you format the card, the protected images will also be erased.
To protect an image, press and quickly let go of the <> button. If you hold down the button for approx. 2 sec., a voice memo will be recorded.
If [ is not set to [Protect (Hold: Record memo)], you cannot use the <> button to protect images. Use [1: Protect images] to protect images.
Movies can also be protected.
Once an image is protected, it cannot be erased by the camera’s erase function. To erase a protected image, you must first cancel the protection.
If you erase all the images (p.281), only the protected images will remain. This is convenient when you want to erase unnecessary images all at once
