How to print to a CP Direct printer from the EOS 30D
| Article ID: ART101748 |
| |
Date published: 05/11/2015 |
| |
Date last updated: 08/15/2015 |
Description
How to print to a CP Direct printer from the EOS 30D
Solution
 Printing with CP Direct
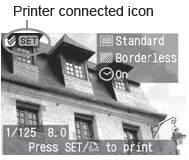 |
1 Select the image to be printed.
- Check that the <> icon is displayed on the upper left of the LCD monitor.
- Turn the
 dial to select the image to be printed. dial to select the image to be printed.
2 Press <SET>.
- The print setting screen will appear.
|
|

|
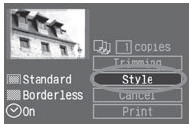 |
3 Select [Style].
- Turn the dial to select [Style], then press <SET>.
- The Style screen will appear.
|
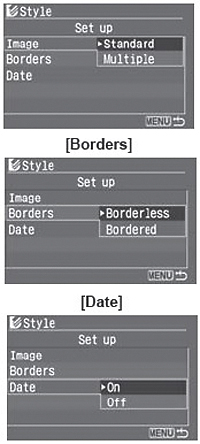 |
4 Set the options as desired.
- Set the [Image], [Borders], and [Date] as desired.
- Turn the dial to select the menu item, then press <SET>.
- Turn the dial to select the desired setting, then press <SET>.
- [Image] is selectable when card-size paper is used. If you select [Multiple], 8 small images of the same picture will be printed on the paper.
- Check the [Borders] and [Date] settings and set them if necessary.
- When you are done, press the <MENU> button to return to the print setting screen.
|
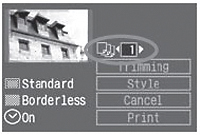 |
Set the number of copies.
- Set as necessary.
- Turn the dial to select [copies], then press <SET>.
- Turn the dial to set the number of copies, then press <SET>.
- Set a number from 1 to 99.
6 Set the trimming.
|
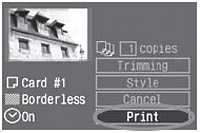 |
7 Start printing.
- Turn the dial to select [Print], then press <SET>.
- The printing will start.
- During the printing, the
 button lamp will blink in blue. button lamp will blink in blue.
- When the printing ends, the screen will return to step 1.
- To stop the printing, press <SET> while [Stop] is displayed, then turn the dial to select [OK] and press <SET>.
|
