Perform deep print head cleaning (Windows) i960
| Article ID: ART160139 |
| |
Date published: 06/09/2015 |
| |
Date last updated: 08/18/2015 |
Description
Deep print head Cleaning instructions
Solution
Follow the steps below to perform a Deep Print Head Cleaning (Windows):
Note: If a computer is not available, standard print head cleaning can be performed by pressing and holding the <Resume> button on the printer until the <Power> light flashes one time.
-
Confirm that the cable is connected and the printer is powered on.
-
Open the Printers folder.
For Windows 7
- Click the 'Start' button from the bottom left of the Windows screen, and then click on 'Devices and Printers'.
- Click your right mouse button on the listing for your printer, and then select 'Printing Preferences' from the menu that appears.
For Windows Vista
- Click / Select the 'Start' from the bottom left of the Windows screen, 'Control Panel', 'Hardware and Sound', and then click on 'Printers'. Note: If you are in 'Classic' view, click 'Printers' directly from the 'Control Panel'.
- Click your right mouse button on the listing for your printer, and then select 'Preferences' from the menu that appears.
For Windows XP Home Edition
- Click / Select the 'Start' button from the bottom left of the Windows screen, 'Control Panel,' 'Printers and Other Hardware,' and 'Printers and Faxes.'
- Click your right mouse button on the listing for your printer, and then select 'Preferences' from the menu that appears.
For Windows XP Professional Edition
- Click 'Start' from the bottom left of the Windows screen, and 'Printers and Faxes.'
- Click your right mouse button on the listing for your printer, and then select 'Preferences' from the menu that appears.
For Windows 2000
- Click / Select 'Start' from the bottom left of the Windows screen, and 'Settings,' then 'Printers.'
- Click your right mouse button on the listing for your printer, and then select 'Properties' from the menu that appears.
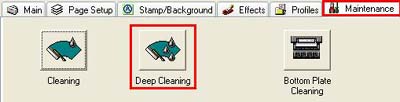
- Click the Maintenance tab, and then click the 'Deep Cleaning' icon.
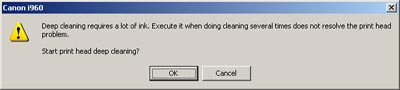
- Confirm the message, and then click the 'OK' button.
- The Power lamp will blink and print head deep cleaning will start. Deep Cleaning completes when the Power lamp stops blinking and lights. (It will take about a minute for the Power lamp to stop blinking and light solid.)
- Print a Nozzle Check Pattern From the 'Maintenance' tab to determine if further cleaning is necessary. You may need to perform up to three deep print head cleanings.
Note: If a computer is not available, the Nozzle Check Pattern can be printed by pressing and holding the <Resume> button on the printer until the <Power> light flashes one time.
