
Installing / Removing ink cartridge(s) MP190
| Article ID: ART101020 | | | Date published: 05/11/2015 | | | Date last updated: 12/09/2015 |
Description
Solution
Replacing a FINE Cartridge |
 |
This section explains the way to confirm the ink status and the procedure to replace FINE Cartridges.
When ink runs out or other errors occur, an error code is displayed on the LED to inform you of the error.
When printing from your computer, error messages appear on your computer screen as well.
|
|
 Getting the Ink Status Information
You can confirm the status of FINE Cartridges in the following ways:
Note
The ink level detector is mounted on the machine to detect the remaining ink level. The machine considers as ink is full when a new FINE Cartridge is installed, and then starts to detect a remaining ink level. If you install a used FINE Cartridge, the indicated ink level of it may not be correct. In such case, refer to the ink level information only as a guide.
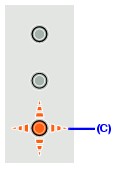
 With the Ink Lamps
Make sure that the LED is on the standby mode. You can confirm the status of each cartridge by the ink lamps.

(A) Alarm lamp
(B) Black Ink lamp
(C) Color Ink lamp
(C) The Ink lamp lights.
Ink is low. You can continue printing for a while, but we recommend you to have a new FINE Cartridge available.
*The diagram on the left indicates the status of the Color FINE Cartridge as an example.
(A) The Alarm lamp lights.
(C) The Ink lamp flashes.
If "E, 1, 6" is displayed on the LED, ink has run out.
*The diagram on the left indicates the status of the Color FINE Cartridge as an example.
(C) The Ink lamp flashes.
The function for detecting the remaining ink level is disabled.
*The diagram on the left indicates the status of the Color FINE Cartridge as an example.


With the Computer Screen
You can confirm the status of each FINE Cartridge on the printer status monitor (Windows) and Canon IJ Printer Utility (Macintosh).


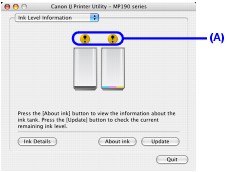
(A) Confirm whether any symbols are displayed here.
Ink is low. You can continue printing for a while, but we recommend you to have a new FINE Cartridge available.
Ink has run out.

Message may be displayed during printing. Confirm the displayed message and take appropriate action.
Follow the procedure below to open each of the confirmation screens.
1 Open the printer properties dialog box.
2 Click View Printer Status on the Maintenance sheet.
To confirm the FINE Cartridge information, click the Ink Details menu.
You can also display the printer status monitor by clicking Canon XXX Printer (where "XXX" is your machine's name) which appears on the taskbar during printing.
1 Open the Canon IJ Printer Utility.
2 Select Ink Level Information in the pop-up menu.
To confirm the FINE Cartridge information, click Ink Details.
Replacing FINE Cartridges
When FINE Cartridges run out of ink, replace them using the following steps.
Important
Handling FINE Cartridges
(A) Electrical Contacts
(B) Print Head Nozzles
Refilling ink is not recommended.
Furthermore, with such cartridges, the Low Ink Warning may not be displayed properly.

Even when printing with one ink only, print with leaving the empty FINE Cartridge installed. If either of the Color FINE Cartridge or Black FINE Cartridge is not installed, an error occurs and the machine cannot print.
For information on how to configure this setting, refer to the PC Printing Guide on-screen manual.
Color ink is also consumed in Print Head Cleaning and Print Head Deep Cleaning, which may be necessary to maintain the machine's performance.
1 Open the Paper Output Tray.
2 Make sure that the machine is turned on, lift the Scanning Unit (Cover), then pull the Scanning Unit Support (A) down into place.
The FINE Cartridge Holder moves to the left.
Caution
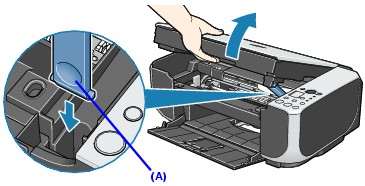
If the Scanning Unit (Cover) is left open for more than 10 minutes, the FINE Cartridge Holder moves to the right. Close and reopen the Scanning Unit (Cover) to return the holder to the left.
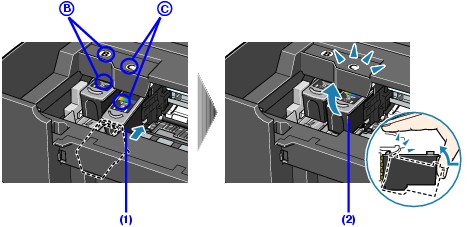
3 Remove the empty FINE Cartridge.
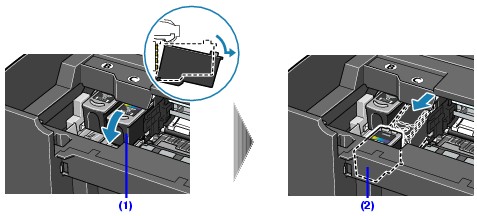
(1) Push down the FINE Cartridge.
(2) Remove the FINE Cartridge.
4 Prepare the replacement FINE Cartridge.

(1) Unpack a new FINE Cartridge and remove the orange protective tape (A) gently.
5 Install the FINE Cartridge.
(1) Insert a new FINE Cartridge all the way into the appropriate slot.
The Black FINE Cartridge should be installed into the left slot (
) and the Color FINE Cartridge should be into the right slot (
).
(2) Push up the FINE Cartridge until it clicks into place.
The machine cannot be used unless the FINE Cartridges are installed.
6 Lift the Scanning Unit (Cover) slightly to set the Scanning Unit Support back to its original position, and then gently close the Scanning Unit (Cover).
Be sure to hold the Scanning Unit (Cover) firmly, and be careful not to get your fingers caught.