If a paper jam occurs during printing (support code 1300 / 1303 / 1304 / 1313 is displayed), follow the procedure below.
Learn how to remove documents jammed in the ADF (Auto Document Feeder)
Did you try to print on a small paper size such as 4"x6" 10x15cm size?
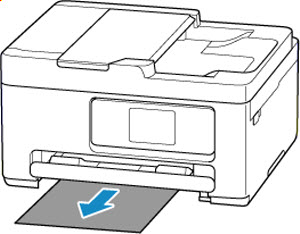
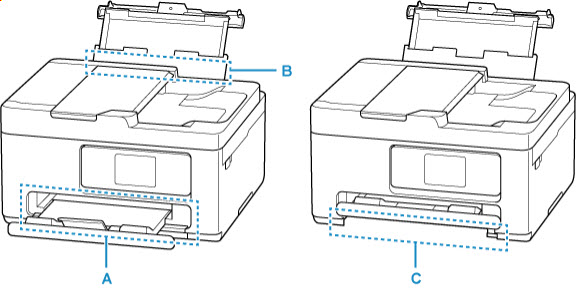
Is the jammed paper visible in the paper output slot (A)?
Information on removing this paper can be found below.
Are there any foreign objects in the feed slot of the rear tray (B)?
If so, remove those.
Is the jammed paper visible in the feed slot of the rear tray (B)?
Remove any paper other than the jammed paper in the rear tray, and then check if the jammed paper is visible in the feed slot of the rear tray.
Information on removing this paper can be found below.
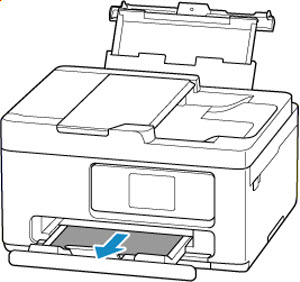
Is the jammed paper visible in the feed slot of the cassette (B)?
Retract the paper output tray , and then check if the jammed paper is visible in the feed slot of the cassette.
Information on removing this paper can be found below.
If the jammed paper is not visible in the paper output slot or the feed slot, remove the paper from the inside of the printer
+ Removing Jammed Paper through the Paper Output Slot
Hold jammed paper firmly with both hands and pull it out slowly.
Slowly pull out the paper so as not to tear it.
If you cannot pull out the paper, turn the printer back on without pulling forcibly. The paper may be ejected automatically.
Press the printer's Stop
If the paper cannot be pulled out or is torn, open the printer 's scanning unit / cover and remove jammed paper inside the printer
Select OK printer 's touch screen .
The printer resumes printing. Reprint the page you were printing if it was not printed properly due to the paper jam.
If you turned off the printer in step 1, all jobs in the print queue are canceled. Redo the printing.
When reloading the paper, make sure you are using suitable paper and loading it correctly.
If the measures above do not solve the problem, a bit of paper may remain in the printer
+ Removing Jammed Paper through the Feed Slot of the Rear Tray
Hold jammed paper firmly with both hands and pull it out slowly.
Slowly pull out the paper so as not to tear it.
detach the transport unit and then pull out the jammed paper from the feed slot of the rear tray
Load paper envelopes rear tray .
Make sure you are using suitable paper and loading it correctly.
We recommend using paper sizes other than A5 to print documents with photos or graphics. A5 paper may curl and jam as it leaves the printer .
Select OK printer 's touch screen .
The printer resumes printing. Reprint the page you were printing if it was not printed properly due to the paper jam.
If the measures above do not solve the problem, a bit of paper may remain in the printer
+ Removing Jammed Paper through the Feed Slot of the Cassette
Hold jammed paper firmly with both hands and pull it out slowly.
Slowly pull out the paper so as not to tear it.
detach the rear cover and remove the jammed paper from the rear side
Load plain paper cassette .
Make sure you are using suitable paper and loading it correctly.
Select OK printer 's touch screen .
The printer resumes printing. Reprint the page you were printing if it was not printed properly due to the paper jam.
If the measures above do not solve the problem, a bit of paper may remain in the printer
If your product issue was not resolved after following the steps above, or if you require additional help, please create or log in to your Canon Account


 button to stop printing, and then turn off the printer.

 If the paper cannot be pulled out or is torn,