
(1) top cover
Open to replace an ink tank, check the ink lamp, or remove jammed paper inside the printer.
(2) feed slot cover
Prevents anything from falling into the feed slot.
Open it to slide the paper guides, and close it before printing.
(3) paper support
Open to load paper in the rear tray.
(4) rear tray
Load various sizes or types of paper which you can use on the printer. Two or more sheets of the same size and type of paper can be loaded at the same time, and fed automatically one sheet at a time.
(5) paper guides
Slide to align with both sides of the paper stack.
(6) inner cover
Open by pulling it out to attach the disc tray. Use when printing onto a printable disc. Keep closed for normal operation.
(7) paper output tray
Printed paper is ejected. Open it before printing.
(8) output tray extension
Pull out to support paper. Pull it out before printing.
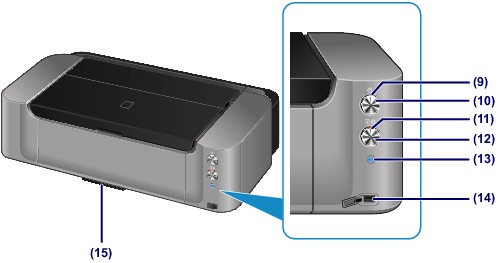
* All buttons and lamps are shown lit in the above illustration for explanatory purposes.
(9) POWER lamp
Lights white after flashing when the power is turned on.
 Note Note
POWER and Alarm lamps
You can check the status of the printer by the POWER and Alarm lamps.
- POWER lamp is off: The power is off.
- POWER lamp lights white: The printer is ready to print.
- POWER lamp flashes white: The printer is getting ready to print, or printing is in progress.
- Alarm lamp flashes orange: An error has occurred and the printer is not ready to print.
- POWER lamp flashes white and Alarm lamp flashes orange alternately: An error that requires contacting the service center may have occurred.
For support and service options, sign into (or create) your Canon Account from the link below.
My Canon Account
|
(10) ON button
Press to turn the power on or off.
(11) Alarm lamp
Lights or flashes orange when an error occurs, such as paper-out or ink-out.
(12) RESUME/CANCEL button
Press to cancel a print job in progress. You can press this button to release from printer error status and resume printing, after the printer problem is resolved.
(13) Wi-Fi button/Wi-Fi lamp
Hold down to automatically set up the wireless LAN connection.
Lights or flashes blue to indicate the wireless LAN status.
Lights:
Wireless LAN connection is enabled.
Flashes:
Printing over wireless LAN. While setting up the wireless LAN, the number of flashes indicates setup status.
(14) direct print port
Connect a PictBridge compliant device such as a digital camera to print directly.
 Warning Warning
Do not connect any equipment other than PictBridge compliant devices to the direct print port of the printer. This may cause fire, electric shock, or damage to the printer.
|
 Important Important
Do not touch the metal casing.
Do not use the USB cable longer than 10 feet (3 meters) to connect any PictBridge compliant device to the printer since it may affect the operation of other peripheral devices.
|
(15) disc tray storage compartment
The disc tray supplied with the printer can be stored here.
PIXMA Pro Series Printers Support
