
Using the scanner push-buttons (8600F)
| Article ID: ART124053 | | | Date published: 05/12/2015 | | | Date last updated: 08/17/2015 |
Description
Solution
Using the Scanner Buttons
The scanner buttons allow you to copy, scan, e-mail and save scanned images in PDF format with a press of a button. Simply place your document on the scanner, and then press the scanner button for the required function.

Scanner buttons allow you to scan your documents with just a press of a button. There are 4 PDF buttons (COLOR, BLACK & WHITE, CUSTOM, and FINISH) as well as [COPY], [PHOTO/FILM], and [E-MAIL] buttons.
PDF buttons allow you to easily create PDF files using the [COLOR], [BLACK & WHITE], or [CUSTOM] button according to your needs.
The button names are not labeled on the scanner.
|
|||||||||||||||||||||||||||||||||||||||||||||||||||
| * | Before using the scanner buttons in Mac OS X 10.3 or 10.2.8, you need to set CanoScan Toolbox to open automatically when a scanner button is pressed. For instructions: Using Scanner Buttons in Mac OS X 10.3/10.2.8 |
| • |
By default, the images scanned using [PHOTO/FILM], [E-MAIL] and [PDF] buttons are saved in the following locations:
|
[PDF] Buttons
 Saving Scanned Images in Color PDF
- Place your document on the scanner.
- Press [COLOR].
The explanation of PDF buttons on the scanner is displayed.

Click [OK] on the window to start scanning.
A window appears to indicate the progress and to display the setting values.
After the first page is scanned, you will be prompted to either continue scanning additional pages or end the operation.

- Scan additional pages if required, or end the operation.
If you want to scan additional pages, set the next page of the document on the scanner and press [COLOR].
After the page is scanned, you will be prompted to either continue scanning additional pages or end the operation.
When you are finished scanning, press [FINISH] on the scanner.
The scanned image is saved in PDF format and opened in Presto! PageManager (Windows).
 Saving Scanned Images in Black & White PDF
- Place your document on the scanner.
- Press [BLACK & WHITE].
The explanation of PDF buttons on the scanner is displayed.
Click [OK] on the window to start scanning.
A window appears to indicate the progress and to display the setting values.
After the first page is scanned, you will be prompted to either continue scanning additional pages or end the operation.

- Scan additional pages if required, or end the operation.
If you want to scan additional pages, set the next page of the document on the scanner and press [BLACK & WHITE].
After the page is scanned, you will be prompted to either continue scanning additional pages or end the operation.
When you are finished scanning, press [FINISH] on the scanner.
The scanned image is saved in PDF format and opened in Presto! PageManager (Windows).
 Saving Images in PDF Files Using Custom Settings
- Place your document on the scanner.
- Press [CUSTOM].
The explanation of PDF buttons on the scanner is displayed.
Click [OK]. You will be prompted to select whether to display the [Settings] window.

When you click [OK], the [PDF] window ([CUSTOM] tab) of CanoScan Toolbox is displayed.
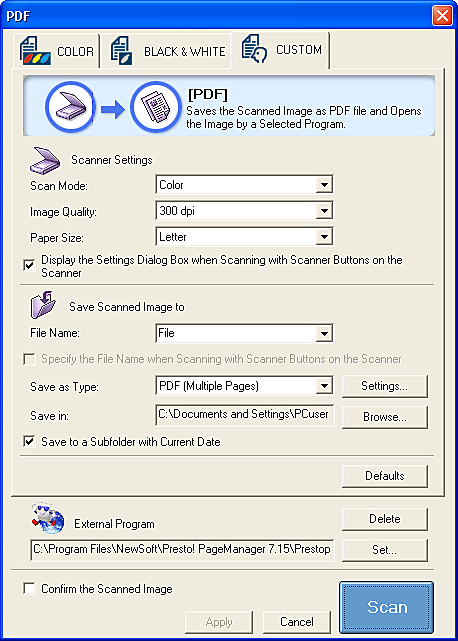
- Specify the settings as needed.
- Click [Scan].
After the first page is scanned, you will be prompted to either continue scanning additional pages or end the operation.

- Scan additional pages if required, or end the operation.
If you want to scan additional pages, set the next page of the document on the scanner and press [CUSTOM].
After the page is scanned, you will be prompted to either continue scanning additional pages or end the operation.
When you are finished scanning, press [FINISH] on the scanner.
The scanned image is saved in PDF format and opened in Presto! PageManager (Windows).
| • | In Windows, Adobe Acrobat Reader/Adobe Acrobat may start to create thumbnails. If there is a file associated with another application in the same folder where the images are saved, that application may start instead. | |
| • | Check [Do not display this message again.] if you do not want to display the window the next time you press a PDF button. If the window is set not to appear, you can scan multiple pages using only the PDF buttons. |
|
| • | You can click [Next] on the computer screen to scan additional pages instead of pressing [COLOR], [BLACK & WHITE], or [CUSTOM] button on the scanner. Likewise, you can click [Finish] on the computer screen to end operation, instead of pressing the [FINISH] button on the scanner. |
|
| • | The [COLOR], [BLACK & WHITE], and [CUSTOM] buttons are set to work in conjunction with CanoScan Toolbox. If you want to change the scanner button settings, click [Cancel] while the document is being scanned, and change the settings as needed on CanoScan Toolbox window. |
[COPY], [PHOTO/FILM], and [E-MAIL] Buttons
 Copying a Document ([COPY] Button)
-
Set up your printer.

• This procedure requires the use of a separately available printer. For instructions on setting up your printer, see the operation manual that came with the printer.
- Place your document on the scanner.
-
Press [COPY].
The [Copy] window of CanoScan Toolbox is displayed, and the scanning starts.
The scanned image is automatically printed out on A4 or Letter size paper by default.
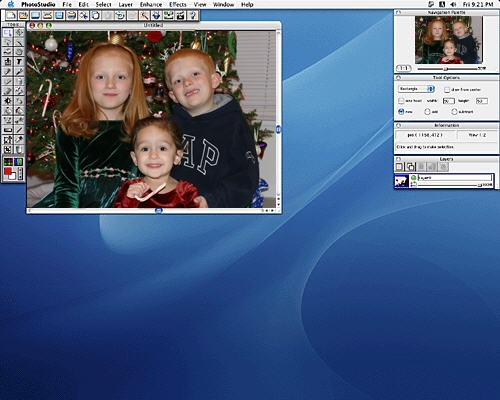
 Scanning Images into Your Computer ([PHOTO/FILM] Button)
- Place your document on the scanner.
- Press [PHOTO/FILM].
The [Photo] window of CanoScan Toolbox is displayed, and the scanning starts.
The saved image is opened in ArcSoft PhotoStudio.


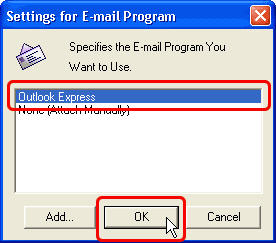
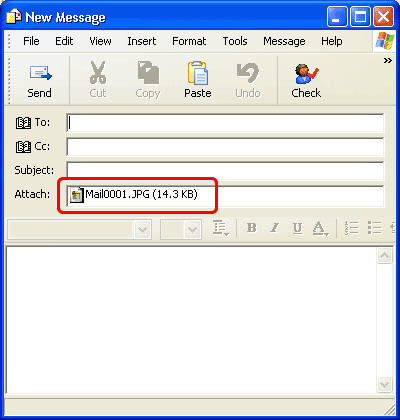
 Attaching Images to E-mail ([E-MAIL] Button)
| • |
The following e-mail applications are supported for this scanner:
|
- Place your document on the scanner.
- Press [E-MAIL].
The [Mail] window of CanoScan Toolbox is displayed, and the scanning starts.
- Select the e-mail application to use and click [OK]. (First time only)
The application starts and displays a new message window with the scanned image attached.
If the application you use is not listed, select [None (Attach Manually)]. Then, after the scanning is complete, manually attach the saved image in your message.
| • | You can press [COPY], [PHOTO/FILM], or [E-MAIL] button to continue scanning using the same settings, with the CanoScan Toolbox window displayed on the monitor. | |
| • | The [COPY] and [PHOTO/FILM] buttons are set to work in conjunction with CanoScan Toolbox. If you want to change the scanner button settings, click [Cancel] while the film is being scanned, and change the settings as needed on CanoScan Toolbox window. | |
| • | If you are prompted to select the application to start (instead of CanoScan Toolbox starting up automatically) when you press a scanner button: |
Using Scanner Buttons in Mac OS X 10.3/10.2.8
In order to start CanoScan Toolbox automatically in Mac OS X 10.3 or 10.2.8 when a scanner button is pressed, you need to set the scanner buttons to work with CanoScan Toolbox first.
| • | Before performing this procedure, make sure that CanoScan Toolbox is installed, and that the scanner is connected to your computer. |
- Mac OS X 10.3
- Open the [Applications] folder in the hard disk and double-click Image Capture. The preview scan automatically starts.
- Click [Options].
- Select [CanoScan Toolbox] in [When a scanner button is pressed, open] on the [Settings] screen.
- Click [OK] and quit [Image Capture].
CanoScan Toolbox starts automatically the next time you press a scanner button.
| • |
If you see a TWAIN screen when [Image Capture] is started, do the following to deselect TWAIN software.
|
- Mac OS X 10.2.8
- Open the [Applications] folder in the hard disk and double-click [Image Capture]. The preview scan automatically starts.
- Select [Preferences] from the [Image Capture] menu.
- Select [Other] in [When a scanner button is pressed, open].
- Select CanoScan Toolbox in the file selection dialog box.
- Click [Open] and quit [Image Capture].
CanoScan Toolbox starts automatically the next time you press a scanner button.