To create a new page, press the [Enter] key. (Page Break)
[Example] Create a new page after the currently displayed page.

- Move the cursor to the end of the line.
|
|
- Press the [Enter] key.
- A page break will be performed and a new page will be created.
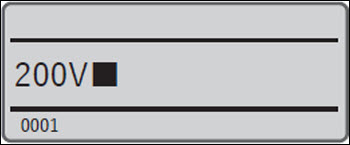
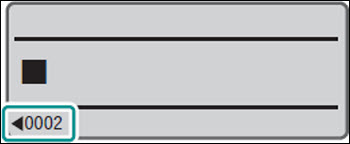
- You can check the page number of the currently displayed page on the display. Also, arrows (
 / /  )
before and after the page number indicate that there is a page before or after the currently displayed page. )
before and after the page number indicate that there is a page before or after the currently displayed page.
|
|
 The format setting of the new page will be the same as the previous page.
You can copy the page where you have entered text and paste it before or after another page.
[Example] Copy the first page and paste it after the second page.
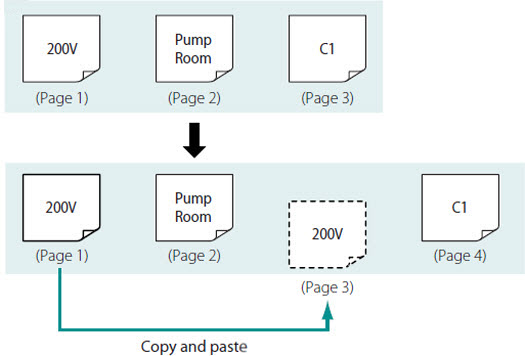
- Display the page to be copied (the first page).
|
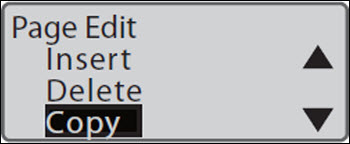
- Press the [Option] key.
|
- Use [
 ]
or [ ]
or [ ]
to select "Page Edit" and press the [Enter] key. ]
to select "Page Edit" and press the [Enter] key.
|

|
- Use []
or []
to select "Copy," and press the [Enter] key.
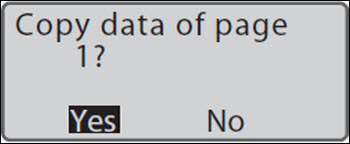
- A confirmation screen will appear.
|
|
- Use []
or []
to select "Yes" and press the [Enter] key.
- The first page will be copied and you will be returned to the character input display.
|
|
- Press the [Option] key.
|
- Use []
or []
to select "Page Edit" and press the [Enter] key.
|
|
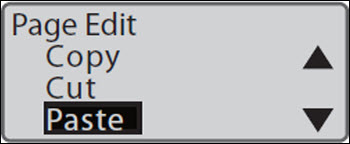
- Use []
or []
to select "Paste" and press the [Enter] key.
- A confirmation screen for the paste location will appear.
|
|
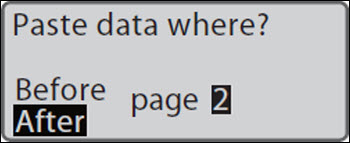
- Use []
or []
to enter "2" (page), and use []
or []
to select "After."
|
|
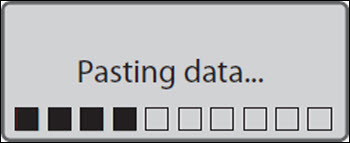
- Press the [Enter] key.
- The copied page will be pasted to the specified location and you will be returned to the character input display.
|
|
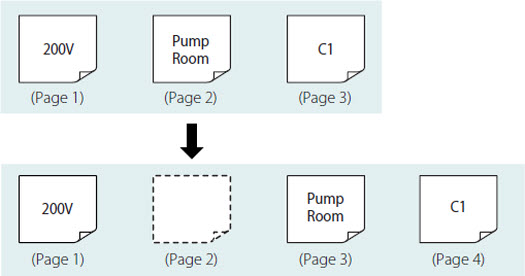
Cut the page on which you have entered text and paste it before or after another page.
[Example] Cut the second page and paste it after the third page.
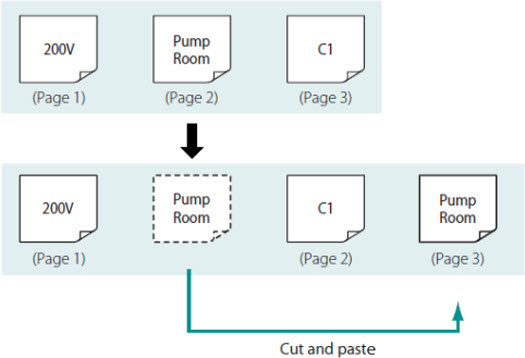
- Display the page to be moved (page 2).
|
- Press the [Option] key.
|
- Use []
or []
to select "Page Edit" and press the [Enter] key.
|
|
- Use []
or []
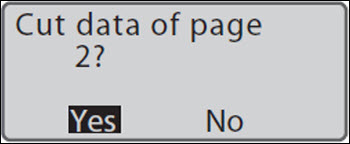
to select "Cut," and press the [Enter] key.
- A confirmation screen will appear.
|
 |
- Use []
or []
to select "Yes," and press the [Enter] key.
- The second page will be cut and you will be returned to the character input display.
|
 |
- Press the [Option] key.
|
- Use []
or []
to select "Page Edit" and press the [Enter] key.
|
|
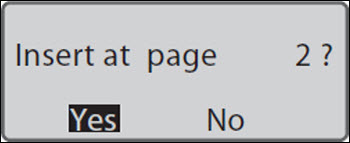
- Use []
or []
to select "Paste" and press the [Enter] key.
|
|
- Use []
or []
to select "2," (page), and use []
or []
to select "After".
|
|
- Press the [Enter] key.
- The cut page will be pasted to the specified location and the display returns to the character input display.
|
|
Inserts a blank page at the specified location.
[Example] Insert a new blank page between the first and second pages.
- Display the page at the position where you want to insert a blank page (page 2).
|
- Press the [Option] key.
|
- Use []
or []
to select "Page Edit" and press the [Enter] key.
|
|
- Use []
or []
to select "Insert," and then press the [Enter] key.
- A confirmation screen will appear.
|

|
- Select "Yes" with []
or []
and press the [Enter] key.
- A blank page will be inserted on the second page, and you will be returned to the character input display.
|
|
Deletes a specified page. When you delete a page, the data entered on that page will also be deleted.
[Example] Deleting the second page.
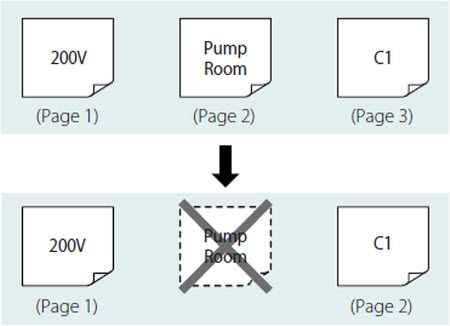
- Display the page you want to delete (page 2).
|
- Press the [Option] key.
|
- Use []
or []
to select "Page Edit" and press the [Enter] key.
|
|
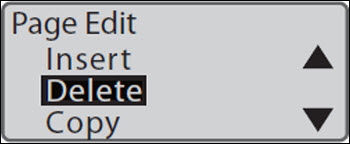
- Use []
or []
to select "Delete," and press the [Enter] key.
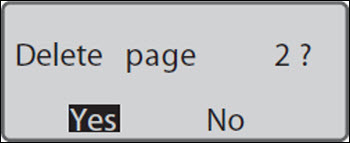
- A confirmation screen will appear.
|
|
- Use []
or [] to
select "Yes" and press the [Enter] key.
- The second page will be deleted and you will be returned to the character input display.
|
|
You can divide the data which is entered two lines in one page into two pages.
[Example] Page division of page 3.

- Display the page to be divided (page 3).
|
- Press the [Option] key.
|
- Use []
or []
to select "Page Edit" and press the [Enter] key.
|
|
- Use []
or []
to select "Division," and press the [Enter] key.
|
 |
- Use []
or []
to select "Specify," and press the [Enter] key.
- If you select "All," all pages will be divided.
|
 |
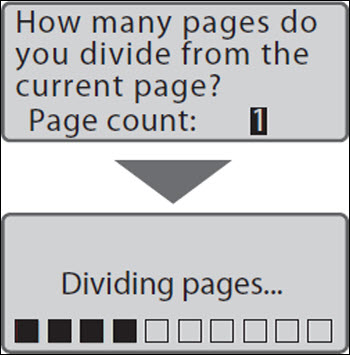
- Use []
or [] to
enter "1" (for page) and press the [Enter] key.
- The second line of the third page will be created as the fourth page, and you will be returned to the character input display.
|
 |
If you divide a page of one-line input, the same data will be created for two pages.
[Example] Divide data that contains a page of one-line input with "All".
Pages with numbering cannot be divided.
When you divide a page, the settings such as character size and cut length will be changed. It is recommended to save the file before dividing it.
The following settings will be changed to their default settings.
- Character Size / Frame / Cut Length / Orientation / Continuous Print / Character Space
Since the character size will be the default setting, the cut length may change
depending on the data. Also, if the cut length exceeds 150 mm, the data for the excess length will be deleted.
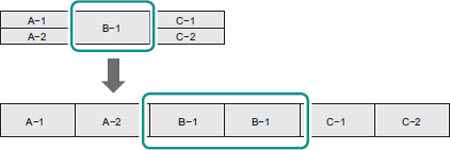
You can combine two pages of data into two lines on one page.
[Example] Combine pages 3 to 6.

- Display the page you wish to make into a combined one (page 3).
|
- Press the [Option] key.
|
- Use []
or []
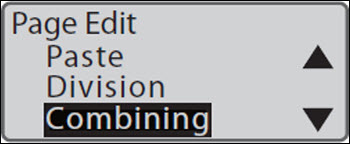
to select "Page Edit" and press the [Enter] key.
|
|
- Use []
or []
to select "Combining" and press the [Enter] key.
- The page combining selection screen will appear.
|
|
- Use []
or []
to select "Specify," and press the [Enter] key.
- If you select "All," all pages will be combined into one page with two lines.
|

|
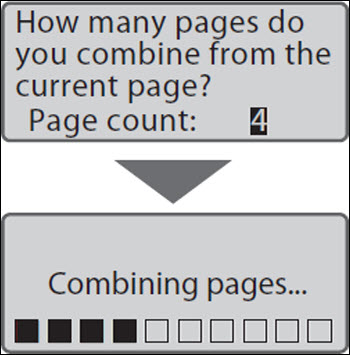
- Use []
or [] to
enter "4" (page) and press the [Enter] key.
- Pages 3 to 6 will be combined and you will be returned to the character input display.
|
 |
Pages with numbering or pages with two line input cannot be combined.
When you combine pages, the settings such as character size and cut length will be
changed. It is recommended to save the fi le before combining.
The following settings will be changed to their default settings.
- Character Size / Frame / Cut Length / Orientation / Continuous Print / Character Space
Since the character size will be the default setting, the cut length may change
depending on the data. Also, if the cut length exceeds 150 mm, the data for the excess length will be deleted.

