
TC-20/TC-20M Printer Preferences - Windows
| Article ID: ART184733 | | | Date published: 05/02/2024 | | | Date last updated: 05/03/2024 |
Description
Solution
Select an option for more information.
The Main tab allows you to create a basic print setup in accordance with the media type. Unless special printing is required, normal printing can be performed just by setting the items on this tab.
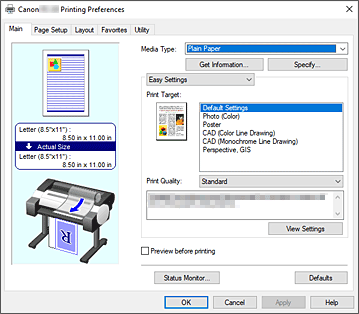
- The paper illustration shows how the original will be laid out on a sheet of paper.
You can check an overall image of the layout.
The printer illustration shows how to load paper to match the printer driver settings.
Check whether the printer is set up correctly by looking at the illustration before you start printing. - Selects a type of printing paper.
Select a media type that matches the paper that is loaded in the printer. This ensures that printing is carried out properly for the specified paper. - Opens the Paper Information on Printer dialog box.
You can check the settings on the printer and apply the checked settings to the printer driver. - Open the Paper Detailed Settings dialog box, and specify detailed print settings that match the media type loaded in the printer.
- Switches the Easy Settings and Advanced Settings.
- This mode allows you to print by using pre-registered print settings.
- Print settings that are generally used frequently are pre-registered as print purposes. By using a print purpose to print, you can print by using settings that match the document.
- Select this when printing general documents such as business documents.
- Select this when printing a color illustration or a photograph.
- Select this when printing posters.
- Select when printing data such as drawings.
- Select when printing data such as drawings in monochrome.
- Select when printing data such as perspectives and GIS.
Default Settings
Photo (Color)
Poster
CAD (Color Line Drawing)
CAD (Monochrome Line Drawing)
Perspective, GIS
- Selects your desired printing quality.
Select one of the following to set the print quality level that is appropriate for the purpose. Depending on the Media Type settings, the same print results may be produced even if the Print Quality is changed.
- Gives priority to print quality over printing speed.
- Prints with average speed and quality. Resolution settings depend on media type.
- Good for trial printing.
- Opens the Custom dialog
box.
Select this when you want to set the printing quality level individually.
High
Standard
Draft
Custom
- Opens the View Settings dialog box.
Print Target
Print Quality
View Settings
- Print settings that are generally used frequently are pre-registered as print purposes. By using a print purpose to print, you can print by using settings that match the document.
- This mode allows you to print by specifying detailed settings that match your purpose.
- Select elements to prioritize for print results.
- Prioritize image results when printing.
- Prioritize detailed lines and text when printing.
- Use printer settings when printing.
Image
Line Drawing/Text
Auto (Use Printer Settings)
- Selects your desired printing quality.
Select one of the following to set the print quality level that is appropriate for the purpose. Depending on the Media Type settings, the same print results may be produced even if the Print Quality is changed.
- Gives priority to print quality over printing speed.
- Prints with average speed and quality. Resolution settings depend on media type.
- Good for trial printing.
- Opens the Custom dialog
box.
Select this when you want to set the printing quality level individually.
High
Standard
Draft
Custom
- Select the color to print.
- Prints with the number of colors in the document.
- Select this setting to print a line drawing using black ink.
- Print all non-white parts in black.
- Opens the Color
Settings dialog box.
You can adjust individual color settings such as Cyan, Magenta, Yellow, Brightness, and Contrast on the Color Adjustment tab, and select the Color Correction method on the Matching tab.
Color
Monochrome
Monochrome Bitmap
Color Settings
- To make thin lines thicker and easier to see when printing, add a checkmark.
Print Priority
Print Quality
Color Mode
Thicken Fine Lines
- Select elements to prioritize for print results.
Easy Settings
Advanced Settings
- This mode allows you to print by using pre-registered print settings.
- You can start up the Canon imagePROGRAF Preview, and check what the printing results will be before executing the print.
Check this check box to display a preview before printing. - Displays the status monitor.
- Restores all the settings you have changed to their default values.
Clicking this button restores all the settings on the current screen to their default values (factory settings).
Settings Preview
Media Type
Get Information...
Specify...
Pull-down menu
Preview before printing
Status Monitor...
Defaults
Paper Detailed Settings dialog box
- Wait time can be set to allow ink to dry. Between Pages settings are only enabled for roll paper.
- The wait time until outputting paper can be set after printing one page. Time is taken before cutting roll paper to allow the ink to dry,
so the page may be dropped into the basket with dried ink.
- Settings in printer unit operation panel are applied.
- Page will be output immediately after printing
- Page will be output after set amount of time has passed after printing.
Printer Default
None
30 sec. / 1 min. / 3 min.
- The wait time until printing the next scan can be set after printing one scan in the page. Set to avoid smudging or unevenness in the page.
- Settings in printer unit operation panel are applied.
- Next scan will be print immediately after first scan is print.
- Next scan will be print after the set amount of time has passed after printing one scan.
* If smudges and/or unevenness occur, please increase time.
Printer Default
None
0.5 sec./1 sec.
Between Pages
Between Scans
- The wait time until outputting paper can be set after printing one page. Time is taken before cutting roll paper to allow the ink to dry,
so the page may be dropped into the basket with dried ink.
- The margin length on the edge of the paper can be selected.
- Set how images are printed relative to the margin amount on the roll paper.
- Settings in printer unit operation panel are applied.
- This setting adds margins to the outside of the print data. Larger margins make the printed material vertically longer, and more of the roll paper will be used.
- This setting adds margins to the inside of the print data. Larger margins increase the unprinted area at the top and bottom of the printed material.
When using Prioritize Paper Size, the top and bottom of the image may be cut off depending on the margin amount you set. It is recommended that you consider the margins beforehand when creating the print data.
Printer Default
Prioritize Image Size
Prioritize Paper Size
- Set the margin length on each end of the roll paper.
- Settings in printer unit operation panel are applied.
- Automatically set the margin amount.
- Select a larger margin when rubbing of the print heads occurs, such as when heavily curling paper is being used.
Printer Default
Auto
Leading Edge 5 mm / Far End 5 mm / Leading Edge 15 mm / Far End 15 mm / Leading Edge 30 mm / Far End 30 mm
Top/Bottom Margins
Leading Edge/Far End Margin
- Set how images are printed relative to the margin amount on the roll paper.
- Select auto-cut speed. This can be adjusted when paper cannot be cut precisely with auto-cut.
- Settings in printer unit operation panel are applied.
- Select when cut is not smooth with Standard settings.
- Select when there are no particular problems with auto-cut.
- If this is selected for paper with adhesive, the cutter will not stick to the adhesive easily and it will slow deterioration of the cutter's capabilities.
Printer Default
Fast
Standard
Slow
- Controls color unevenness and unaligned ruled lines.
Please check when printing in one direction. - Select whether to print reflected image or not. When you select this check box, text and images will be printed as if reflected in a mirror.
Drying Time
Roll Paper Safety Margin
Cut Speed
Unidirectional Printing
Mirror
Custom dialog box
Set the quality level, and select the desired print quality.
- You can use the slider bar to adjust the print quality level.
- Certain print quality levels cannot be selected depending on the settings of Media
Type.
 The High, Standard,
or Draft print quality modes are linked with the slider bar. Therefore when the slider bar is moved, the corresponding quality and value are displayed on the left. This is the same as when the corresponding quality is selected for Print Quality on the Main tab.
The High, Standard,
or Draft print quality modes are linked with the slider bar. Therefore when the slider bar is moved, the corresponding quality and value are displayed on the left. This is the same as when the corresponding quality is selected for Print Quality on the Main tab.
Quality
View Settings dialog box
- Select the print purpose. The settings of the selected print purpose are displayed in Details.
- Displays the name of the selected print purpose.
- Displays the settings of the print purpose that was selected for Print Target.
Print Target
Name
Details
Color Settings dialog box
Color Adjustment Tab
This tab allows you to adjust the color balance by changing the settings of the Cyan, Magenta, Yellow, Brightness, and Contrast options.
- Shows the effect of color adjustment.
The color and brightness change when each item is adjusted. - Displays a pattern for checking color changes produced by color adjustment.
If you want to display the preview image with a color pattern, check this check box. - Adjusts the strengths of Cyan, Magenta, and Yellow.
Moving the slider to the right makes a color stronger, and moving the slider to the left makes a color weaker.
You can also directly enter a value linked to the slider. Enter a value in the range from -50 to 50.
This adjustment changes the relative amount of ink of each color used, which alters the total color balance of the document. Use your application if you want to change the total color balance significantly. Use the printer driver only if you want to adjust the color balance slightly. When Monochrome is
selected for Color Mode, the color balance (Cyan, Magenta, and Yellow) can't be set. - Adjusts the brightness of your print. You cannot change the levels of pure white and black. However, the brightness of the colors between white and black can be changed. Colors become brighter as you drag the slider toward the right and darker as you drag the slider toward the left. You can also directly enter brightness values that are linked to the slider bar. Enter a value in the range from -50 to 50.
- Adjusts the contrast between light and dark in the image to be printed.
Moving the slider to the right increases the contrast, moving the slider to the left decreases the contrast.
You can also directly enter a value linked to the slider. Enter a value in the range from -50 to 50.
Preview
View Color Pattern
Cyan / Magenta / Yellow
Brightness
Contrast
Matching Tab
This is displayed when Color is selected for Color Mode.
Allows you to select the method for adjusting colors to match the type of document to be printed.
- Allows you to select Driver Matching, ICC Profile Matching, ICM, or Off to match the purpose of the print operation.
- Print with the optimal color using the driver's original color profile. Normally, you should choose this mode.
- Carry out color matching using the ICC profile. Specify the input profile, printer profile and matching method in detail, and select when printing. You can use the digital camera or scanner ICC profile, or the ICC profile created using the profile creation tool.
- Perform color matching on the host computer using the Windows ICM function. Select when printing from an ICM function-compatible application.
- Print without performing color matching on the printer driver. Select this when performing color matching using applications such as Adobe Photoshop, or printing using a profile creation tool or color chart.
When setting not to use ICM in the application software, ICC Profile Matching and ICM of Color Correction do not function. There are also times when it does not print correctly.
Driver Matching
ICC Profile Matching
ICM
Off
- Specifies the input profile to be used when you select ICC Profile Matching for Color Correction.
- Specifies the printer profile to be used when ICC Profile Matching is selected for Color Correction.
Normally Auto Settings is selected but you can also select a printer profile manually. - Specifies the matching method to be used when you select Driver Matching, ICC Profile Matching, or ICM, for Color Correction.
- Reproduces colors of general photos naturally and features smooth gradation. In addition, selecting this setting allows you to adjust colors easily using an application software.
- Reproduces vivid colors on data such as a poster. In addition, prints in easy-to-see colors suitable for line drawing.
- When image data is converted to the color space of the printer, this method converts the image data so the color reproduction approximates the shared color regions. Select this method to print image data with colors that are close to the original colors.
The white spots are reproduced as white spots (background color) on the paper. - This method uses the white spot definitions in the input and output ICC profiles to convert the image data.
Although the color and color balance of the white spots change, you may not be able to get the desired output results because of the profile combination.
Perceptual (Photo) / Perceptual
Saturation (Poster/CAD) / Saturation
Relative Colorimetric
Absolute Colorimetric
Depending on the media type, you may obtain the same print results even when you change the Rendering Intent setting. If Driver Matching is selected for Color Correction, then Relative Colorimetric and Absolute Colorimetric are not displayed.
Color Correction
Input Profile
Printer Profile
Rendering Intent
The Page Setup tab allows you to specify the scaling for enlarging or reducing, set the paper feeding method, and more.
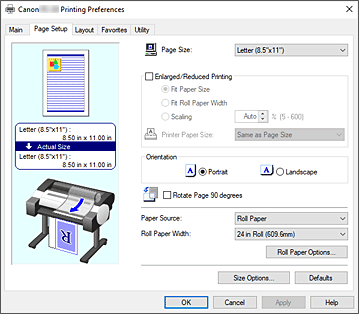
- The paper illustration shows how the original will be laid out on a sheet of paper.
You can check an overall image of the layout.
The printer illustration shows how to load paper to match the printer driver settings.
Check whether the printer is set up correctly by looking at the illustration before you start printing. - Selects a page size.
Ensure that you select the same page size as you selected within the application.
When you select Custom Size from Custom Paper Size, the Custom Size Settings dialog box appears, and you can specify any vertical and horizontal dimensions for the paper. - You can enlarge or reduce a document and then print it.
When you select Enlarged/Reduced Printing, you can then set Fit Paper Size, Fit Roll Paper Width, or Scaling.- Enlarge/reduce the document to match the size of the paper to be printed, and then print the document.
- You can enlarge/reduce the document to match the roll paper width and then print the document.
When you select this radio button, the Information dialog box appears, and you can select Roll Paper Width. - Enlarge or reduce the document to a specified scale before printing.
- When you select Fit Paper Size, or Scaling, you can specify the setting.
Select the size of the paper to be printed.
Fit Paper Size
Fit Roll Paper Width
Scaling
Printer Paper Size
- Selects the printing orientation.
If the application used to create your document has a similar function, select the same orientation that you selected in that application.- Prints the document so that its top and bottom positions are unchanged relative to the paper feed direction. This is the default setting.
- Prints the document by rotating it 90 degrees relative to the paper feed direction.
Portrait
Landscape
- Rotate the long edge of the document 90 degrees, match it to the width of the roll paper, and then print the document.
When you print a portrait document onto roll paper, you can save paper by rotating the document 90 degrees and print the document horizontally relative to the paper. - Shows the source from which paper is supplied.
You may be able to switch the paper source with the printer driver.- Feeds paper using roll paper.
- Feeds paper using the cut sheet.
Roll Paper
Top Feed
Depending on the media type and size, the Paper Source settings that can be selected may differ. - Select the roll paper width.
Select the width that matches the width of the roll paper loaded in the printer. - Displays the Roll
Paper Options dialog box.
You can specify banner printing, and other settings for printing on roll paper. - Displays the Paper
Size Options dialog box.
The Paper Size Options dialog box allows you to create and register any user-defined paper.
Settings Preview
Page Size
Enlarged/Reduced Printing
Orientation
Rotate Page 90 degrees
Paper Source
Roll Paper Width
Roll Paper Options...
Size Options...
Custom Size Settings dialog box (Paper Size)
This dialog box allows you to specify the size (width and height) of the custom paper.
- Specifies the Width and the Height of the custom paper. Measurement is shown according to the units specified in Units.
- Select the unit for entering a user-defined paper size.
Paper Size
Units
Roll Paper Options dialog box
You can specify settings for printing on roll paper.
- Select this check box to print documents with several pages as one continuous document. When you do this, the spaces between the pages will be removed.
Banner Printing
Paper Size Options dialog box
You can create and register any user-defined paper. You can then select the defined paper size from Custom Paper Size of Page Size.
- The names and sizes of the paper sizes that the printer driver can use are displayed.
- From Paper Size List, you can delete a user-defined paper that a user created.
Paper deletion is not possible in the following case:
- When a standard paper size of the printer driver is selected
- When an oversized paper size is selected
- When a paper size with a red circle is selected
- You can specify the name of a user-defined paper.
- You can specify the units for the height and width dimensions of the user-defined paper.
- You can specify the Width and Height settings of the paper.
- When you select this check box, you can change the size while keeping the Width and Height ratio.
- Specify the paper width.
- Specify the paper height.
Fix the Ratio of the Width to Height
Width
Height
- Register the set user-defined paper in the OS.
By registering in the OS, any user sharing the use of the printer or PC can use the set user -defined paper. - You can register a user-defined paper that was set and overwrite the existing user-defined paper.
- You can narrow down the paper sizes to be displayed in Paper Size List.
- When you select this check box, add appropriate margins so that the document contents will not get cut off, and then print the document.
Paper Size List
Delete
Custom Paper Size Name
Units
Page Size
Register with the OS
Add
Display Series
Oversize
The Layout tab allows you to specify how to arrange the document onto the paper. You can also set the number of copies to be printed and the print sequence. If the application software that you used to create the document features the same functions, specify the settings from the application software.
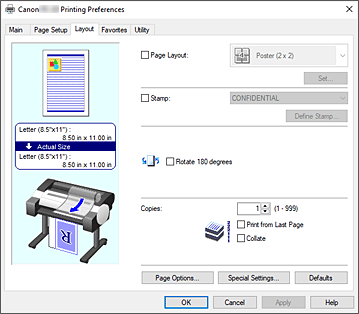
- The paper illustration shows how the original will be laid out on a sheet of paper.
You can check an overall image of the layout.
The printer illustration shows how to load paper to match the printer driver settings.
Check whether the printer is set up correctly by looking at the illustration before you start printing. - Selects the size of the document you want to print and the type of printing.
- Printing is performed with poster settings.
The value in parentheses represents the ratio of the vertical x horizontal lengths. As the number of divisions increases, the number of sheets used for printing increases. If you are pasting pages together to create a poster, increasing the number of divisions allows you to create a larger poster.- Opens the Pages
to Print dialog box.
Specify this setting when you want to print only specific pages.
Set...
- Opens the Pages
to Print dialog box.
- Multiple pages are assigned to one sheet of paper and printed. The number presents the number of pages assigned to one sheet.
- Opens the Page
Layout Printing dialog box.
You can freely specify detailed settings for assigned printing.
Set...
- Opens the Page
Layout Printing dialog box.
- Word processing and spreadsheet software documents and web browser screens, etc. can be edited a print from PosterArtist.
You must install PosterArtist to use this function. Go to the Canon website, download PosterArtist, and then install it.
Poster (1 x 2)/Poster (2 x 2)
2 Pages/Sheet / 4 Pages/Sheet / 6 Pages/Sheet / 8 Pages/Sheet / 9 Pages/Sheet / 16 Pages/Sheet
Edit Using PosterArtist
- Printing is performed with poster settings.
- The Stamp function prints a specific character string over the document pages. You can select the characters to be printed from a list or use the Define Stamp dialog box to set any characters.
- Opens the Define
Stamp dialog box.
You can specify detailed stamp settings or register any stamp.
Define Stamp...
- Opens the Define
Stamp dialog box.
- Rotates document 180 degrees and prints it.
- Specifies the number of copies you want to print. You can specify a value from 1 to 999.
If the application used to create your document has a similar function, specify the number of copies with the application without specifying it here.
- Check this check box when you want to print from the last page in order. If you do this, you do not need to sort the pages into their correct order after printing.
Uncheck this check box to print your document in normal order, starting from the first page. - Check the check box when you are printing two or more copies, and want to print them in groups. Uncheck the check box when you want to print them as a group on the same page.
Print from Last Page
Collate
- Check this check box when you want to print from the last page in order. If you do this, you do not need to sort the pages into their correct order after printing.
- Opens the Page
Options dialog box.
You specify settings for printing information such as date, user name, and page number. Depending
on your usage environment, you may not be able to use the Page Options function. In this case, set Spooling at Printer Driver in the Special Settings dialog box to Yes. - Opens the Special
Settings dialog box.
If you are unable to obtained the desired print results, you can change the print processing method.
Settings Preview
Page Layout
Stamp
Rotate 180 degrees
Copies
Page Options...
Special Settings...
Pages to Print dialog box
When printing a poster that has been divided into several pages, you can specify which pages to print and just print those pages.
Simply clear the check boxes of the pages you do not want to print.
In the setting view, the pages that were unchecked are hidden, and only the pages to be printed are displayed.
- Switches the pages to be displayed or hidden.
The Pages to Print dialog box appears only when Poster (1 x 2) or Poster (2 x 2) is selected for Page Layout.
Invert
Page Layout Printing dialog box
This dialog box allows you to select the number of document pages to be placed on one sheet of paper, the page order, and whether a page border line is to be printed around each document page.
The settings specified in this dialog box can be confirmed in the settings preview on the printer driver.
- Shows the settings made on the Page Layout Printing dialog box.
You can check what the print result will look like before you actually print the data. - Specifies the document orientation to be printed on a sheet of paper.
- Prints a page border line around each document page.
Select something other than None from the list to print the page border line. The Page Layout Printing dialog box appears only when 2 Pages/Sheet, 4 Pages/Sheet, 6 Pages/Sheet, 8 Pages/Sheet, 9 Pages/Sheet, or 16 Pages/Sheet is selected for Page Layout.
Preview Icon
Page Order
Page Border
Define Stamp dialog box
The Define Stamp dialog box allows you to specify settings for printing a stamp over the document pages. In addition to the pre-registered ones, you can register and use your original stamp.
- This is a list of the pre-registered stamps.
- Creates an original stamp.
Click this item to set Name, Text, Font, Style, Size, and Color.- Enter the stamp name to be registered.
- Enter the characters to be used in the stamp.
- Selects the font for the stamp text string.
- Selects the font style for the stamp text string.
- Selects the font size for the stamp text string.
- Select the color of the stamp text string.
Name
Text
Font
Style
Size
Color
- Deletes an unnecessary stamp.
Specify the title of an unnecessary stamp from the Stamps, and click this button. - Selects a frame that encloses the stamp text string.
- Select the stamp printing method.
Select Transparent to print the stamp on the back of the document, and select Overlap to print the stamp on the front. - Specifies the stamp position on the page.
You can specify values in X and Y to set the coordinates, or you can drag the horizontal and vertical slide bars to the left/right or up/down to change the coordinates.- Moves the stamp to the center of the paper.
Move to Center
- Set the stamp positioning angle.
You can specify a value in Set Angle to set the angle, or you can drag the slide bar left/right to change the angle.
When specifying an angle value, set a value in the range of -180 to 180. - Select this check box if you want to print a stamp only on the first page.
Stamps
Add
Delete
Outline
Print Style
Position
Angle
Stamp first page only
Page Options dialog box
Specify the print settings, such as date, user name, and page number.
- Select the position for printing the date.
- Prints the time along with the date.
- Select the position for printing the user name.
- Select the position for printing the page number.
It will be displayed if you select Yes in Spooling at Printer Driver in the Special Settings dialog box.
- The Format Settings dialog box opens, and you can set the format.
Print Date
Print Time Also
Print User Name
Print Page Number
Format Settings
Format Settings dialog box
Set the format to be used when printing the contents set in the Page Options dialog box.
- Select the font type.
- Select the font style.
- Select the font size.
- Select the font color.
Font
Style
Size
Color
Special Settings dialog box
The Special Settings dialog box allows you to change the print processing method if you do not get the print results you want.
- This is a list of items that you can set in the Special Settings dialog box.
When you click an item that you want to set, the setting contents are displayed outside the box.- Set whether print jobs are to be spooled in the print driver or whether PageComposer processing is to be performed.
Setting No (Use RAW Spooling) or Yes may improve the print results or the printing speed. Also, depending on the setting, you may not be able to use some of the driver functions.- Use this function to print on long paper.
- The print problem may be corrected.
Select this in usual cases. - Image distortions may be corrected (for example, small lines may be eliminated).
Yes
No
- The print problem may be corrected.
- If you check the Preview before printing check box on the Main tab and then print, PageComposer starts.
FineZoom Settings
Preview Switching
- Use this function to print on long paper.
- You can assign higher priority to color management by the application software.
- If image colors or line thicknesses are printed incorrectly, you may be able to get the print results you want by setting this function to off.
This is only displayed when using a 32-bit driver. - If the color profile information set in the application software is output to the printer driver, the printing results may include an unexpected tint. You can resolve the problem in this case by setting Disable the color profile setting of the application software to On.
Even
if this is set to On, it will only disable some of the color profile information, and it is still possible to print using the color profile.
This should normally be set to Off when using. - This function prevents thin lines from fading when printing by darkening light colored lines.
- This function is for switching the rendering resolution for drawings using the hatch brush or pattern brush.
- Set to Off if the thickness and density of lines and text are not printed uniformly.
Spooling at Printer Driver
Application Color Matching Priority
Fast Graphic Process
Disable the color profile setting of the application software
Adjust Faint Lines
Specify Pattern Resolution
Cleaner Lines/Text
- Set whether print jobs are to be spooled in the print driver or whether PageComposer processing is to be performed.
Settings Summary
The Favorites tab allows you to register frequently used print settings as favorites.

- A list of the registered favorite settings appears. The Default Settings are registered in the initial settings.
- The settings of the favorite that you selected from Favorites appear.
- The comment registered to the favorite appears.
- You can change the print settings to the settings of the favorite that you selected from the Favorites list.
- You can delete favorites that have become unnecessary.
- The Edit dialog box opens.
You can change the name and icon settings of the favorite that you selected from the Favorites list. - The Add dialog box opens.
You can register the current settings as a favorite. - The setting in the application software will take priority over the favorites setting set on the printer driver.
The setting in the application software is only prioritized for Page Size, Orientation and Copies.
Place a checkmark to prioritize the settings for the application software. - You can read the settings of the favorite that was saved to a file (.cfg).
- You can save the settings of a favorite to a file (.cfg).
Favorites
Settings Details
Comment
Apply Favorite
Delete
Edit...
Add...
Application Settings Priority
Import...
Export...
Edit dialog box
You can change the name and icon of the favorite that you selected from the Favorites list.
- Changes name to be displayed in Favorites list.
- Changes icon to be displayed in Favorites list.
- Changes information to be displayed in Comment.
Name
Icon
Comment
Add dialog box
You can save the current print settings as the settings of a favorite.
- Set the name to be displayed in Favorites list.
- Set the icon to be displayed in Favorites list.
- Enter information to be displayed in Comment.
Name
Icon
Comment
The Utility tab allows you to perform printer maintenance or check the settings of the printer.
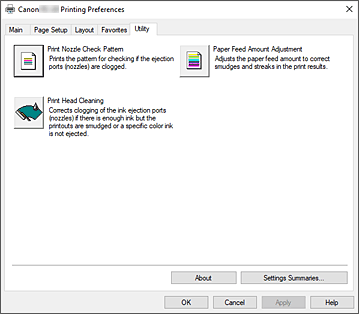
- Prints a nozzle check pattern.
Perform this function if printing becomes faint or a specific color fails to print. Print a nozzle check pattern, and check whether the print head is working properly.
If the print result for a specific color is fainted, or if there are any unprinted sections, use Print Head Cleaning to clean the print head.- Displayed using the Media Type, Page Size and Roll Paper Width for each currently set paper feed position.
Paper Source
- Performs print head cleaning.
Print head cleaning removes any blockage in the print head nozzles.
Perform cleaning when printing becomes faint, or a specific color fails to print, even though all ink levels are sufficiently high. - This function adjusts the paper feed amount if the print result is faint or contains streaks.
- Opens the About dialog box.
You can check information such as the version and copyright of the printer driver. - The Settings Summaries dialog box is displayed.
You can confirm the list of items set in the printer driver.
If you click the tab of each sheet, you can confirm the setting details of each item.
 Print
Nozzle Check Pattern
Print
Nozzle Check Pattern
 Print
Head Cleaning
Print
Head Cleaning
 Paper
Feed Amount Adjustment
Paper
Feed Amount Adjustment
About
Settings Summaries...
If your product issue was not resolved after following the steps above, or if you require additional help, please create or log in to your Canon Account to see your technical support options.
Or if you still need help, visit our Canon Community by clicking the button below to get answers:

____________________________________________________________________________________________