Replace ink tank(s) MP730 / MP700
| Article ID: ART157125 |
| |
Date published: 06/09/2015 |
| |
Date last updated: 08/17/2015 |
Description
Replace any ink tanks that are empty.
Solution
Replacing an ink tank
Use the following procedure to replace empty ink tanks:
- Make sure the device is powered on.
- Press the <Open> button (1) and lift up the scanning unit. The print head holder automatically moves to the center of the machine.

- Press on the tab to release the empty ink tank, then remove it from its slot.
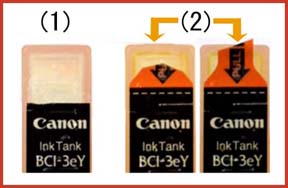
- On the new ink tank, pull the orange tape in the direction of the arrow and remove the plastic wrapper so you can see the air hole.
- Turn the ink tank over so that the protective cap is facing up. Then hold the ink tank and remove the protective cap.
- Insert the ink tank into the empty slot on the print head. Press down gently on the ink tank until an audible click is heard.
- Repeat steps 3 to 6 to replace another empty ink tank.
- Close the scanning unit until it locks into place.
- If additional ink tanks need to be replaced, replace them before starting a new print job.
