| Solution |
IMPORTANT
- In the following explanation, smartphone setting procedures are indicated by the
 icon, and camera setting procedures are indicated by the icon, and camera setting procedures are indicated by the  icon. icon.
- In this article, iPhones and iPads are collectively referred to as 'smartphones'.
NOTE
- Keep your fingers or other objects off the Wi-Fi antenna area. Covering this may decrease the speed of your image transfers.
- Connections require that a memory card be in the camera.
- Depending on the condition of the network you are using, it may take a long time to send movies. Be sure to keep an eye on the camera battery level.
- When sending movies to smartphones, note that the supported image quality varies depending on the smartphone. For details, refer to the smartphone user manual.
- On the screen, wireless signal strength is indicated by the following icons.
-[  ] high, [  ] medium, [  ] low, [  ] weak
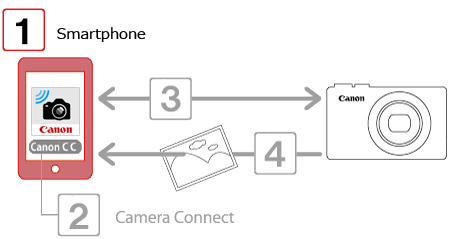
Getting Started
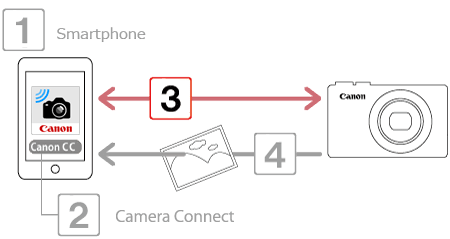
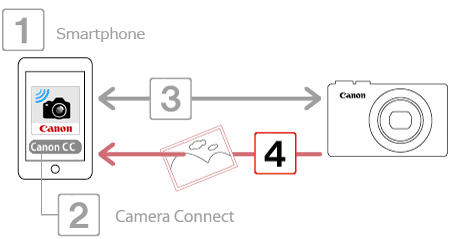
The procedure for using the Wi-Fi function to send images from a camera to an smartphone is explained in the following four steps. Proceed in order from Step 1.
 Step 1: Confirming the iOS version  Step 2: Installing Camera Connect on the smartphone and setting Wi-Fi to On.  Step 3: Connecting the camera to the smartphone  Step 4: Sending images to the smartphone.
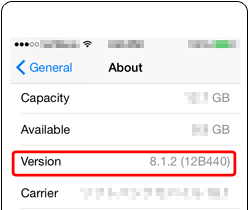
Step 1: Confirming the iOS version
1. Check the smartphoneâs specifications.
- To check the iOS version information, touch [Settings]
 [General] [About]. [General] [About].
IMPORTANT
Please refer to the related information for details on the smartphones which can be connected with a camera wirelessly.
Step 2: Installing Camera Connect on the smartphone and setting Wi-Fi to ON
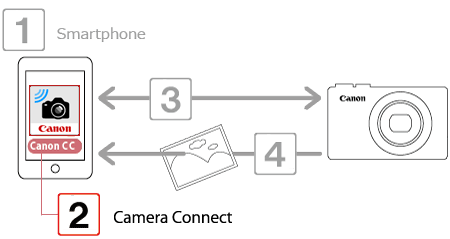
Download Camera Connect from the App Store and install it on the smartphone.
If Camera Connect is already installed on the iPhone, please proceed to
Step 3: Connecting the camera to the smartphone.
NOTE
- The example procedure is shown on an iPhone installed with iOS 8.1.
- The example screen images from the iPhone are used to explain the setting procedures and may differ from the screens shown on other models.
- Interface or functions of Camera Connect are subject to change, for application improvement or update. In such a case, features of Camera Connect may differ from sample screens or operation instructions in this explanation.
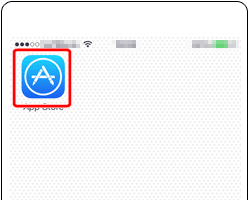
 1. Touch the [App Store] application on your smartphone to access the App Store.
IMPORTANT
- The Camera Connect application is free, but separate connection charges for accessing the App Store may be applicable.
- An Apple account is necessary to download Camera Connect.
- Downloading the application via a cellular network may take longer than downloading via Wi-Fi.
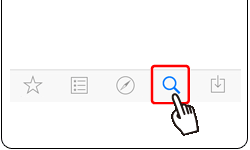
2. Tap the search icon.
3.  Enter [Camera Connect] in the search field, and then  tap [Search].
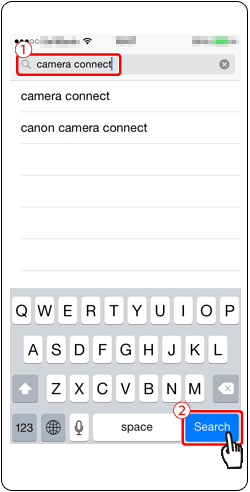
4. Choose [Camera Connect] from the displayed search results, and install it on the smartphone. After installation has been completed, tap the [Home] button to return to the Home Screen.
5. Touch [Settings].
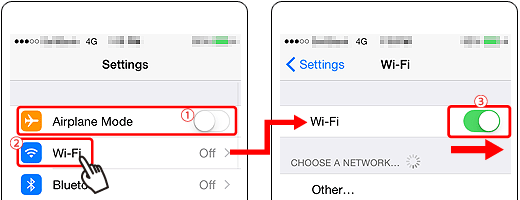
6. Confirm the smartphoneâs settings. : Make sure that [Airplane mode] is not set. : Touch [Wi-Fi].  : Set the [Wi-Fi] switch to [ON].
Step 3: Connecting the camera to the smartphone
IMPORTANT
The position and shape of the operation buttons, screens displayed, and setting items may differ according to the model you use.
- Procedures for using the two connection methods below are explained in the following sections.
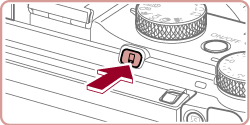
A: Registering the smartphone to the [  ] button and connecting.
NOTE
Simply press the [ ] button to connect the devices. This simplifies sending images to a smartphone.
B: Connecting via Wi-Fi.
[  ] Pressing the Wi-Fi button to connect with the smartphone, and saving images from the camera to the smartphone. ] Pressing the Wi-Fi button to connect with the smartphone, and saving images from the camera to the smartphone.
NOTE
You can connect the camera to a smartphone as you would connect it to a computer or other device. Multiple smartphones can be added.
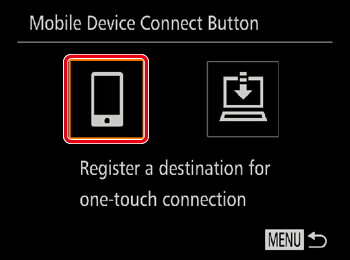
A. Pressing the Mobile Device Connect button to connect with the smartphone, and saving images from the camera to the smartphone.
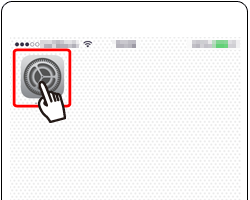
 A-1. Press the cameraâs [Mobile device connect] ( ) button. (Hereafter referred to as the [ ] button.)
NOTE
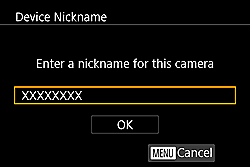
- When setting up Wi-Fi for the first time, the camera nickname registration screen will be displayed.
If the [Device Nickname] screen is displayed, press the [  ], [  ] buttons to choose [OK], and then press the [  ] button. You can change the device nickname (display name) that is displayed on the camera. To change the nickname, press the [ ], [ ] buttons to choose [Change Device Nickname] and press the [ ] button. Then, select the input field and press the [ ] button. Use the keyboard displayed to enter a new nickname.
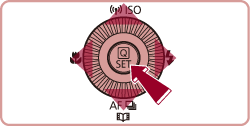
A-2. Press the [  ], [  ] buttons to choose [  ], and then press the [ ] button.

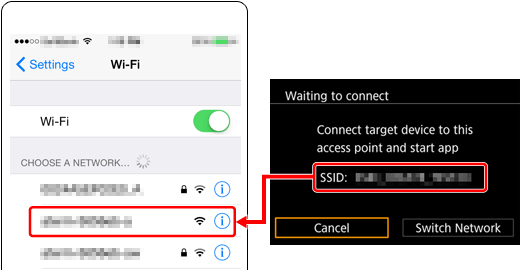
A-3. The cameraâs SSID is displayed on the screen.
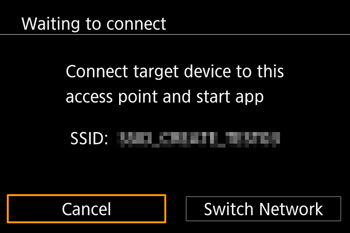
REFERENCE
- When you are in the vicinity of an access point that you have previously connected to, the camera will automatically connect to it.
- To change access points, select [Switch Network] from the screen that will be displayed when the connection is being established.
 A-4. Choose the SSID (network name) displayed on the cameraâs screen from the list of access points displayed on the smartphone.
NOTE
For better security, you can display a password on the screen by accessing MENU and choosing [  ] tab > [Wi-Fi Settings] > [Password] > [On]. In this case, enter the password displayed on the camera in the password field on the smartphone when it is displayed.
- After confirming that the iPhone and the camera are connected, touch the [Home Button] to return to the [Home Screen].
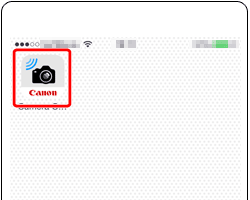
A-5. Tap the [Camera Connect] (  ) application icon on the smartphone to start [Camera Connect].
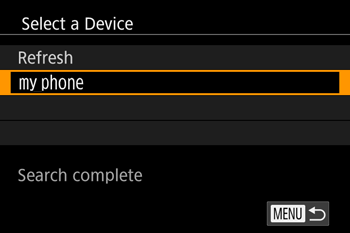
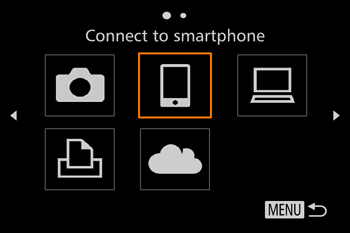
- After the camera recognizes the smartphone, a device selection screen is displayed.
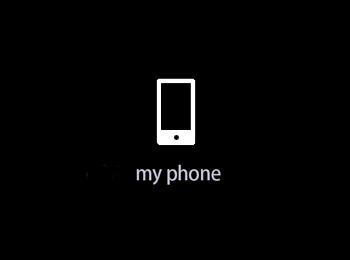
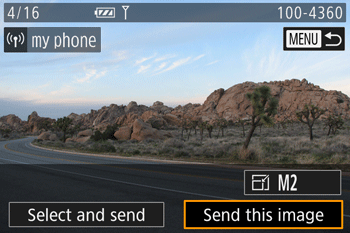
A-6. Press the [ ], [ ] buttons to choose the smartphone to connect with, and then press the [ ] button. *[my phone] is shown in the example image above.
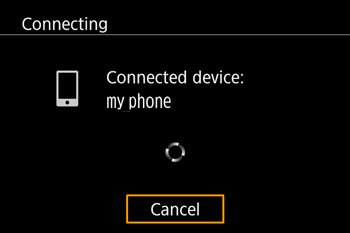
A-7. After a connection is established with the smartphone, the smartphoneâs name is displayed on the camera. (This screen will close in about one minute.)
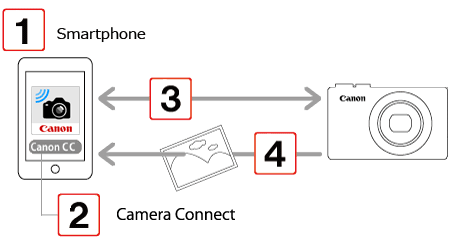
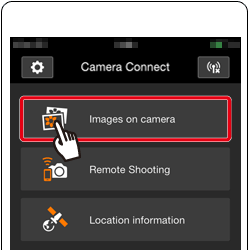
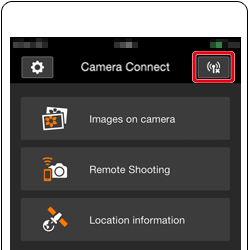
A-8. Touch [Images on camera ] in Camera Connect.
REFERENCE
- Once you have connected to a smartphone initially via Wi-Fi by pressing the [ ] (Mobile device connection) button, you can simply press the [ ] (Mobile device connection) button after that to connect again for viewing and saving camera images on connected devices.
- One smartphone can be registered to the [ ] (Mobile device connection) button.
- Once a connection has been established with a smartphone, you can automatically reconnect to the registered device by simply pressing the [ ] button, even if the camera has been turned off.
NOTE
Please proceed to Step 4: Sending images to the smartphone.
B : [ ] Pressing the Wi-Fi button to connect with the smartphone, and saving images from the camera to the smartphone.
B-1. Press the [Playback] (  ) button to turn the camera on.
B-2. Press the [Wi-Fi ] ( ) button.
NOTE
- When setting up Wi-Fi for the first time, the camera nickname registration screen will be displayed.
This nickname will be displayed on [Select a Device] screen when connecting to other devices via Wi-Fi.
If the [Device Nickname] screen is displayed, press the [ ], [ ] buttons to choose [OK], and then press the [ ] button. You can change the device nickname (display name) that is displayed on the camera. To change the nickname, press the [ ], [ ] buttons to choose [Change Device Nickname] and press the [ ] button. Then, select the input field and press the [ ] button. Use the keyboard displayed to enter a new nickname.
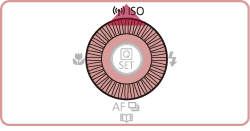
B-3. Press the [ ], [ ], [ ], [ ] buttons to choose [ ], and then press the [ ] button.
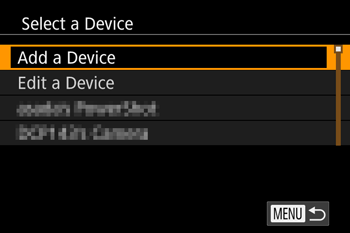
B-4. Press the [ ], [ ] buttons to choose [Add a Device], and then press the [ ] button.
B-5. The cameraâs SSID is displayed on the screen.
B-6. Choose the SSID (network name) displayed on the cameraâs screen from the list of access points displayed on the smartphone.
NOTE
For better security, you can display a password on the screen by accessing the MENU and choosing [ ] tab [Wi-Fi Settings] [Password] [On]. In this case, enter the password displayed on the camera in the password field on the smartphone when it is displayed.
- After confirming that the smartphone and the camera are connected, touch the [Home Button] to return to the [Home Screen].
B-7. Tap the [Camera Connect] ( ) application icon on the iPhone to start [Camera Connect].
- After the camera recognizes the smartphone, a device selection screen is displayed.
B-8. Press the [ ], [ ] buttons to choose the smartphone to connect with, and then press the [ ] button. *[my phone] is shown in the example image above.
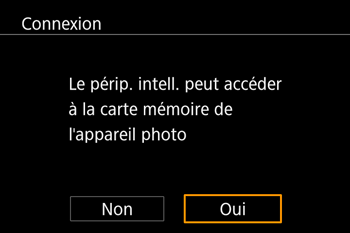
B-9. [Press the [ ], [ ] buttons to choose [Yes], and then press the [ ] button. You can now use the smartphone to browse, import, or geotag images on the camera or shoot remotely.
REFERENCE
- You can change privacy settings for registered smartphones.
B-10. A screen like the one below will appear.
B-11. Once you have connected to the smartphone, a screen like the one below will appear.
NOTE
- You can connect to smartphones that you have already connected to by choosing them on the [Select a Device] screen in step B-4.
- After you have accessed the Wi-Fi menu once, you can access it again by pressing the [ ] button. The recent target device is listed first, so you can easily connect again by pressing the [ ], [ ] buttons to choose it. To add a new device, display the device selection screen by pressing the [ ], [ ] buttons, and then configure the setting. If you prefer not to display recent target devices, press the [MENU] button, and on the [ ] tab, choose [Wi-Fi Settings] [Target History] [Off].
- To add multiple smartphones, repeat the above procedures starting from step B-3.
B-12. Touch [Images on camera ] in Camera Connect.
Please proceed to Step 4: Sending images to the smartphone.
Step 4: Sending images to the smartphone
1. Use the smartphone to import images from the camera to the smartphone. When the camera is connected to the smartphone, a list of the images on the camera will appear in [Camera Connect].
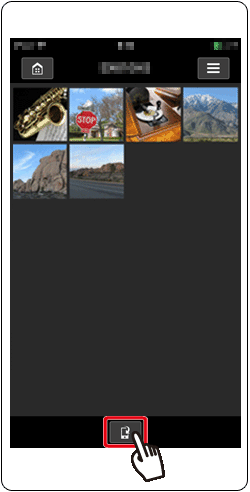
2. After the screen refreshes, choose the desired images, and then touch [Save] on the bottom right of the screen. The selected images will be saved to the smartphone.
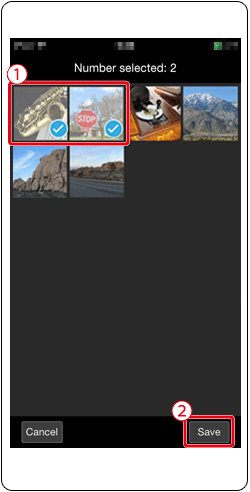
3. After the images have been saved, touch the [Home] button to return to the menu screen.

4. To end the connection, touch the [  ] icon displayed in the upper right of the screen, and then touch [Yes].

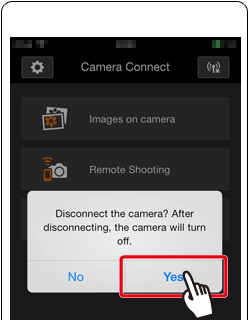
When the connection is ended, the camera will automatically turn off.
NOTE
- To control the camera manually, either end the connection from the smartphone or restart the camera after pressing the power button to turn it off momentarily.
|