
Setting the Wireless LAN to Use from Other Computers
| Article ID: ART165378 | | | Date published: 04/13/2016 | | | Date last updated: 09/12/2017 |
Description
Setting the Wireless LAN to Use from Other Computers
Solution
| Solution |
Installation Preparations and Precautions This explains the preparations for installing the MF driver and software correctly, and precautions to take when installing.
 Installation Preparations Installation PreparationsBefore installing the MF driver and MF Scan Utility, complete the following operations.
Set the following items with the [System Management Settings] menu > [PDL Selection (Plug and Play)] of the device.
- Connection method with the device (network or USB)
- Page description language (UFRII LT, UFRII LT (V4), PCL6, PS, or FAX*)
*Can be used only when connected to the device via a network.
For details about the setting menus, refer to the manual of the device.
You can acquire the installer by any of the following means.
- Download from the web site (http://www.canon.com/) (32-bit or 64-bit version)
- Supplied DVD-ROM : In some cases, the installer may be provided on a CD-ROM. If you use a CD-ROM, read CD-ROM for DVD-ROM in the explanations of the manual.
Precautions to Be Taken When InstallingTake care of the following items when installing.
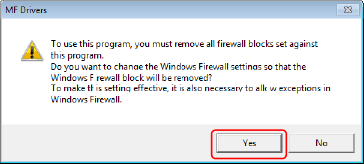
- If you are logged on with an Administrator account: Click [Allow] or [Continue].
- If you are logged on with a standard user account: Enter an Administrator account password â click [OK].
- An environment in which communication between the domain controller and client operating system is not possible.
- You are logged onto a client computer as a domain user belonging to a group with Administrator privileges.
Confirm the status of the user account you are logged on in [Computer Management] > [Local Users and Groups] > [Groups].
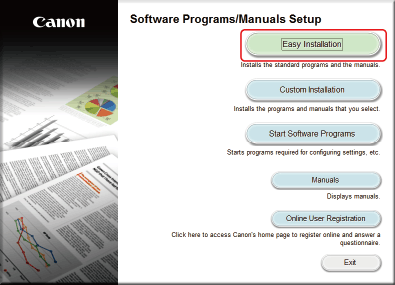
Installing with [Easy Installation] Confirm that the following conditions are satisfied. Complete the preparation operations.
If you do not know the network environment you are using, check with your network administrator.
1. Set the DVD-ROM in the computer â click [Easy Installation].
If the DVD-ROM menu is not displayed, in the following procedure, start the installer. For the DVD-ROM drive name, enter "D:."
Enter "D:\MInst.exe" in [Search the Web and Windows] â press the [ENTER] key on the keyboard.
[
 ] (Start) > enter "D:\MInst.exe" in [Search programs and files] or [Start Search] â press the [ENTER] key on the keyboard. ] (Start) > enter "D:\MInst.exe" in [Search programs and files] or [Start Search] â press the [ENTER] key on the keyboard.
Right-click the lower left corner of the screen â [Run] > enter "D:\MInst.exe" â click [OK].
Right-click the [Start] screen â [Run] > enter "D:\MInst.exe" â click [OK].
[
] (Start) > [Run] > enter "D:\MInst.exe" â click [OK].
Click [Run MInst.exe].
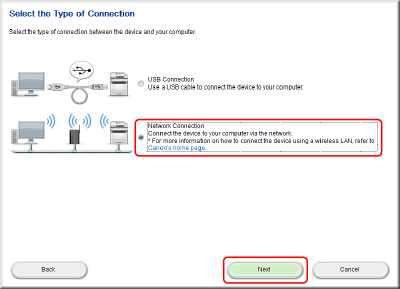
2. If the following screen is displayed, select [Network Connection] â click [Next].
3. Click [Install].
4. Read the license agreement â click [Yes].
5. Click [Next].
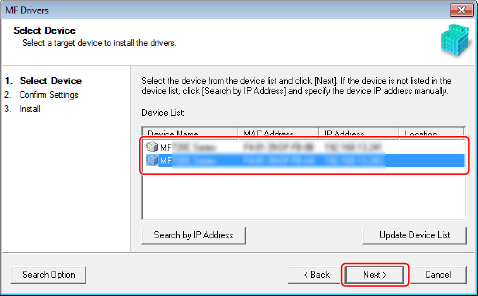
6. Select the device you are using â click [Next].

7. Check the settings â click [Start].
8. Install the software according to the instructions on the screen.
9. Eject the DVD-ROM, select [Restart Computer Now (Recommended)], and click [Restart].
Installing with [Custom Installation] Confirm that the following conditions are satisfied. Complete the preparation operations.
If you do not know the network environment you are using, check with your network administrator.
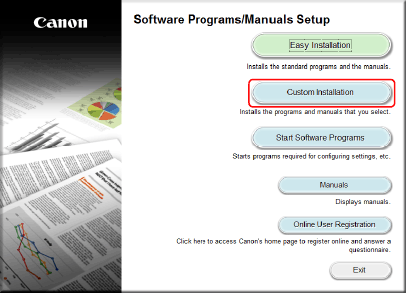
1. Set the DVD-ROM in the computer â click [Custom Installation].
If the DVD-ROM menu is not displayed, in the following procedure, start the installer. For the DVD-ROM drive name, enter "D:."
Enter "D:\MInst.exe" in [Search the Web and Windows] â press the [ENTER] key on the keyboard.
[
] (Start) > enter "D:\MInst.exe" in [Search programs and files] or [Start Search] â press the [ENTER] key on the keyboard.
Right-click the lower left corner of the screen â [Run] > enter "D:\MInst.exe" â click [OK].
Right-click the [Start] screen â [Run] > enter "D:\MInst.exe" â click [OK].
[
] (Start) > [Run] > enter "D:\MInst.exe" â click [OK].
Click [Run MInst.exe].
2. If the following screen is displayed, select [Network Connection] â click [Next].
3. Select the software you want to install â click [Install].
4. Read the license agreement â click [Yes].
5. Click [Next].
6. Select the device you are using â click [Next].
7. Select the driver to install â click [Next] â set as required.
If a list of drivers corresponding to the page description language is displayed after selecting a printer driver in the [Select Driver] screen, select the driver you are going to use.
If you want to use the install destination computer as a print server, select the following.
8. Check the settings â click [Start].
9. Setting the default printer and test printing.
When setting as a default driver: select the driver â click [Next]
When test printing: select the check box of the driver
10. Click [Exit].
11. If you selected MF Scan Utility, check the instructions on the screen â click [Next] if you want to continue with the installation.
12. Install the software according to the instructions on the screen â click [Next].
13. Eject the DVD-ROM, select [Restart Computer Now (Recommended)], and click [Restart].
Checking the Results of the Installation If installed correctly, an MF driver or software icon is displayed in the locations shown next. If the icon is not displayed, uninstall the MF driver or software and reinstall it.
For a printer driver or fax driver:
[Settings] > [Devices] > [Printers & scanners] > [Printers]
Windows Control Panel > [Devices and Printers], [Printers], or [Printers and Faxes].
For a scanner driver:Windows Control Panel > [Scanners and Cameras].
For MF Scan Utility
Start menu > List of apps
Click [
 ] in the lower left corner of the [Start] screen â [Apps] screen > [Canon] folder > [MF Scan Utility] folder ] in the lower left corner of the [Start] screen â [Apps] screen > [Canon] folder > [MF Scan Utility] folder
[
] (Start) or [Start] menu > [Canon] folder > [MF Scan Utility] folder
For other software or electronic manuals:Taskbar or [Desktop] screen
|
|
ID: 8202834300_EN_1
|
|
SIMS Doc Id
8202834300