|
|
EOS R6 Mark II: Transferring Images to an FTP Server
| Article ID: ART182298 |
| |
Date published: 05/11/2023 |
| |
Date last updated: 09/13/2023 |
Description
Transferring Images to an FTP Server
Solution
|
Transferring Images to an FTP Server
By connecting to an FTP server, you can send images on the camera to a computer.
With FTP transfer, you can automatically transfer each image to the FTP server as you shoot or transfer a set of images together.
Connecting the Camera to an FTP Server
For secure FTP transfer using a root certificate, import a root certificate ().
-
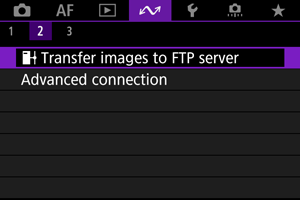
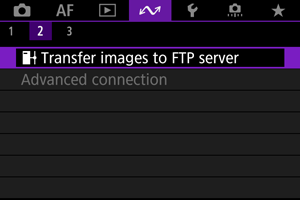
Select [ : :  Transfer images to FTP server]. Transfer images to FTP server].
-
Select [OK].
- This screen is not displayed if the Wi-Fi setting is already set to [Enable].
-
Select [Add a device to connect to].
-
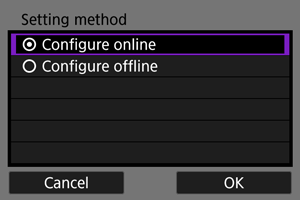
Select a setting method.
- To skip configuration of access point connection settings, select [Configure offline] and go to step 6 to configure FTP server settings. Select this option when specifying an access point at a remote location.
-
Establish a Wi-Fi connection.
-
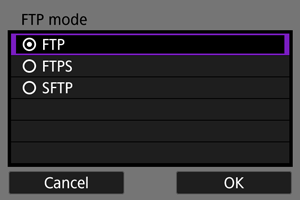
Select an FTP mode.
- For secure FTP transfer using a root certificate, select [FTPS].
- For secure FTP transfer over an SSH connection, select [SFTP]. Login settings are configured in step 10.
- Select [OK] to go to the next screen.
-
Select [Address setting].
- Select [OK] to go to the next screen.
-
Enter the FTP server IP address.
- Use the virtual keyboard () to enter the IP address. If DNS is used, enter the domain name.
- To confirm input and return to the screen in step 7, press the
 button. button.
-
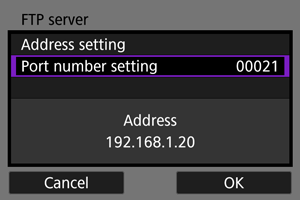
Configure the port number.
- Normally, set [Port number setting] to 00021 (for FTP/FTPS) or 00022 (for SFTP).
- Select [OK] to go to the next screen.
- Go to step 11 if you selected [FTP] or [FTPS] in step 6. Go to step 10 if you selected [SFTP].
-
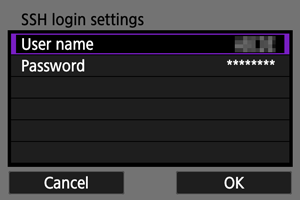
Configure the SSH login authentication settings.
- Select [User name] and [Password] to access the virtual keyboard () and enter the user name and password for SSH password authentication.
- Select [OK] to go to the next screen.
-
Configure the passive mode setting.
- Not displayed if you selected [SFTP] in step 6.
- Select [OK] to go to the next screen.
- Enable this setting in network environments protected by a firewall.
- If an Error 41 (Cannot connect to FTP server) is displayed in step 14, setting [Passive mode] to [Enable] may resolve it.
-
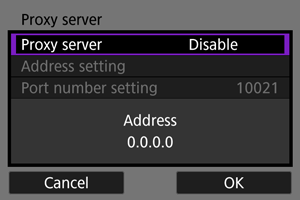
Configure proxy server settings.
- Not displayed if you selected [FTPS] or [SFTP] in step 6.
- Select [OK] to go to the next screen.
-
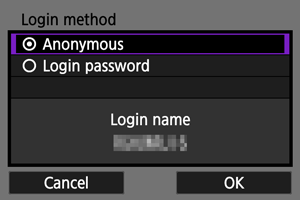
Configure the login method.
- Not displayed if you selected [SFTP] in step 6.
- Select [OK] to go to the next screen.
-
Specify a target folder.
- Select [Root folder] to have images saved in the root folder, as specified in FTP server settings ().
- Select [Select folder] to specify a target folder in the root folder. If the folder does not exist, it is created automatically.
- Select [OK] to go to the next screen.
-
Press the  button. button.
- If you selected [Configure online] in step 4, the [Wi-Fi on] screen appears ().
- Not displayed if you selected [Configure offline] in step 4.
Connection settings for FTP transfer are now complete.
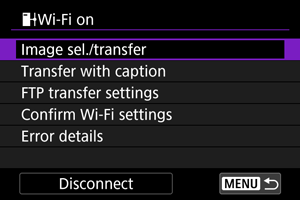
[Wi-Fi on] screen
-
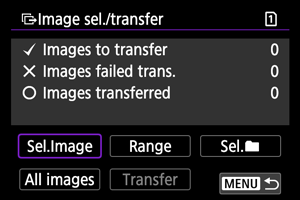
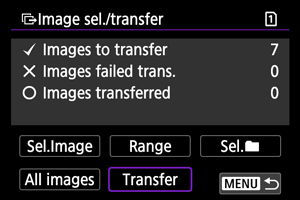
Image sel./transfer
Images can be transferred to an FTP server ().
-
Transfer with caption
You can add a registered caption to individual images before transfer ().
-
FTP transfer settings
You can configure settings related to FTP transfer and power saving ().
-
Confirm Wi-Fi settings
You can check setting details for Wi-Fi connections.
-
Error details
After any Wi-Fi connection errors, you can check the error details ().
-
Disconnect
Terminates the Wi-Fi connection.
Importing a root certificate for FTPS
If you specified [FTPS] FTP mode when configuring connection settings, the root certificate used by the FTP server must be imported to the camera.
- Only the root certificate with a file name of “ROOT.CER,” “ROOT.CRT,” or “ROOT.PEM” can be imported to the camera.
- Only one root certificate file can be imported to the camera. Insert a card containing the root certificate file in advance.
- The priority card selected for [Record/play] or [Playback] in [
 : Record func+card/folder sel.] is used to import a certificate. : Record func+card/folder sel.] is used to import a certificate.
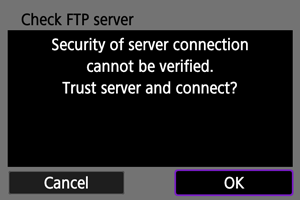
- It may not be possible to trust servers you try to connect to in FTPS connections with a self-signed certificate.
-
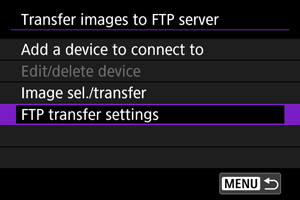
Access the [Transfer images to FTP server] screen.
-
Select [FTP transfer settings].
-
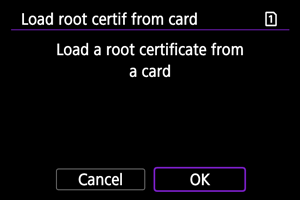
Select [Set root certif].
-
Select [Load root certif from card].
-
Select [OK].
- The root certificate is imported.
- Select [OK] on the confirmation screen to return to the [Set root certif] screen.
Note
- To delete the root certificate imported to the camera, select [Delete root certificate] on the screen in step 4. To check who it was issued to and issued by, the period of validity, and other information, select [View root certificate details].
Transferring Images Individually
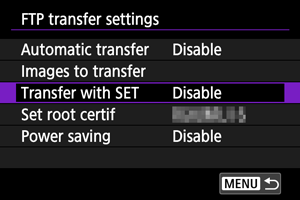
Automatic transfer after each shot
Each image can be immediately transferred to the FTP server automatically after your shot. You can continue shooting still photos as usual while images are being transferred.
-
Select [: Transfer images to FTP server].
-
Select [FTP transfer settings].
-
Select [Automatic transfer].
-
Select [Enable].
-
Take the picture.
- The captured image is transferred to the FTP server.
Caution
- Images cannot be erased during image transfer.
Note
- During continuous shooting, images are transferred to the FTP server in the order they are captured.
- Captured images are also stored on the card.
- Any images for which transfer fails or is interrupted will be transferred automatically when the connection is recovered (). These images can also be transferred together manually at a later time ().
- Repeated automatic transfer is not attempted if network settings (such as FTP server settings) are changed before automatic FTP transfer begins.
Transferring the current image
Enables you to transfer the image you are viewing simply by pressing the button. You can continue shooting still photos as usual while images are being transferred.
-
Access the [FTP transfer settings] screen.
-
Select [Transfer with SET].
-
Select [Enable].
-
Select an image.
- On the camera, press the
 button. button.
- Select an image to transfer, then press the button to transfer the image.
- Movies cannot be transferred this way. Selecting a movie and pressing the button will display the movie playback panel.
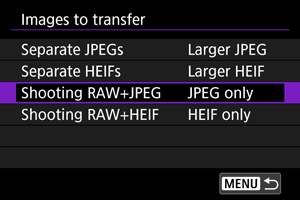
Specifying sizes or types of images to transfer
You can specify which images to transfer when recording images of different sizes to both cards, or when shooting RAW+JPEG or RAW+HEIF images.
-
Access the [FTP transfer settings] screen.
-
Select [Images to transfer].
-
Select the size of images to transfer.
-
Select the type of images to transfer.
-
Shooting RAW+JPEG
Choose from [JPEG only], [RAW only] or [RAW+JPEG].
-
Shooting RAW+HEIF
Choose from [HEIF only], [RAW only] or [RAW+HEIF].
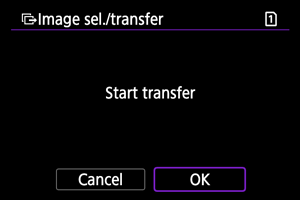
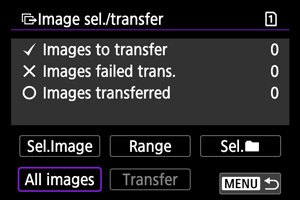
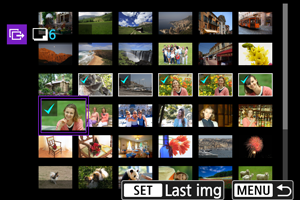
Transferring Multiple Images at Once
After shooting, you can select multiple images and transfer them all at once, or you can transfer unsent images or images that could not be sent previously.
You can continue shooting still photos as usual during transfer.
Caution
- Image transfer in progress is paused while the still photo shooting/movie recording switch is set to
 . To resume image transfer, set it to . To resume image transfer, set it to  . .
- If you will transfer many images, consider using a household power outlet accessory (sold separately).
Adding a Caption Before Transfer
You can add a registered caption to each image before transfer. This is convenient if you want to inform the recipient of the printing quantity, for example. Captions are also added to images saved to the camera.
- You can check captions added to images by examining the Exif information, in the user comments.
- Captions can be created and registered with EOS Utility ().
-
Access the [Image transfer] screen.
-
Select [Transfer with caption].
- The last image viewed is displayed.
-
Specify the caption.
-
Select [Transfer].
- The image is transferred with the caption. After transfer, display returns to the [Image transfer] screen.
Caution
- Other images cannot be selected from the [Transfer with caption] screen. To select another image for transfer with a caption, view that image before following these steps.
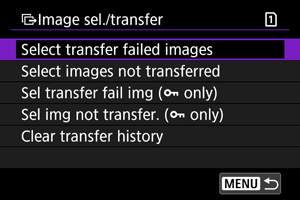
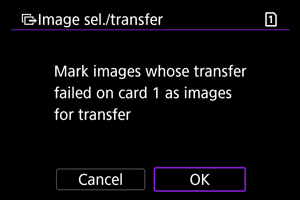
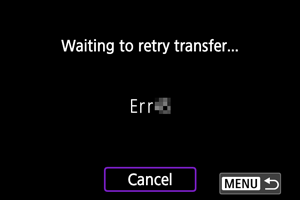
Auto Retry If Transfer Fails
If transfer fails, the Wi-Fi icon blinks temporarily. In this case, the following screen is displayed after you press the button and select [: Transfer images to FTP server].
To resolve the error displayed, see Responding to Error Messages.
Once you have resolved the issue, the images that could not be sent initially will be transferred automatically. With this option activated, transfer is attempted again automatically after failure, whether automatic transfer is used or captured images are transferred manually via FTP. Note that if you cancel transfer or turn the camera off, auto retry is not attempted.
See Transferring Multiple Images at Once and transfer images as needed.
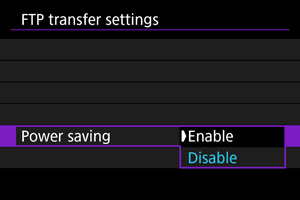
Using the Power Saving Function
When [Enable] is set and no image is transferred for a certain period, the camera will log off from the FTP server and end the Wi-Fi connection. The connection is re-established automatically when the camera is ready for image transfer again. If you prefer not to end the Wi-Fi connection, set to [Disable].
-
Select [: Transfer images to FTP server].
-
Select [FTP transfer settings].
-
Select [Power saving].
Viewing Transferred Images
Images transferred to the FTP server are stored in the following folder as specified in the FTP server settings.
Transferring Images with Mobile File Transfer
Using the Mobile File Transfer smartphone app, you can transfer images from the camera to FTP servers over a mobile network connection.
Refer to the following website for instructions on transferring images with Mobile File Transfer.
|
SIMS Doc Id
1679063428917000584
|