
Use the Printer Driver - LX-D5500 / LX-P5510
| Article ID: ART183614 | | | Date published: 06/20/2023 | | | Date last updated: 07/11/2023 |
Description
This article provides information on using the printer driver of the LX-D5500 / LX-P5510.
Solution
Select an option below for more information.
There are multiple ways to access the printer driver and adjust settings:
- Opening the printer driver setup window from the application
The settings are effective only for the document that is currently open.
- Opening the printer driver setup window from [Printers & scanners]
The settings are effective for all documents.
- Opening the Properties window
Display the [Utility] tab to perform printer maintenance or change printer settings.
Opening the Printer Driver Setup Window from the Application
 The procedure may be different depending on the application you print from. For more details, refer to the Instruction Manual that comes with your application.
- Select [Print] from the [Files] menu or toolbar of the application.
The Print dialog box appears.
- Select [Canon LX-D5500] (or [Canon LX-P5510]) and then click [Preferences] (or [Properties]).
The printer driver setup window appears.
Opening the Printer Driver Setup Window from [Printers & scanners]
- Click the search icon on the taskbar, enter [Printers & scanners] in the search box.
- Select [Canon LX-D5500] (or [Canon LX-P5510] > [Manage] > [Printing Preferences].
Windows 11:
Select [Canon LX-D5500] (or [Canon LX-P5510] > [Printing Preferences].
The printer driver setup window appears.
 The settings that can be configured on the [Utility] tab of the printer properties window are different from those that can be configured on the [Utility] tab of the printing preferences window.
Opening the Printer Properties Window
- Click the search icon on the taskbar, enter [Printers & scanners] in the search box.
- Select [Canon LX-D5500] (or [Canon LX-P5510] > [Manage] > [Printer Properties].
Windows 11:
Select [Canon LX-D5500] (or [Canon LX-P5510] > [Printer Properties].
The printer properties window appears.
Some Windows functions and print settings are displayed in the printer properties window. Print settings are located in the [General] tab and the [Utility] tab of the printer properties window. Refer to Windows product documentation for information related to Windows functions. The settings that can be configured on the [Utility] tab of the printer properties window are different from those that can be configured on the [Utility] tab of the printing preferences window.
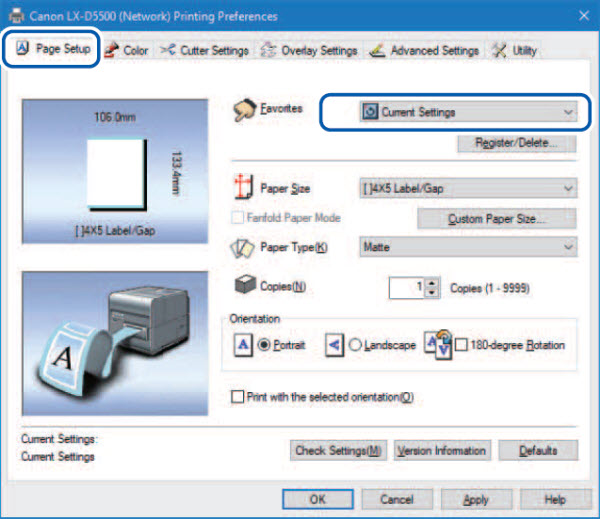
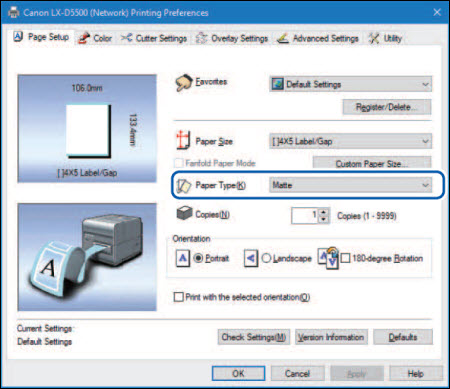
Changes to paper size, paper type, number of copies, page orientation and more can be adjusted in the [Page Setup] tab of the [Printing Preferences] window.
For LX-D5500 |
|
![[Page Setup] tab of the [Printing Preferences] window](https://support.usa.canon.com/library/CANON/CITS_TECH_SUPPORT/Printers/LX-D5500/Printer%20Driver/page_setup_tab.jpg) |
|
For LX-P5510 |
|
|
|
|
|
|
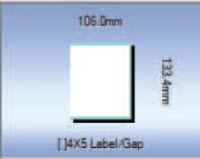
Paper Size Preview |
| The current paper size is displayed in a preview. | |
|
|
Print Orientation Preview |
| Paper orientation for printing is displayed in a preview. | |
|
|
Favorites |
| Register commonly used print settings. | |
|
|
Register / Delete |
| Register or delete Favorites. | |
|
|
Paper Size |
| Set a paper size. | |
|
|
Custom Paper Size |
| Set an optional paper size. | |
|
|
Paper Type |
| Set a paper type. | |
|
|
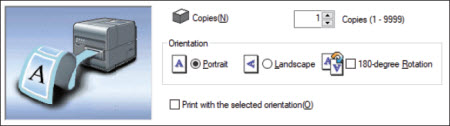
Copies |
| Set the number of copies to print. | |
|
|
Orientation |
| Set the orientation of printing on the paper. | |
|
|
Print with the selected orientation |
| Click the check box on when printing with the selected the [Orientation]. | |
|
|
Fanfold Paper Mode |
| If [Special Settings] has been configured to use fanfold paper, the check box appears checked. | |
|
|
Check Settings |
| Displays the current print settings. | |
|
|
Version Information |
| Displays the printer driver version and copyright information. | |
|
|
Defaults |
| Reset the [Page Setup] tab to its defaults. | |
|
|
|
![[Page Setup] tab of the [Printing Preferences] window](https://support.usa.canon.com/library/CANON/CITS_TECH_SUPPORT/Printers/LX-P5510/Printer%20Driver/page_setup_tab.jpg)
Registration of Favorites
Frequently used print settings can be registered using [ Favorites]. Selecting a registered favorite from the [Favorites List] allows you to make prints with the registered print settings.
Up to ten print settings can be registered in [Favorites].
When the [Settings] screen of the printer driver is displayed from the application, it is not possible to register or delete settings in / from [Favorites]. To do so, display the [Settings] screen of the printer driver from the [Printers & scanners] of Windows.
|
|
 |
|
![[Register / Delete] circled](https://support.usa.canon.com/library/CANON/CITS_TECH_SUPPORT/Printers/LX-D5500/Printer%20Driver/register_delete_circled.jpg) |
|
The Register / Delete Favorites dialog box appears. |
|
|
|
|
A confirmation message appears. |
|
|
|
![[Yes] circled](https://support.usa.canon.com/library/CANON/CITS_TECH_SUPPORT/Printers/LX-D5500/Printer%20Driver/click_yes_setting_file_name.jpg) |
|
The print settings are registered in the [Favorites]. |
|
![[OK] circled](https://support.usa.canon.com/library/CANON/CITS_TECH_SUPPORT/Printers/LX-D5500/Printer%20Driver/click_OK_confirm_setting_file_name.jpg) |
|
|
![[Setting File Name] specified](https://support.usa.canon.com/library/CANON/CITS_TECH_SUPPORT/Printers/LX-D5500/Printer%20Driver/setting_name_entered.jpg)
Default Settings
Default settings are as follows:
LX-D5500
| Tab Name | Item Name | Setting |
| Page Setup | Paper Size | [ ]4 x 5 Label / Gap |
| Paper Type | Matte | |
| Copies | 1 | |
| Orientation | Portrait | |
| 180-degree Rotation | Off | |
| Print with the selected orientation | Off | |
| Color | Resolution | Input resolution 600dpi |
| Half-tone Process | Error Diffusion | |
| Color Correction | Driver Correction | |
| Monochrome Print | Off | |
| Print the gradation smoothly * | Off | |
| Sharpness * | 0 (None) | |
| Color Balance * | Bk/C/M/Y All 0 | |
| Brightness * | Normal | |
| Density* | 0 | |
| Contrast * | 0 | |
| Cutter Settings** | Auto Cutter | Off |
| Overlay Settings | Overlay | Off |
| Print Mode | - | |
| Preview | - | |
| Comment | - | |
| Print the overlay with simple setting | - | |
| Advanced Settings | Print Order | Ascend |
| Paper Speed | 200mm / sec (7.9 inch / sec) |
* Items in the Detailed Settings dialog box.
** Use [Cutter Settings] tab when an optional auto cutter is installed.
LX-P5510
| Tab Name | Item Name | Setting |
| Page Setup | Paper Size | [ ]4 x 5 Label / Gap |
| Paper Type | Matte Paper | |
| Copies | 1 | |
| Orientation | Portrait | |
| 180-degree Rotation | Off | |
| Print with the selected orientation | Off | |
| Print Setup | Resolution | Input resolution 1200dpi |
| Automatic Speed | Off | |
| Paper Speed | 150mm / sec (5.9 inch / sec) | |
| Print Order | Ascend | |
| Color Correction | Driver Correction | |
| Monochrome Print | Off | |
| Economy print mode * | Off | |
| Sharpness * | 0 (None) | |
| Color Balance * | Bk / C / M / Y All 0 | |
| Brightness * | Normal | |
| Density* | 0 | |
| Contrast * | 0 | |
| Cutter Settings** | Auto Cutter | Off |
| Overlay Settings | Overlay | Off |
| Print Mode | - | |
| Preview | - | |
| Comment | - | |
| Print the overlay with simple setting | - |
* Items in the Detailed Settings dialog box.
** Use [Cutter Settings] tab when an optional auto cutter is installed.
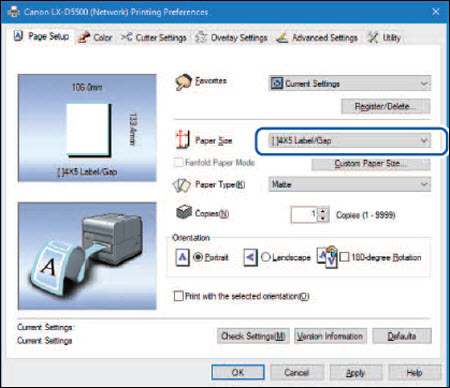
Selecting the Paper Size
Select the size of the paper to use for printing from the pull-down menu.
 |
|
|
|
|
Standard label paper
In addition to the three selections for standard paper sizes, you can also register twelve custom paper sizes.
| Paper Size | Paper Form | Paper Size (W x L) mm |
Margins mm | Gap / Mark mm | Gap mm | ||||
| Top | Bottom | Left | Right | Left | Right | ||||
| 4 X 1.5 Label / Gap | Label / Gap | 97.3 × 38.1 | 1.5 | 1.5 | 1.5 | 1.5 | 2.5 | 2.0 | 2.3 |
| 4 X 3 Label / Gap | Label / Gap | 97.3 × 76.2 | 1.5 | 1.5 | 1.5 | 1.5 | 2.5 | 2.0 | 2.3 |
| 4 X 5 Label / Gap | Label / Gap | 101.6 × 127 | 1.5 | 1.5 | 3.0 | 1.5 | 6.4 | 0.5 | 3.9 |
| 4 X 8 Label / Gap | Label / Gap | 97.3 × 203.2 | 1.5 | 1.5 | 1.5 | 1.5 | 2.5 | 2.0 | 2.3 |
| 2 X 1.5 Label / Gap | Label / Gap | 46.5 × 38.1 | 1.5 | 1.5 | 1.5 | 1.5 | 2.5 | 2.0 | 2.3 |
| 2 X 3 Label / Gap | Label / Gap | 46.5 × 76.2 | 1.5 | 1.5 | 1.5 | 1.5 | 2.5 | 2.0 | 2.3 |
| 2 X 8 Label / Gap | Label / Gap | 46.5 × 203.2 | 1.5 | 1.5 | 1.5 | 1.5 | 2.5 | 2.0 | 2.3 |
Customize
It is possible to register in the printer driver a desired paper size (width, length, etc.) which cannot be selected from the [Paper Size] pull-down menu of the printer driver as "Customize."
However, this setting is effective only for the documents that are currently open.
| Paper Size | Paper Form | Paper Size (W x L) mm |
Margins mm | Gap / Mark mm | Gap mm | ||||
| Top | Bottom | Left | Right | Left | Right | ||||
| Customize | Label / Gap | 101.6 × 127 | 1.5 | 1.5 | 3.0 | 1.5 | 6.4 | 0.5 | 3.9 |
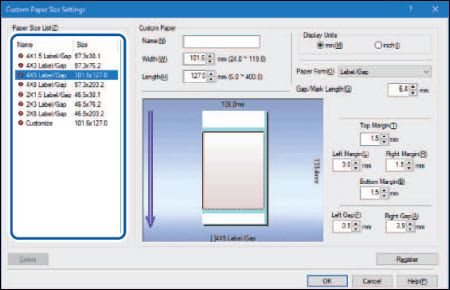
Setting a Custom Paper Size
If the desired paper size is not found in the [Paper Size], set a new paper size in the [Custom Paper Size Settings].
This setting is effective for all documents.
Registering this setting as a custom paper size allows the size to be selected from the [Paper Size] pulldown menu. Up to 50 different paper sizes.
Preregistered paper settings marked with ( ) cannot be deleted.
|
![[Custom Paper Size] circled](https://support.usa.canon.com/library/CANON/CITS_TECH_SUPPORT/Printers/LX-D5500/Printer%20Driver/custom_paper_size_circled.jpg) |
|
The Custom Paper Size Settings dialog box opens. |
|
 |
|
|
|
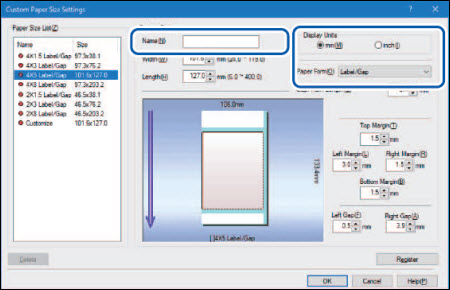
| Name | Enter the name of new paper in the [Name] text box. Up to 15 characters can be entered. Spaces and tabs cannot be used. |
||||||||||||
| Display Unit | Either mm or inch can be set. | ||||||||||||
| Paper Form | Select one of the following paper form.
|
|
 |
|
![[Register] circled](https://support.usa.canon.com/library/CANON/CITS_TECH_SUPPORT/Printers/LX-D5500/Printer%20Driver/click_register.jpg) |
|
A confirmation message appears. |
|
![[Yes] circled](https://support.usa.canon.com/library/CANON/CITS_TECH_SUPPORT/Printers/LX-D5500/Printer%20Driver/click_yes_label-001.jpg) |
|
![[OK] circled](https://support.usa.canon.com/library/CANON/CITS_TECH_SUPPORT/Printers/LX-D5500/Printer%20Driver/custom_paper_size_click_OK.jpg) |
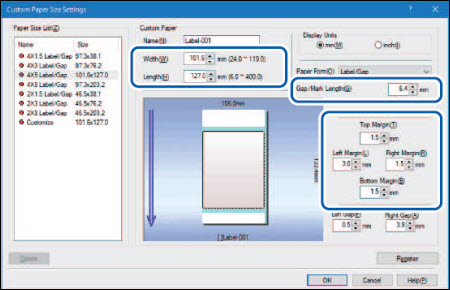
Ranges of Custom Paper Sizes
Custom paper sizes can be selected from a range of values that are dependant on the paper type and form. Enter values within the ranges indicated in the table below.
*1 Paper length: Length from the center of a mark to the center of the next mark.
*2 Top margin (bottom margin):Total of the half of the mark length and the top (bottom) margin of the label.
- Label / Gap
| Minimum | Maximum | |
| Paper Width mm (inch) | 24.0 (0.94) | 119.0 (4.68) |
| Paper Length mm (inch) | 6.0 (0.24) | 500.0 (19.69) |
| Top margin mm (inch) | 1.5 (0.06) | Paper Length - 3 (0.12) - Bottom margin |
| Bottom margin mm (inch) | 1.5 (0.06) | Paper Length - 3 (0.12) - Top margin |
| Left margin mm (inch) | 1.5 (0.06) | Paper Width - 3 (0.12) - Right margin |
| Right margin mm (inch) | 1.5 (0.06) | Paper Width - 3 (0.12) - Left margin |
| Gap / Mark length mm (inch) | 2.5 (0.1) | 9.5 (0.37) |
| Left Gap mm (inch) | 0.5 (0.02) | 2.5 (0.10) |
| Right Gap mm (inch) | 0.5 (0.02) | 95.5 (3.76) |
- Label / Marker, Tag / Marker
| Minimum | Maximum | ||
| Paper Width mm (inch) | 25.0 (0.98) | 120.0 (4.72) | |
| Paper Length mm (inch) | 6.0 (0.24) | 500.0 (19.69) | |
| Top margin mm (inch) | 1.5 (0.06) | Paper Length - 3 (0.12) - Bottom margin | |
| Bottom margin mm (inch) | 1.5 (0.06) | Paper Length - 3 (0.12) - Top margin | |
| Left margin mm (inch) | AIS Mode OFF | 2.5 (0.10) | Paper Width - 3 (0.12) - Right margin |
| AIS Mode ON | 2.7 (0.11) | ||
| Right margin mm (inch) | AIS Mode OFF | 2.5 (0.10) | Paper Width - 3 (0.12) - Left margin |
| AIS Mode ON | 2.7 (0.11) | ||
| Gap / Mark length mm (inch) | 3.0 (0.12) | 10.0 (0.39) | |
- Label / No TOF, Tag / No TOF
| Minimum | Maximum | ||
| Paper Width mm (inch) | 25.0 (0.98) | 120.0 (4.72) | |
| Paper Length mm (inch) | 6.0 (0.24) | 500.0 (19.69) | |
| Top margin mm (inch) | 1.5 (0.06) | Paper Length - 3 (0.12) - Bottom margin | |
| Bottom margin mm (inch) | 1.5 (0.06) | Paper Length - 3 (0.12) - Top margin | |
| Left margin mm (inch) | AIS Mode OFF | 2.5 (0.10) | Paper Width - 3 (0.12) -Right margin |
| AIS Mode ON | 2.7 (0.11) | ||
| Right margin mm (inch) | AIS Mode OFF | 2.5 (0.10) | Paper Width - 3 (0.12) - Left margin |
| AIS Mode ON | 2.7 (0.11) | ||
| Gap / Mark length mm (inch) | 3.0 (0.12) | 10.0 (0.39) | |
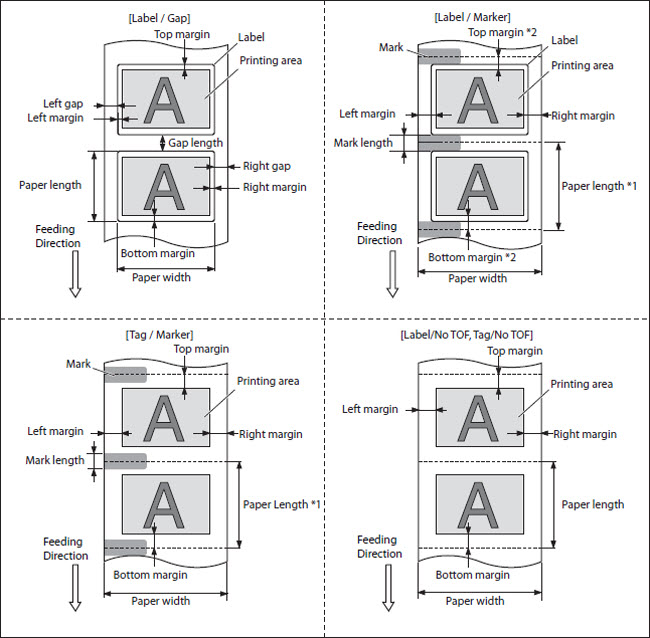
Paper in paper form [Label / Gap] must meet the following requirements:
- The total of the paper width, left gap, and right gap is 25.0 mm (0.98 inch) or more.
- The total of the left margin and left gap or the total of the right margin and right gap is 2.5 mm (0.1 0 inch) or more. (When printing in AIS mode, it is 2.7 mm (0.11 inch).)
The AIS mode is a function to reduce consumption of the print head. When activated, left and right minimum margin is 2.7 mm (0.11 inch).(In the case of [Label / Gap], the total of the left margin and left gap or the total of the right margin and right gap is 2.7 mm (0.11 inch).)
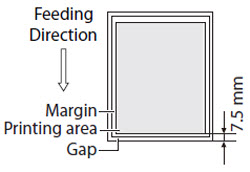
Do not print outside the printable area of the selected paper.
The printed image may be blurred when the image is placed within 7.5mm from paper leading edge.
 |
"Tag paper" is non-adhesive paper.
"Gap" is the space between separator (label-mount) and label (upper paper).
Selecting the Paper Type
Select the correct paper type in the Paper Type drop down menu.
 |
For LX-D5500
| Matte | Choose when you select matte coated paper to print. |
| Gloss | Choose when you select glossy paper to print. |
| Synthetic | Choose when you select synthetic paper to print. |
For LX-P5510
| Matte paper | Choose when you select matte coated paper to print. |
| Matte Synthetic | Choose when you select matte coated synthetic paper to print. |
| Glossy Paper | Choose when you select glossy paper to print. |
| Glossy Polypropylene | Choose when you select glossy polypropylene print. |
| GHS Media | Choose when you select GHS media to print. |
Select the correct paper type in order to receive optimal print quality.
When a paper type associated with Profile (the start character is "*") is selected, the [Color Correction], [Print the gradation smoothly] (LX-D5500 only) and [Brightness] cannot be adjusted.
Selecting the Orientation
Select the direction of print under Orientation.
|
|
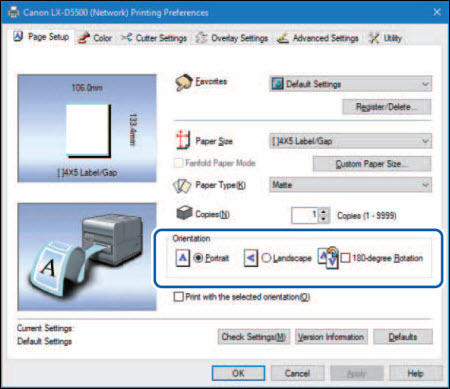
Printed results for portrait and landscape orientation can be achieved by following the descriptions below.

[Portrait]
Select this option to print the document rotated 90 degrees to the right in relation to the direction of paper feeding.
 |
 |
| Direction of paper feed |
[Landscape]
Select this option to print the document horizontally in relation to the direction of paper feeding.
 |
 |
| Direction of paper feed |
[180-degree Rotation]
Check this check box to print a document set for [Portrait] or [Landscape] rotated 180 degrees.
・Portrait / rotated 180 degrees
 |
 |
| Direction of paper feed |
・Landscape / rotated 180 degrees
 |
 |
| Direction of paper feed |
Setting the Print with the Selected Orientation
When you print to a paper whose width is longer than its height, some application software may automatically change the paper orientation, which could impact proper printing.
If this happens, check the [Print with the selected orientation] check box so that proper printing takes place according to the [Orientation] setting of the printer driver.
| (Document) | (Print result) | |
| Landscape | 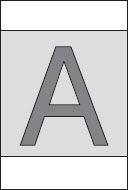 |
|
 |
||
| Portrait | 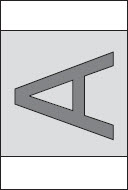 |
|
|
||
Choose this setting when proper printing is not possible from the application software. Normally, you do not have to choose this setting.
Even if [Print with the selected orientation] is specified, proper printing may not be possible from some application software.
[Print with the selected orientation] setting does not affect [180-degree Rotation].
|
![[Print with the selected orientation] check box checked](https://support.usa.canon.com/library/CANON/CITS_TECH_SUPPORT/Printers/LX-D5500/Printer%20Driver/print_with_selected_orientation_checked.jpg) |
|
| Document | [Orientation] of the printer driver |
| Landscape | Portrait |
|
 |
When printing a document in Portrait:
Select [Landscape] from the [Orientation] of the printer driver.
| Document | [Orientation] of the printer driver |
| Portrait | Landscape |
|
 |
|
Checking the Setting Contents
Click [Check Settings] to confirm the current paper settings.
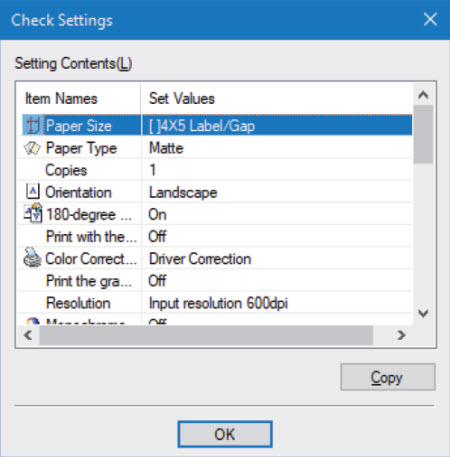 |
On the displayed screen, clicking [Copy] allows you to copy the settings. To read the copied settings, paste them to the page of an application software such as Notepad.
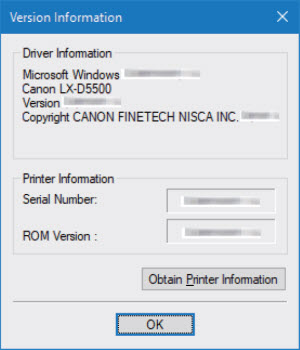
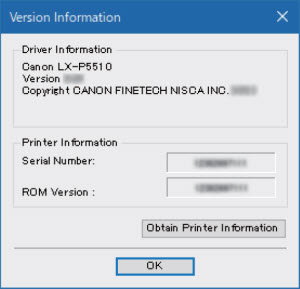
Checking the Version Information
Follow this procedure to confirm the printer driver version and copyright information.
Click Version Information to open the Version Information dialog box.
Keep the following points in mind when running [Obtain Printer Information].
- Close the Status Monitor if it is running.
- If this function is run on a shared printer, make sure the Status Monitor has not been launched on the client when working on a server, or has not been launched on the server when working on the client. The process may not be completed correctly if the Status Monitor is running.
Printer information may not be collected depending on the status of printer connection.
- Not connected to the printer.
- Telecommunications lines or networks are busy.
For LX-D5500
|
||
![[Version Information] circled](https://support.usa.canon.com/library/CANON/CITS_TECH_SUPPORT/Printers/LX-D5500/Printer%20Driver/version_information_circled.jpg) |
 |
|
| Serial number | Printer serial number |
| ROM Version | Printer ROM version |
| Obtain Printer Information | Click [Obtain Printer Information] to get information on the printer connected. |
For LX-P5510
|
||
![[Version Information] circled in the [Utility] tab](https://support.usa.canon.com/library/CANON/CITS_TECH_SUPPORT/Printers/LX-P5510/Printer%20Driver/utility_tab_version_information_circled.jpg) |
 |
|
| Serial number | Printer serial number |
| ROM Version | Printer ROM version |
| Obtain Printer Information | Click [Obtain Printer Information] to get information on the printer connected. |
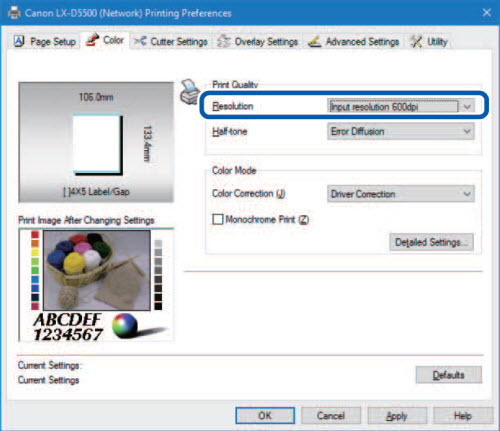
For LX-D5500
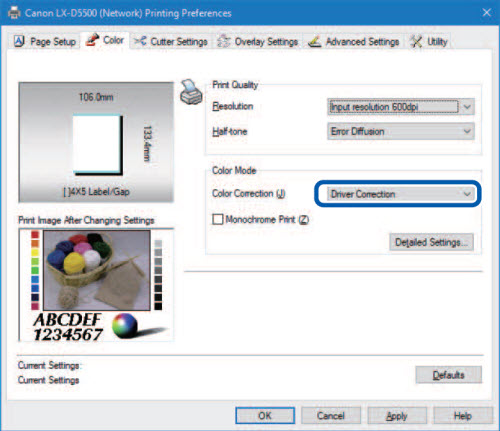
Print quality and color settings can be configured in the [Color] tab of the [Printing Preferences] window.
![Image of the LX-D5500 printer driver window, [Color] tab](https://support.usa.canon.com/library/CANON/CITS_TECH_SUPPORT/Printers/LX-D5500/Printer%20Driver/color_tab_sections.jpg)
| [1] | Paper Size Preview |
| The selected paper size is displayed in a preview. | |
| [2] | Print Image After Changing Settings |
| Preview of the image to be printed with the current color settings. | |
| [3] | Resolution |
| Select the resolution. | |
| [4] | Half-tone |
| Select a half-toning method. | |
| [5] | Color Correction |
| Select the color correction method. | |
| [6] | Detailed Settings |
| Clicking this button displays the [Detailed Settings] dialog box. Use this dialog box to adjust advanced color settings. | |
| [7] | Monochrome Print |
| Select this check box to make black-and-white prints. | |
| [8] | Defaults |
| Reset the [Color] window to its defaults. |
The settings configured on the [Detailed Settings] dialog box do not change even if you click [Defaults] in the [Color] tab.
For LX-P5510
Print quality and color settings can be configured in the [Print Setup] tab of the [Printing Preferences] window.
![Image of the LX-P5510 printer driver window, [Print Setup] tab](https://support.usa.canon.com/library/CANON/CITS_TECH_SUPPORT/Printers/LX-P5510/Printer%20Driver/print_setup_tab_sections.jpg)
| [1] | Paper Size Preview |
| The selected paper size is displayed in a preview. | |
| [2] | Print Image After Changing Settings |
| Preview of the image to be printed with the current color settings. | |
| [3] | Resolution |
| Select the resolution. | |
| [4] | Print Speed |
| Set the printing speed. | |
| [5] | Print Order |
| Specify the order of printing. | |
| [6] | Color Correction |
| Select the color correction method. | |
| [7] | Monochrome Print |
| Select this check box to make black-and-white prints. | |
| [8] | Detailed Settings |
| Clicking this button displays the [Detailed Settings] dialog box. Use this dialog box to adjust advanced color settings. | |
| [9] | Defaults |
| Reset the [Print Setup] window to its defaults. | |
| [10] | Set Pinpoint Color Match |
| Prints an image with colors close to the desired colors. |
The settings configured on the [Detailed Settings] dialog box do not change even if you click [Defaults] in the [Print Setup] tab.
Selecting a Resolution
Resolution settings can be adjusted to control print quality.
 |
| Input resolution 1200dpi | Prints data after processing it for a resolution of 1200x1200 dpi.
Longer print times but higher print quality occurs when printing with the [Input Resolution 1200 dpi] setting. |
| Input resolution 600dpi | Prints data after processing it for a resolution of 600x600 dpi(For LX-P5510, 1200x600dpi).
Faster print times but lower print quality occurs when printing with the [Input Resolution 600 dpi] setting. |
Selecting a Half-tone (For LX-D5500 Only)
The dot pattern or half tone can be adjusted to control print quality.
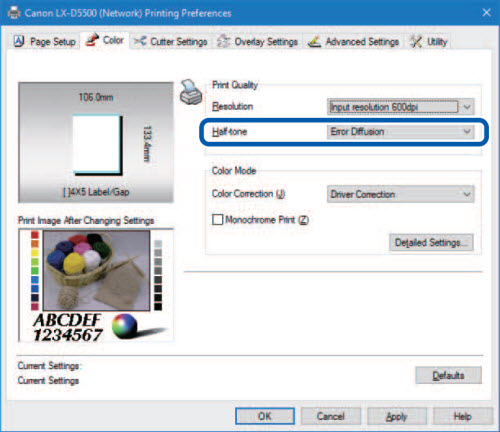 |
| Dither | This method is suitable for printing of graphics requiring clear borders between colors. |
| Error Diffusion | This method is suitable for printing of photos and graphics requiring subtle gradation. |
Selecting a Color Correction
It is possible to select a color correction method suitable for the document to be printed
 |
| Driver Correction | The optimum color adjustment is made for this printer. |
| Use ICM *LX-P5510 Only |
Select this option to correct colors using the Windows color correction function of ICM (Image Color Management). |
| Disable | Image processing is performed at the highest speed without color correction. Select this method to give priority to the printing speed. |
[Color correction] can not be selected when a paper type associated with Profile (the start character is "*") is selected.
[Pinpoint Color Match] can not be used when [Use ICM] is selected.
Printing in Black and White
Color documents can be printed in black and white.
When black-and-white prints are made, only black ink is used.
To print in black-and-white, click the [Monochrome Print] check box.
![[Monochrome Print] check box selected](https://support.usa.canon.com/library/CANON/CITS_TECH_SUPPORT/Printers/LX-D5500/Printer%20Driver/monochrome_print_selected.jpg) |
[Pinpoint Color Match] can not be used when the [Monochrome Print] check box is checked.
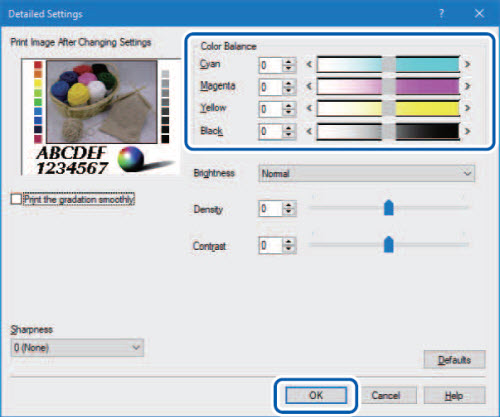
Adjusting the Color Balance
You can adjust the color balance for printed colors (cyan, magenta, yellow and black) if you are dissatisfied with the color tone of the printout.
|
|
|
|
 |
|
|
|
|
|
|
|
|
Adjusting the Brightness
If you believe the overall image is too dark or too bright, a brightness adjustment can be made.
This adjustment changes the mid-range colors without affecting the darkest or brightest areas of the image.
|
|
|
|
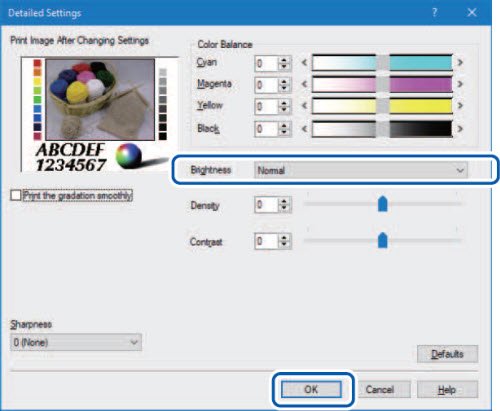 |
| Brighter | Print with a brighter appearance. Select this setting when you feel that the result is too dark. |
| Normal | Print at normal brightness.
Use this setting at first, and change the Brighter and Darker adjustments if needed. |
| Darker | Print with a darker appearance. Select this setting when you feel that the result is too light. |
Click [Defaults] to return the printer to the default settings on the [Detailed Settings] dialog box.
The print image with selected color corrections is displayed in the [Print Image After Changing Settings] section of the window.
[Brightness] can not be selected when [Color Correction] is set to [Disable] or [Use ICM].
[Brightness] can not be selected when a paper type associated with Profile (the start character is "*") is selected.
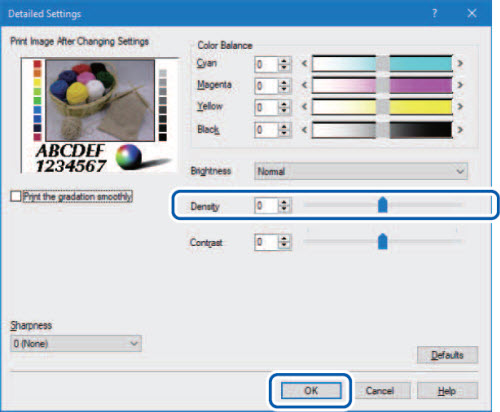
Adjusting the Density
The overall density of the printout can be adjusted if you are dissatisfied with the results.
|
|
|
|
 |
|
|
|
|
|
|
|
|
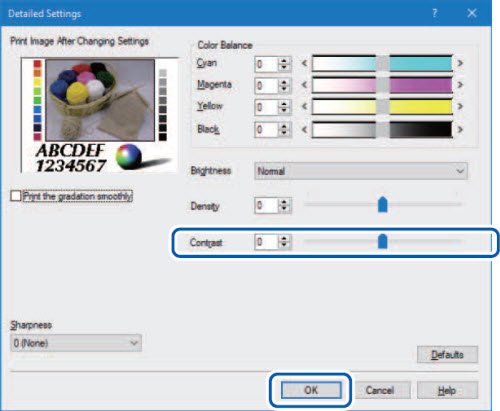
Adjusting the Contrast
An overall contrast adjustment can be made if you would like to better distinguish the light and dark areas of the printout.
|
|
|
|
 |
|
|
|
|
|
|
|
|
|
|
Print the Gradation Smoothly (For LX-D5500 Only)
Use the [Print the gradation smoothly] feature if you see uneven color gradients in the printout.
![[Print the gradation smoothly] box checked](https://support.usa.canon.com/library/CANON/CITS_TECH_SUPPORT/Printers/LX-D5500/Printer%20Driver/print_gradation_smoothly_box_checked.jpg) |
Click [Defaults] to return the printer to the default settings in the [Detailed Settings] dialog box.
The print image with selected color corrections is displayed in the [Print Image After Changing Settings] section of the window.
[Print the gradation smoothly] can not be selected when the [Monochrome Print] check box is selected.
[Print the gradation smoothly] can not be selected when [Color Correction] is set to [Disable].
[Print the gradation smoothly] can not be selected when a paper type associated with Profile (the start character is "*") is selected.
Use Economy Print Mode (For LX-P5510 Only)
Marking the [Economy print mode] checkbox enables printing with less ink (black, cyan, magenta, and yellow).
This mode reduces the consumption of all inks although print quality is not as high as that of regular printing.Use this mode to check printout data or lower print cost.
![[Economy print mode] checkbox checked](https://support.usa.canon.com/library/CANON/CITS_TECH_SUPPORT/Printers/LX-P5510/Printer%20Driver/economy_print_mode_checked.jpg) |
Setting the Sharpness
You can improve contours (edge definition) and reduce blurriness in an image by adjusting the sharpness.
|
|
|
|
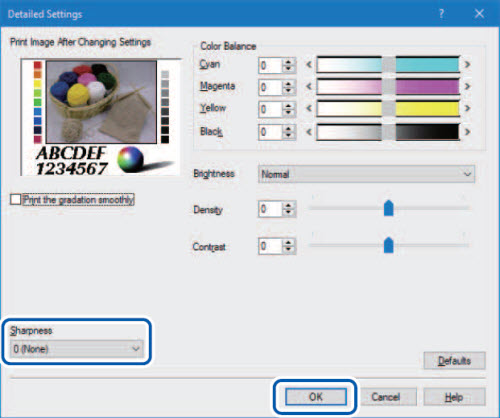 |
| 0(None) | No adjustment is made to sharpness. |
| 1(Small) | To increase sharpness, select one of [1(Small)], [2(Medium)], and [3(Large)]. The higher the number, the more the contour enhancement effect. |
| 2(Medium) | |
| 3(Large) |
Click [Defaults] to return the printer to the default settings in the [Detailed Settings] dialog box.
The print image with selected color corrections is displayed in the [Print Image After Changing Settings] section of the window.
[Pinpoint Color Match] can not be used when [Sharpness (any of 1 to 3)] selected.
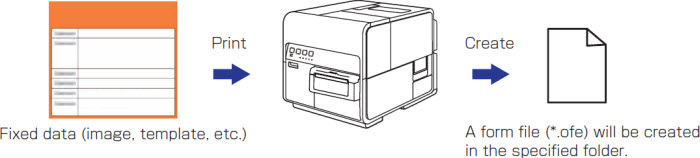
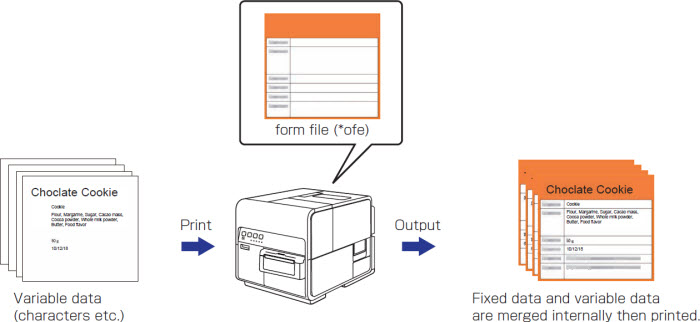
Overlay printing is a printer function which internally combines two pieces of data, i.e., the fixed data created in advance as a "form file" that is commonly printed on all pages and the data on each page of a document (variable data such as characters.) The combined data (form and variable data) is printed onto each printed sheet using the same form but different information from the variable data.
Data using a template containing a lot of images can be printed without transferring large-capacity image data to the printer many times, allowing the data to be printed quickly.
Overlay printing process
|
 |
|
 |
Printing a Form to a File
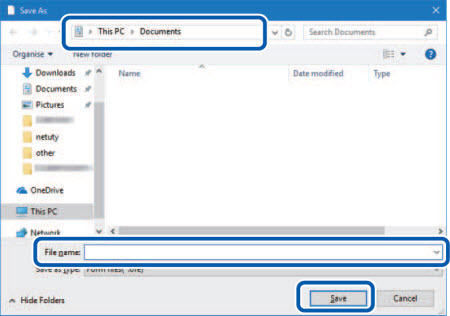
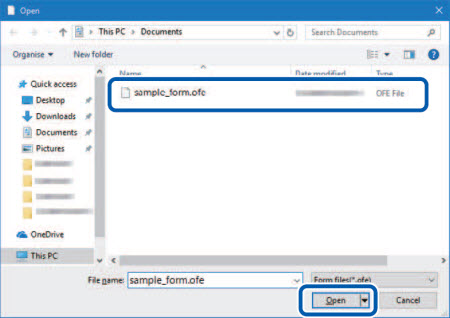
Send (print) fixed data (image, template, etc.) to the printer to create a form file.
|
|
 |
|
![[Overlay Settings] tab (circled) with [Print the form to the file] (circled) selected](https://support.usa.canon.com/library/CANON/CITS_TECH_SUPPORT/Printers/LX-D5500/Printer%20Driver/Overlay%20Printing/print_form_to_file_circled.jpg) |
|
 |
|
 |
|
|
|
|
|
|
|
![[Advanced] tab (circled) with [Enable advanced printing features] not checked (circled)](https://support.usa.canon.com/library/CANON/CITS_TECH_SUPPORT/Printers/LX-D5500/Printer%20Driver/Overlay%20Printing/enable_adv_print_features_circled.jpg) |
|
The spool format will be set to RAW mode. |
|
|
![[How to Overlay printing] box (circled) in the [Overlay Settings] tab (circled)](https://support.usa.canon.com/library/CANON/CITS_TECH_SUPPORT/Printers/LX-D5500/Printer%20Driver/Overlay%20Printing/how_to_overlay_button_checked.jpg) |
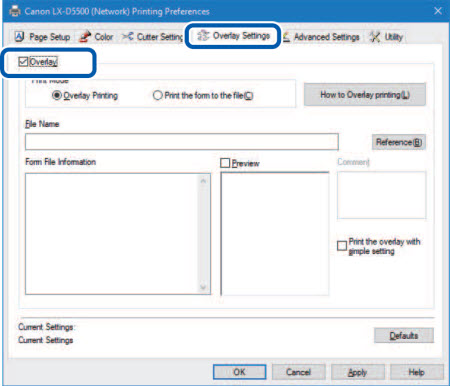
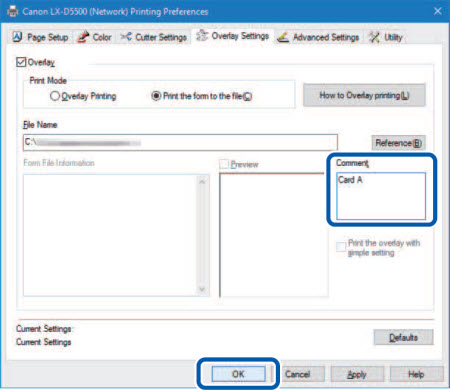
Carrying out Overlay Printing
|
|
|
|
|
![[Overlay Printing] selected (circled), [Reference] button circled](https://support.usa.canon.com/library/CANON/CITS_TECH_SUPPORT/Printers/LX-D5500/Printer%20Driver/Overlay%20Printing/overlay_printing_selected_reference_button_circled.jpg) |
|
 |
|
![[Form File Information] area circled](https://support.usa.canon.com/library/CANON/CITS_TECH_SUPPORT/Printers/LX-D5500/Printer%20Driver/Overlay%20Printing/form_file_information_area_circled.jpg) |
|
![[Print the overlay with simple setting] check box checked (circled)](https://support.usa.canon.com/library/CANON/CITS_TECH_SUPPORT/Printers/LX-D5500/Printer%20Driver/Overlay%20Printing/print_overlay_simple_setting_box_checked.jpg) |
|
|
|
![[OK] circled](https://support.usa.canon.com/library/CANON/CITS_TECH_SUPPORT/Printers/LX-D5500/Printer%20Driver/Overlay%20Printing/click_OK.jpg) |
|
|
Print settings: Paper form, paper size (length, width, margins), and print quality
|
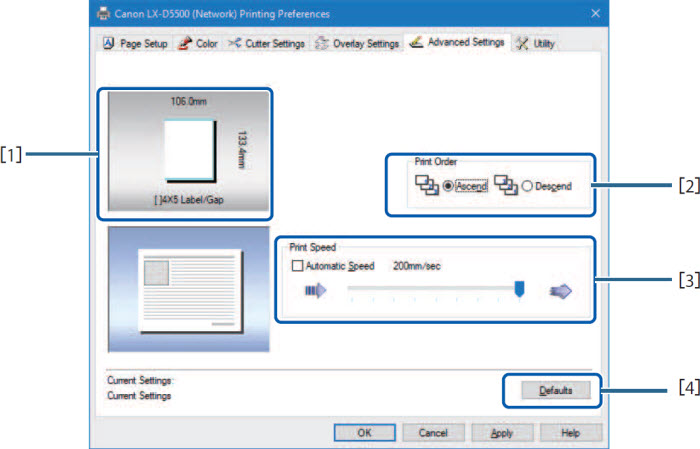
Print order and print speed can be adjusted in the [Advanced Settings] tab of the [Printing Preferences] window.
 |
|
| [1] | Paper Size Preview |
| The currently set paper size is displayed in a preview. | |
| [2] | Print Order |
| Specify the order of printing. | |
| [3] | Print Speed |
| Set the printing speed. | |
| [4] | Defaults |
| Reset the [Advanced Settings] tab to its defaults. | |
Selecting Print Order
Decide on whether to start printing from the first or last page.
To print from the first page afterwards, select [Ascend]; to print from the last page upward, select [Descend].
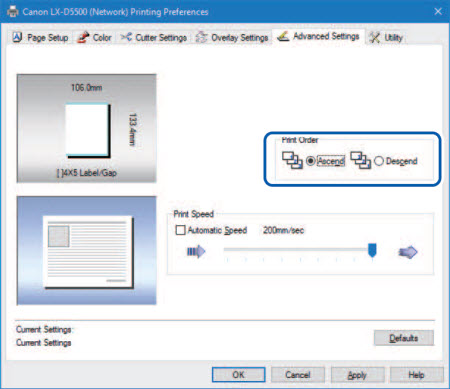 |
The settings on the [Print Order] do not take effect when the [Enable advanced printing features] check box is not checked in the [Advanced] tab displayed in the printer properties window.
![[Enable advanced printing features] check box checked (circled)](https://support.usa.canon.com/library/CANON/CITS_TECH_SUPPORT/Printers/LX-D5500/Printer%20Driver/Advanced%20Settings/enable_adv_printing_features_checked.jpg) |
Adjusting the Print Speed
Printing can be performed at gradually varying printing speeds.
For LX-D5500
Adjust the paper feed interval by moving the sliders. From the right, there are scales representing 200 / 160 / 120 / 100 / 90 / 80 / 70 / 60 / 50 (mm / sec) (7.9 / 6.3 / 4.7 / 3.9 / 3.5 / 3.2 / 2.8 / 2.4 / 2.0 (inch / sec)).
![[Print Speed] area circled](https://support.usa.canon.com/library/CANON/CITS_TECH_SUPPORT/Printers/LX-D5500/Printer%20Driver/Advanced%20Settings/print_speed_slider.jpg) |
Check [Automatic Speed] to allow the print speed to vary automatically to suit the status of print data transmission.
| When glossy paper is used, the maximum printing speed is limited to 100 mm / sec (4.0 inch / sec). When [Gloss] is selected from the [Paper Type] pull-down menu, the following confirmation message appears. Click [OK]. |
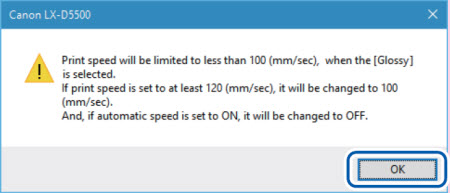 |
| When you have changed glossy paper to a different type of paper, verify the print speed setting. |
For LX-P5510
|
![[Print Setup] tab (circled) with Automatic Speed area circled](https://support.usa.canon.com/library/CANON/CITS_TECH_SUPPORT/Printers/LX-P5510/Printer%20Driver/Advanced%20Settings/print_speed_slider.jpg) |
|
The selectable feed speed varies depending on resolutions. When printing 1200dpi: When printing 600dpi: |
|
|
|
|
|
 |
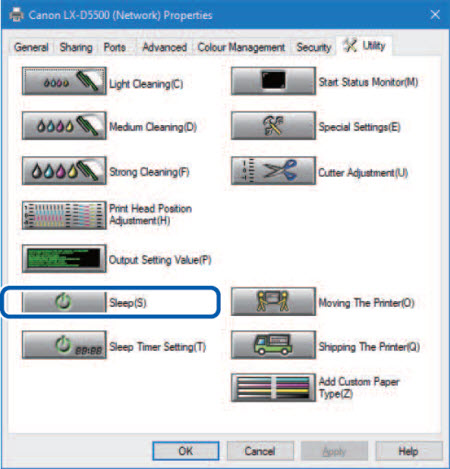
Printer maintenance and control of some printer features is performed in the [Utility] tab of the [Printing Preferences] window or the [Printer Properties] window.
For LX-D5500
 |
For LX-P5510
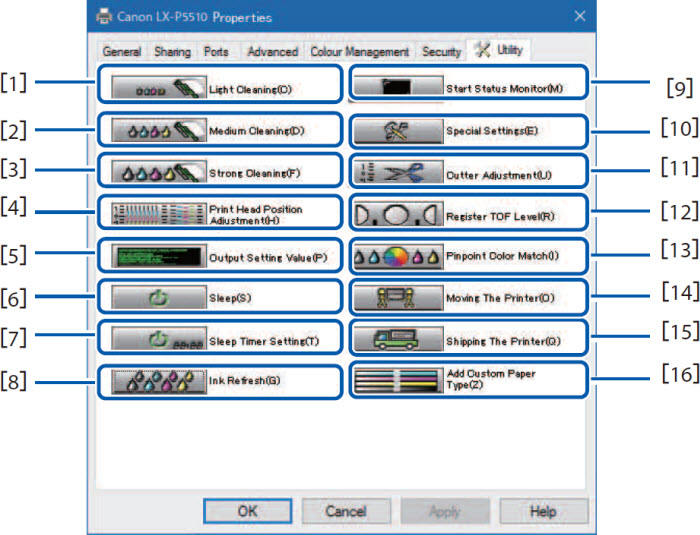 |
| [1] | Light Cleaning |
| Clicking this button cleans the print head. | |
| [2] | Medium Cleaning |
| Performs cleaning somewhat stronger than Light Cleaning. | |
| [3] | Strong Cleaning |
| Performs cleaning somewhat stronger than Medium Cleaning. | |
| [4] | Print Head Position Adjustment * |
| Adjusts the Printhead positions. | |
| [5] | Output Setting Value |
| Prints the current settings of the printer. | |
| [6] | Sleep |
| Switches the printer to the sleep mode. | |
| [7] | Sleep Timer Setting * |
| Sets the interval of time to elapse to switch to the sleep mode and the power off state. | |
| [8] | Ink Refresh (For LX-P5510 Only) |
| Clicking this button allows ink to flow in the print head and ink path to maintain the ink quality. | |
| [9] | Start Status Monitor |
| Displays the Status Monitor window. | |
| [10] | Special Settings * |
| Configure custom printer settings. Normally, do not use this button. | |
| [11] | Cutter Adjustment * |
| Adjusts the stop position at which to cut printed paper with the manual cutter and the position at which to cut printed paper with an optional auto cutter. | |
| [12] | Register TOF Level * (For LX-P5510 Only) |
| Register TOF (Top of Form) sensor value of Label / Marker. | |
| [13] | Pinpoint Color Match * (For LX-P5510 Only) |
| Create and register colors for special color matching, as for logo marks. | |
| [14] | Moving The Printer * |
| Prepares for relocating the printer on the same floor or to another floor in the same building. | |
| [15] | Shipping The Printer * |
| Prepares for long-haul transport, as on truck or aboard aircraft. | |
| [16] | Add Custom Paper Type * |
| Allows the user to adjust ink jetting amounts and register them along with the paper type of new paper. | |
| * Items displayed are from the [Utility] tab of the printer properties window. | |
| The settings that can be configured on the [Utility] tab of the printer properties window are different from those that can be configured on the [Utility] tab of the printing preferences window. |
|
| When configuring settings in the [Utility] tab, the printer must be powered and connected to the computer. |
|
| Administrative privileges required for certain features
Administrative privileges over this printer are required when configuring settings (marked with *) on the [Utility] tab of the printer properties window. If a user without administrative privileges over this printer attempts to configure settings, the following message appears. |
|
![[OK] circled](https://support.usa.canon.com/library/CANON/CITS_TECH_SUPPORT/Printers/LX-D5500/Printer%20Driver/Utility%20Tab/admin_rights_needed_click_OK.jpg) |
|
| If this message appears, contact the administrator of the computer and proceed with operation following the procedure below. | |
|
|
Placing the Printer in Sleep Mode
| When printing is in progress or an error has occurred, the printer cannot be switched to sleep mode. |
| The printer enters sleep mode automatically when it has been left idle for a certain period of time under normal operating conditions. |
| By default, the sleep timer is set to 4 minutes. |
The printer is automatically switched back from sleep mode to online in the following cases:
|
|
|
 |
|
A confirmation message appears. |
|
![Click [Yes] (circled) to set the printer to sleep mode](https://support.usa.canon.com/library/CANON/CITS_TECH_SUPPORT/Printers/LX-D5500/Printer%20Driver/Utility%20Tab/sleep_mode_confirm.jpg) |
|
The power lamp blinks slowly, and the printer is switched to sleep mode. |
Changing the Sleep Timer / Off Timer Setting
This printer can automatically enter sleep mode (sleep timer), or turn off (off timer) when it is not operated for a default amount of time.
| When printing is in progress or an error has occurred, the printer cannot be set to the sleep timer and off timer. |
| Administrative privileges over this printer are required to configure settings of this printer.
If a user without administrative privileges proceeds with configuration of settings, a message "You do not have rights to printer management. Please contact your system administrator." appears. |
| By default, the sleep timer is set to 4 minutes and the off timer 240 minutes (4 hours). |
| For the off timer, set how much time must elapse after switching to sleep mode before the printer is turned off. |
|
|
![[Sleep Timer Setting] circled](https://support.usa.canon.com/library/CANON/CITS_TECH_SUPPORT/Printers/LX-D5500/Printer%20Driver/Utility%20Tab/sleep_timer_setting_button_circled.jpg) |
|
The [Sleep Timer Setting] dialog box appears. |
|
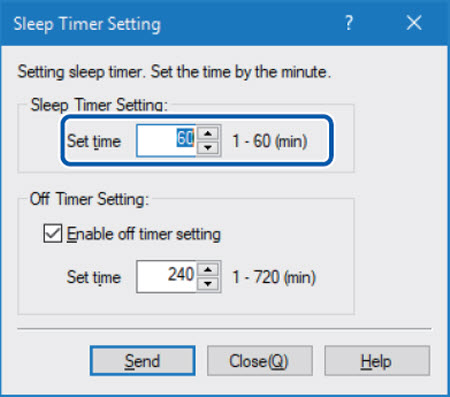 |
|
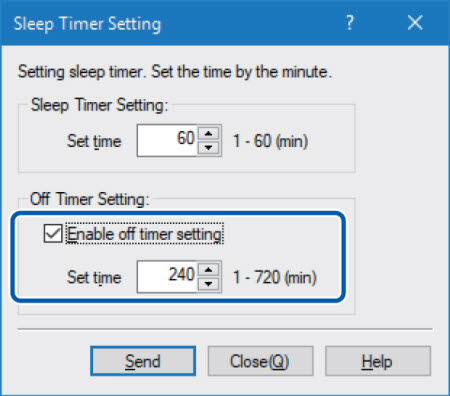 |
|
![[Send] circled](https://support.usa.canon.com/library/CANON/CITS_TECH_SUPPORT/Printers/LX-D5500/Printer%20Driver/Utility%20Tab/click_send_sleep_timer_setting.jpg) |
|
A confirmation message appears. |
|
![[Yes] circled](https://support.usa.canon.com/library/CANON/CITS_TECH_SUPPORT/Printers/LX-D5500/Printer%20Driver/Utility%20Tab/sleep_timer_confirm.jpg) |
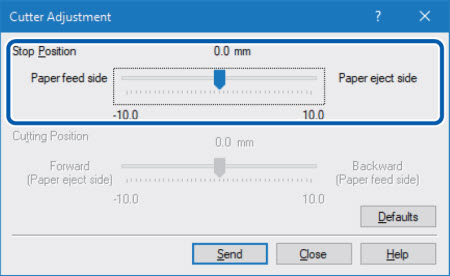
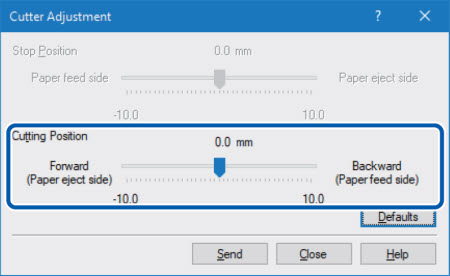
Adjusting the Paper Stop Position (or Cutting Position)
The stop position at which to cut printed paper with the manual cutter can be adjusted.
If the printer is furnished with an optional auto cutter, [Cutting Position] can be adjusted.
| When printing is in progress or an error has occurred, the printer cannot be set to the cutter adjustment. |
| Administrative privileges over this printer are required to configure settings of this printer.
If a user without administrative privileges proceeds with configuration of settings, a message "You do not have rights to printer management. Please contact your system administrator." appears. |
| Whenever paper has been replaced, perform [Cutting Position] adjustment. |
|
|
![[Cutter Adjustment] circled](https://support.usa.canon.com/library/CANON/CITS_TECH_SUPPORT/Printers/LX-D5500/Printer%20Driver/Utility%20Tab/cutter_adjustment_button_circled.jpg) |
|
The Cutter Adjustment dialog box appears. |
|
 |
|
Using the Auto cutter: |
 |
|
|
|
|
![[Yes] circled](https://support.usa.canon.com/library/CANON/CITS_TECH_SUPPORT/Printers/LX-D5500/Printer%20Driver/Utility%20Tab/send_settings_confirm.jpg) |
|
The setting is transmitted to the printer. |
|
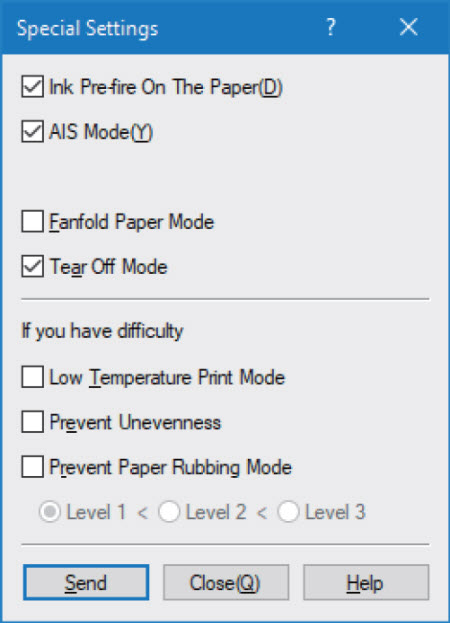
Changing the Special Settings
Use the [Special Settings] to change the special settings of the printer as required. Normally, it is not necessary to change the settings.
There are seven special settings.
[Ink Pre-fire On The Paper]
A very small quantity of ink is constantly discharged onto paper at regular intervals in order to maintain the print head performance. If this check box is unchecked, the printing time increases due to an extra process for print head cleaning.
The default setting is "ON".
[AIS Mode]
The AIS mode is a function to reduce consumption of the print head.
When activated, left and right minimum margin is 2.7 mm (0.11 inch). (When not activated, it is 2.5 mm (0.10 inch))
The default setting is "ON".
[Fanfold Paper Mode]
Select this option when fanfold paper is used.
The default setting is "OFF".
[Tear Off Mode]
Tear Off Mode selects the printer behaviors after printing.
The default setting is "ON".
| Tear Off Mode Setting | Auto-cutter Equipped | Printer Behavior |
| ON | YES | Printed paper is cut off and the next leading edge of paper is set at the printing position. |
| NO (or cutter setting is switched to OFF) | Trailing edge of the printed paper is set at the cutting position so expecting the printed paper is torn off. When receiving the next print data, leading edge of paper is set at the printing position. |
|
| OFF | YES | Printed paper is cut off and the next leading edge of paper is set at the printing position. |
| NO (or cutter setting is switched to OFF) | Leading edge of the printed paper is set at the printing position right after the print has been completed. |
[Low Temperature Print Mode]
Set the printer to [Low Temperature Print Mode].
When the printer is used at a temperature of less than 13 degrees Celsius (55 degrees Fahrenheit),
the amount of ink pre-fire on the paper is increased for printing. Therefore, when used in a location where the room temperature easily fluctuates, the mode automatically switches according to room temperature when printing, resulting in uneven print quality. Use this mode when you want to keep printing quality consistent.
The default setting is "OFF".
Use this function only when necessary, as it consumes more ink than other modes.
[Prevent Unevenness]*For LX-D5500 Only
This prevents uneven printing.
The default setting is "OFF".
When activated, it takes longer than usual for printing to begin and printing speed is slower than usual.
[Prevent Paper Rubbing Mode]
When printing a high-density image, you can increase the gap between the print head and paper to prevent paper rubbing.
The default setting is "OFF".
Level 1: Raises the Print heads from the paper to reduce their contact with the paper.
Level 2: Maximizes paper suction to reduces contact with the paper.
Level 3: Executes Levels 1 and 2 simultaneously
When printing is in progress or an error has occurred, you cannot change any special setting.
When loading roll paper, uncheck the [Fanfold Paper Mode] check box.
Administrative privileges over this printer are required to configure settings of this printer.
If a user without administrative privileges proceeds with configuration of settings, a message "You do not have rights to printer management. Please contact your system administrator." appears.
|
![[Special Settings] circled](https://support.usa.canon.com/library/CANON/CITS_TECH_SUPPORT/Printers/LX-D5500/Printer%20Driver/Utility%20Tab/special_settings_circled.jpg) |
|
The Special Settings dialog box appears. |
|
 |
|
|
|
![[Send] circled](https://support.usa.canon.com/library/CANON/CITS_TECH_SUPPORT/Printers/LX-D5500/Printer%20Driver/Utility%20Tab/special_settings_click_send.jpg) |
|
A confirmation message appears. |
|
|
|
The changed special settings are sent to the printer. |
|
![[Close] circled](https://support.usa.canon.com/library/CANON/CITS_TECH_SUPPORT/Printers/LX-D5500/Printer%20Driver/Utility%20Tab/special_settings_click_close.jpg) |
Register TOF Level (For LX-P5510 Only)
When paper mounted in the printer is not identified correctly, the paper may be of a type the printer is unable to detect automatically.In this case, adjust the TOF Level of the sensor for detecting the leading edge of paper.
Use when label paper has a TOF mark printed on the back.
You can register only one TOF Level. Registering the level of another paper overwrites the TOF Level.
|
![[Register TOF Level] circled](https://support.usa.canon.com/library/CANON/CITS_TECH_SUPPORT/Printers/LX-P5510/Printer%20Driver/Utility%20Tab/register_TOF_level_circled.jpg) |
|
![[OK] circled](https://support.usa.canon.com/library/CANON/CITS_TECH_SUPPORT/Printers/LX-P5510/Printer%20Driver/Utility%20Tab/register_TOF_click_OK.jpg) |
|
![Click [OK] after reading this message](https://support.usa.canon.com/library/CANON/CITS_TECH_SUPPORT/Printers/LX-P5510/Printer%20Driver/Utility%20Tab/peel_off_labels_message.jpg) |
Do not click [OK] before finishing steps 1-3 below.
|
|
 |
|
|
|
The printer reads the TOF mark and the paper is fed. |
|
![[OK] circled](https://support.usa.canon.com/library/CANON/CITS_TECH_SUPPORT/Printers/LX-P5510/Printer%20Driver/Utility%20Tab/TOF_level_registered.jpg) |
|
 |
|
|
|
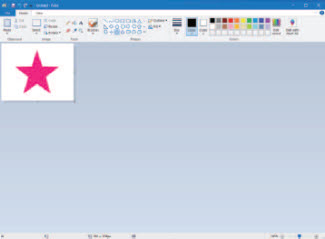
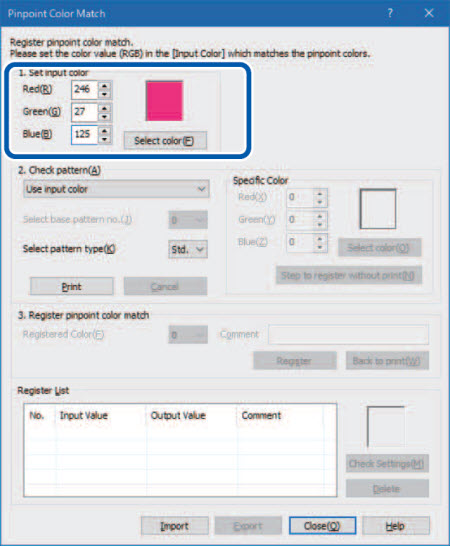
Using Pinpoint Color Match Function (For LX-P5510 Only)
Register a desired color, and you can print images in the intended color.
Use this feature to finely adjust the color of, for example, a logo mark.
Administrative privileges over this printer are required to configure settings of this printer. If a user without administrative privileges proceeds with configuration of settings, a message "You do not have rights to printer management. Please contact your system administrator." appears.
The Pinpoint Color Match feature cannot be used with the following print settings:
- The paper registered in "Add Custom Paper Type" is selected as [Paper Type] on the [Page Setup] tab.
- [Use ICM] is selected for [Color Correction] on the [Print Setup] tab.
- [Monochrome Print] is selected on the [Print Setup] tab.
- [Sharpness] is set (any of 1 to 3 is selected) for [Detailed Settings] on the [Print Setup] tab.
Do not perform any other operation while printing or adjusting check pattern.
The target color must always be a single color. Images in gradations of any color cannot be selected for Pinpoint Color Matches.
When an image in the target color (the same RGB values) is in the same data, this image also turns to the registered target color.
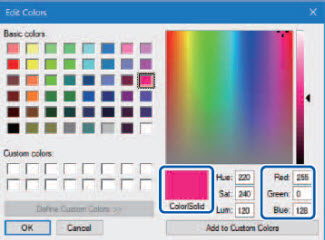
■ Registering a Desired Color
|
|||||||||
|
|
|||||||||
|
 |
||||||||
|
![Color selected, [Edit Colors] circled](https://support.usa.canon.com/library/CANON/CITS_TECH_SUPPORT/Printers/LX-P5510/Printer%20Driver/Utility%20Tab/select_color_click_edit_colors.jpg) |
||||||||
|
 |
||||||||
|
|||||||||
![[Pinpoint Color Match] circled](https://support.usa.canon.com/library/CANON/CITS_TECH_SUPPORT/Printers/LX-P5510/Printer%20Driver/Utility%20Tab/pinpoint_color_match_circled.jpg) |
|||||||||
|
The [Pinpoint Color Match] dialog box appears. |
|||||||||
|
|||||||||
 |
|||||||||
|
|
|||||||||
|
|
||||||||
|
|
||||||||
|
|||||||||
|
|||||||||
|
|||||||||
![[Use input color] circled](https://support.usa.canon.com/library/CANON/CITS_TECH_SUPPORT/Printers/LX-P5510/Printer%20Driver/Utility%20Tab/use_input_color_selected.jpg) |
|||||||||
|
The confirmation message appears. |
|||||||||
|
|||||||||
![[Yes] circled](https://support.usa.canon.com/library/CANON/CITS_TECH_SUPPORT/Printers/LX-P5510/Printer%20Driver/Utility%20Tab/perform_print_of_check_pattern.jpg) |
|||||||||
|
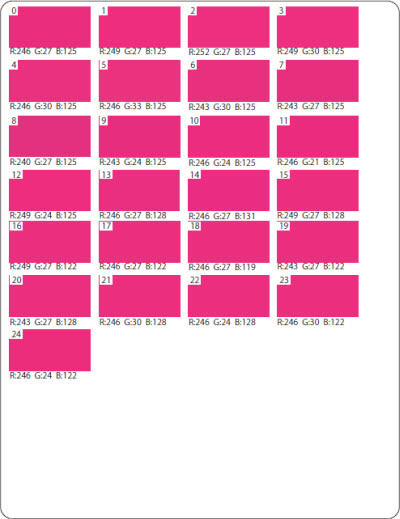
The printer outputs a check pattern, which is a color palette of approximate colors numbered 0 to 24. |
|||||||||
 |
|||||||||
|
|
|||||||||
|
|||||||||
|
|||||||||
|
|||||||||
![[Back to Print] circled](https://support.usa.canon.com/library/CANON/CITS_TECH_SUPPORT/Printers/LX-P5510/Printer%20Driver/Utility%20Tab/back_to_print_circled.jpg) |
|||||||||
|
|||||||||
|
|||||||||
![[Use check pattern no.], [Select base pattern no.], and [Print] circled](https://support.usa.canon.com/library/CANON/CITS_TECH_SUPPORT/Printers/LX-P5510/Printer%20Driver/Utility%20Tab/use_check_pattern_no_selected.jpg) |
|||||||||
|
● Specifying a specific color to register the desired color. |
|||||||||
|
|||||||||
|
|||||||||
![[Use specified color] and [Step to register without print] circled](https://support.usa.canon.com/library/CANON/CITS_TECH_SUPPORT/Printers/LX-P5510/Printer%20Driver/Utility%20Tab/use_specified_color_circled.jpg) |
|||||||||
|
|
|||||||||
|
|||||||||
|
● Printing a check pattern to register the desired color. |
|||||||||
|
|||||||||
|
|||||||||
|
|||||||||
![[Comment] and [Register] circled](https://support.usa.canon.com/library/CANON/CITS_TECH_SUPPORT/Printers/LX-P5510/Printer%20Driver/Utility%20Tab/color_comment_register_circled.jpg) |
|||||||||
|
● Specifying a specific color to register the desired color. |
|||||||||
|
|||||||||
|
|||||||||
![[Comment] and [Register] circled](https://support.usa.canon.com/library/CANON/CITS_TECH_SUPPORT/Printers/LX-P5510/Printer%20Driver/Utility%20Tab/comment_register_circled.jpg) |
|||||||||
|
|||||||||
![Color in [Register List] circled](https://support.usa.canon.com/library/CANON/CITS_TECH_SUPPORT/Printers/LX-P5510/Printer%20Driver/Utility%20Tab/click_cell_registered_color.jpg) |
|||||||||
|
|||||||||
![[Close] circled](https://support.usa.canon.com/library/CANON/CITS_TECH_SUPPORT/Printers/LX-P5510/Printer%20Driver/Utility%20Tab/pinpoint_color_match_click_close.jpg) |
|||||||||
|
The confirmation message appears. |
|||||||||
|
|||||||||
![[Yes] circled](https://support.usa.canon.com/library/CANON/CITS_TECH_SUPPORT/Printers/LX-P5510/Printer%20Driver/Utility%20Tab/finish_pinpoint_color_matching_click_yes.jpg) |
|||||||||
|
|
|||||||||
![[Select color] circled](https://support.usa.canon.com/library/CANON/CITS_TECH_SUPPORT/Printers/LX-P5510/Printer%20Driver/Utility%20Tab/click_select_color.jpg)
![[Add to Custom Colors] circled](https://support.usa.canon.com/library/CANON/CITS_TECH_SUPPORT/Printers/LX-P5510/Printer%20Driver/Utility%20Tab/add_to_custom_colors.jpg)
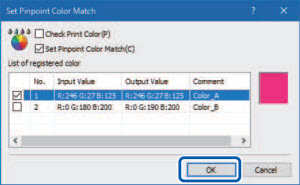
■ Adjusting colors with registered colors
Make adjustments using colors registered with [Pinpoint Color Match] on the [Utility] tab.
|
![[Print Setup] tab and [Set Pinpoint Color Match] circled](https://support.usa.canon.com/library/CANON/CITS_TECH_SUPPORT/Printers/LX-P5510/Printer%20Driver/Utility%20Tab/print_setup_tab_set_pinpoint_color_match_circled.jpg) |
|
![[Set Pinpoint Color Match] checked](https://support.usa.canon.com/library/CANON/CITS_TECH_SUPPORT/Printers/LX-P5510/Printer%20Driver/Utility%20Tab/set_pinpoint_color_match_checked.jpg) |
|
|
Folder for saving the image: |
|
File name: |
|
* When a home folder is created inside the C: drive. |
|
|
|
 |
|
![[OK] circled](https://support.usa.canon.com/library/CANON/CITS_TECH_SUPPORT/Printers/LX-P5510/Printer%20Driver/Utility%20Tab/print_setup_tab_OK_circled.jpg) |
|
![[Check Print Color] selected](https://support.usa.canon.com/library/CANON/CITS_TECH_SUPPORT/Printers/LX-P5510/Printer%20Driver/Utility%20Tab/check_print_color_box_selected.jpg)
Changing the Ink Jetting Amount for Printing
Change the amount of ink used for printing.
You can adjust the overall density, changing color settings such as color balance and density to exceed the setting range. You must first register a new paper type before increasing the ink jetting amount for printing.
Up to 100 custom paper types can be registered.
Pre-registered paper types cannot be changed.
Administrative privileges over this printer are required to configure settings of this printer.
If a user without administrative privileges proceeds with configuration of settings, a message "You do not have rights to printer management. Please contact your system administrator." appears.
When increasing ink jetting amount for printing
- Printing may take a long time or produce blurred images.
Set Print Speed to [Auto] to adjust the speed to suit the image status. If the print result still needs improvement, reduce the speed to 100 mm/sec or lower. - Print ink may dry slowly.
Do not touch the print surface until the ink dries. When the density is set too high, ink may remain damp, depending on the type of paper. Touching the print surface with wet ink might cause stains on your hands, clothes, or surrounding area. - The transport area may get stained.
Clean the transport area if stains appear on printed paper.
|
![[Add Custom Paper Type]](https://support.usa.canon.com/library/CANON/CITS_TECH_SUPPORT/Printers/LX-D5500/Printer%20Driver/Utility%20Tab/add_custom_paper_type_circled.jpg) |
|
The Add Custom Paper Type dialog box appears. |
|
![[Paper Type Names] area circled](https://support.usa.canon.com/library/CANON/CITS_TECH_SUPPORT/Printers/LX-D5500/Printer%20Driver/Utility%20Tab/paper_type_names_area_circled.jpg) |
|
|
![[Custom Paper Type Name] and [Set ink jetting amount] areas circled](https://support.usa.canon.com/library/CANON/CITS_TECH_SUPPORT/Printers/LX-D5500/Printer%20Driver/Utility%20Tab/custom_paper_name_ink_jetting_areas_circled.jpg) |
| Custom Paper Type Name | Enter the name of new paper. Can be entered up to 31 characters. Spaces and tabs cannot be used. "*" cannot be used as the start character of the paper type name. |
| Set ink jetting amount | Set ink jetting amounts for respective colors. Moving the slider to the left decreases the ink jetting amount, and moving the slider to the right increases the ink jetting amount. Determine the ink jetting amounts optimum for the selected type of paper after conducting the print test several times. |
|
![[Register] circled](https://support.usa.canon.com/library/CANON/CITS_TECH_SUPPORT/Printers/LX-D5500/Printer%20Driver/Utility%20Tab/add_custom_paper_type_register_circled.jpg) |
|
A confirmation message appears. |
|
![[Yes] circled](https://support.usa.canon.com/library/CANON/CITS_TECH_SUPPORT/Printers/LX-D5500/Printer%20Driver/Utility%20Tab/custom_paper_registered_click_yes.jpg) |
|
|
![[Yes] circled](https://support.usa.canon.com/library/CANON/CITS_TECH_SUPPORT/Printers/LX-D5500/Printer%20Driver/Utility%20Tab/custom_paper_registered_click_yes_2.jpg) |
|
The paper types are registered in [Paper Type Names]. |
|
![[Close] circled](https://support.usa.canon.com/library/CANON/CITS_TECH_SUPPORT/Printers/LX-D5500/Printer%20Driver/Utility%20Tab/add_custom_paper_type_close_circled.jpg) |
|
|
If your product issue was not resolved after following the steps above, or if you require additional help, please create or log in to your Canon Account to see your technical support options.
Or if you still need help, visit our Canon Community by clicking the button below to get answers:

____________________________________________________________________________________________