
Using the scanner push-buttons (5600F)
| Article ID: ART109021 | | | Date published: 05/11/2015 | | | Date last updated: 08/16/2015 |
Description
Solution
Using the Scanner Buttons
The scanner buttons allow you to copy, scan, e-mail and save scanned images in PDF format with a press of a button. Simply place your document on the scanner, and then press the scanner button for the required function.
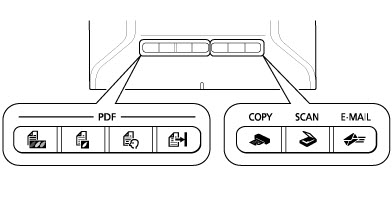
Scanner buttons allow you to scan your documents with just a press of a button. There are 4 PDF buttons (COLOR, BLACK & WHITE, CUSTOM, and FINISH) as well as [COPY], [SCAN], and [E-MAIL] buttons.
PDF buttons allow you to easily create PDF files using the [COLOR], [BLACK & WHITE], or [CUSTOM] button according to your needs.
The button names are not labeled on the scanner.
|
|||||||||||||||||||||||||||||||||||||||||||||||||||


| • |
By default, the images scanned using [SCAN], [E-MAIL] and [PDF] buttons are saved in the following locations:
|
[PDF] Buttons
Save scanned images as PDF files.
-
Place the document on the Platen.
-
Press PDF button.
-
Scanning color documents :
 COLOR Button
 -
Scanning black and white documents :
 BLACK & WHITE Button
 -
Scanning with custom settings :
 CUSTOM Button
Descriptions on the PDF buttons appear.
-
-
Read the descriptions and click OK.
 Note
Note-
Select the Do not display this message again. checkbox to scan documents continuously using the buttons on the machine only.
-
-
Follow the on-screen instructions.
The operation varies depending on the button selected in Step 2.
COLOR and BLACK & WHITE buttons:
Scans in color or black and white.
Scanning... and the scan setting values appear.
CUSTOM button:
A message about the setting screen appears.
Click OK. The CUSTOM tab in the PDF Dialog Box of MP Navigator EX opens.
Specify the scan settings and click Scan.
Note-
Adobe Acrobat Reader or Adobe Acrobat may start (to create thumbnails). If Microsoft Office documents or other documents are saved in the same folder, the corresponding application may start.
-
-
Add a page or end according to the number of pages.
After the first page is scanned, a message prompting you to add a page or end appears.
Adding a pagePlace the next document on the Platen and press the button selected in Step 2 or click Next in the message screen. After the additional page is scanned, a message prompting you to add a page or end appears again.
Ending
Press
 (FINISH button) on the machine or click Finish in the message screen.
The scanned images are saved in PDF format.
[COPY], [PHOTO/FILM], and [E-MAIL] Buttons
 Scanning and Printing/Copying Documents (COPY Button)
Print documents on a printer.
![]() Note
Note
- Prepare the printer when printing with the COPY button. Refer to the manual of your printer to prepare it.
- Place the document on the Platen.
- Press the COPY button.
MP Navigator EX screen appears automatically and scanning starts. The scanned image is printed on a printer
 Scanning Documents and Opening the Scanned Images (SCAN Button)
Scan and save documents. Document type is automatically detected and appropriate settings are applied.
ImportantBy default, when the SCAN button is pressed, MP Navigator EX automatically detects the document type. Documents may not be scanned correctly depending on the document type. In that case, specify the document type.
- Place the document on the Platen.
- Press the SCAN button.
MP Navigator EX screen appears automatically and scanning starts.
 Scanning and Attaching Documents to E-mail (E-MAIL Button)
Attach image files to new e-mail.
-
If an e-mail software program is not selected, manually attach the scanned and saved image to e-mail.
-
Refer to the corresponding manual for the printer, application and e-mail program settings.
-
MP Navigator EX is compatible with the following e-mail software programs:
- Windows Mail (Windows Vista)
- Outlook Express (Windows XP/Windows 2000)
- Microsoft Outlook
- EUDORA
- Netscape Mail(If an e-mail software program does not operate properly, check that the program's MAPI is enabled. To enable MAPI, refer to the manual of the e-mail software program.)
-
Place the document on the Platen.
-
Press the E-MAIL button.
MP Navigator EX screen appears automatically and scanning starts. The scanned image is attached to new e-mail.
-
Specify the recipient, enter the subject and message, then send e-mail.
For details, refer to the manual of the e-mail software program.