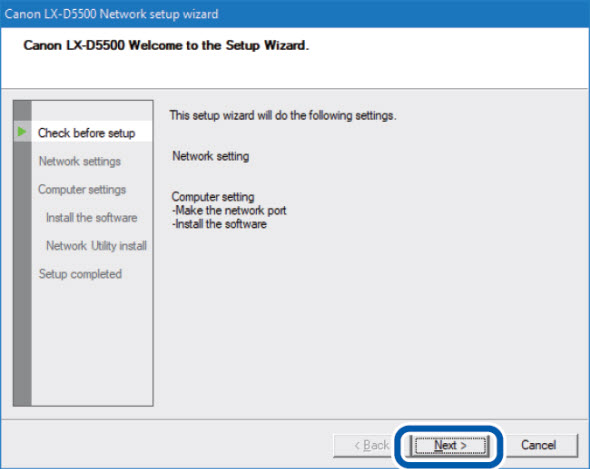
This article shows how to install the printer driver of the LX-D5500 / LX-P5510.
Solution
The printer can be connected to a computer with a USB connection or an Ethernet connection.
Select an option for instructions.
A USB cable does not come with this printer. Use a commercially available USB cable that is compatible with your computer.
Do not connect the USB cable before installing the printer driver. After starting installation of the printer driver, connect the USB cable when instructed by a message shown computer screen during the printer driver installation.
Turn off the printer.
Press and hold the power key for at least 1 second.
If the printer is connected to the computer via USB cable, disconnect the USB cable.
Turn the computer on and log in to the computer as the user with Administrator authority.
System administration authority is required for printer driver installation.
Have Anti-virus programs and other resident programs closed prior to starting the printer driver installation.
Operate the computer as follows.
When downloading and installing the printer driver:
Download the printer driver on the computer. The printer driver can be downloaded from
the Canon
USA web site. After finishing the download, run this file. If you are asked to provide permission to run this file, select the appropriate affirmative option.
A
folder will be created with the same name as the file you have downloaded. This folder will be located in the same location where you saved the file. For example, if you have saved this file in your Downloads folder,
you will find a folder in Downloads with the same name as the file you downloaded from the Canon USA website.
Open the decompressed file, double-click “CFSETUP.EXE“.
If you are asked to provide permission to run this file, select the appropriate affirmative option.
When installing the printer driver using the supplied CD:
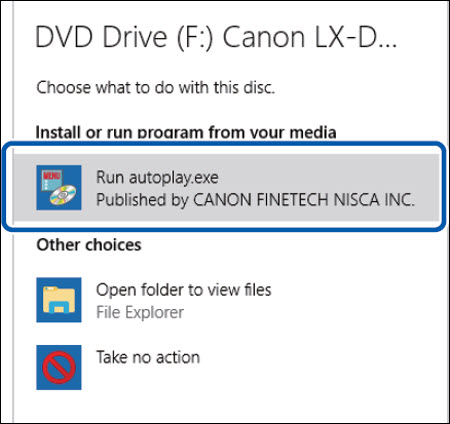
Insert the Printer Software CD into the computer.
Select [Run autoplay.exe].
A user account control dialog box may appear. In this case, select [Yes].
The installation start window may not appear depending on the CD-ROM
drive auto run setting. In this case, double-click the CD-ROM Drive icon in [This PC] (or [Computer]), then double-click [autoplay.exe].
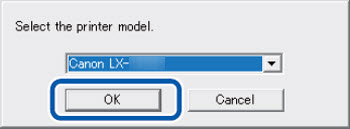
Select [Install the printer driver].
Confirm this printer is selected and click [OK].
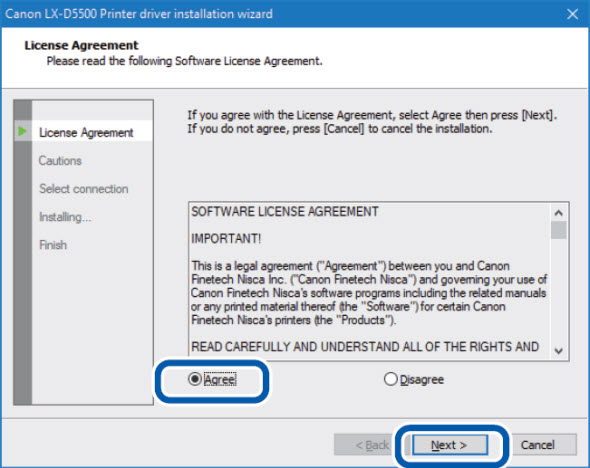
Read the software license agreement, select [Agree], and then click [Next].
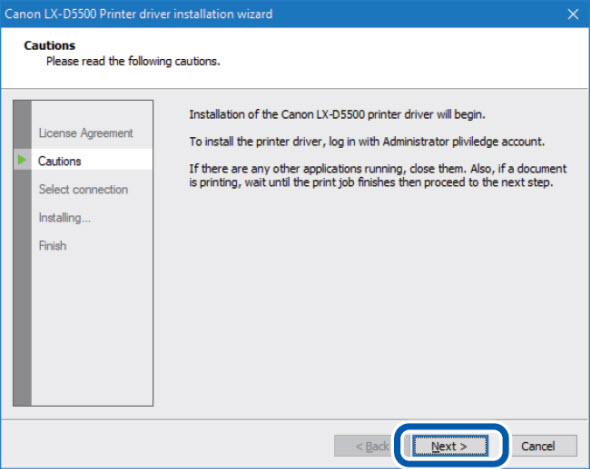
Read the Cautions and then click [Next].
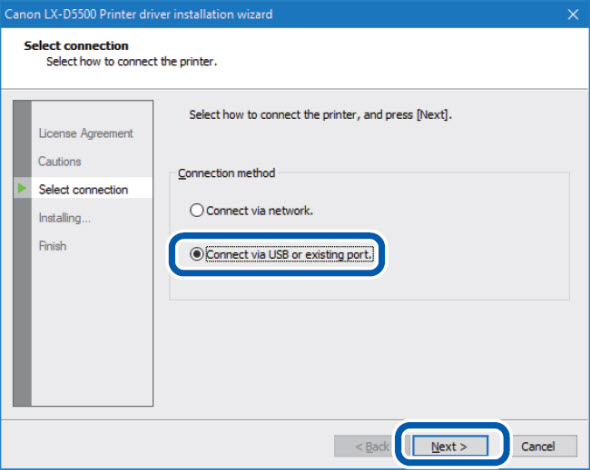
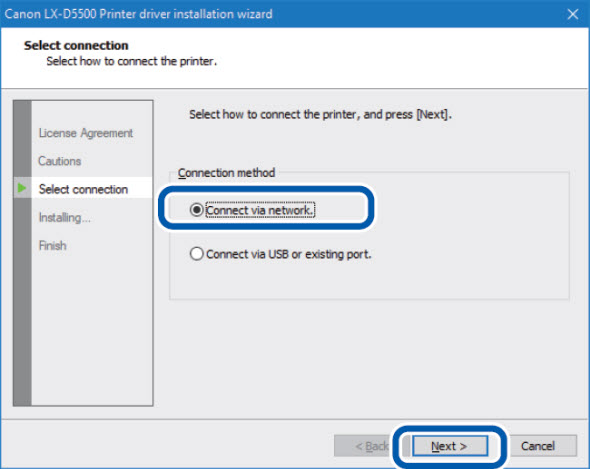
Select [Connect via USB or existing port] and then click [Next].
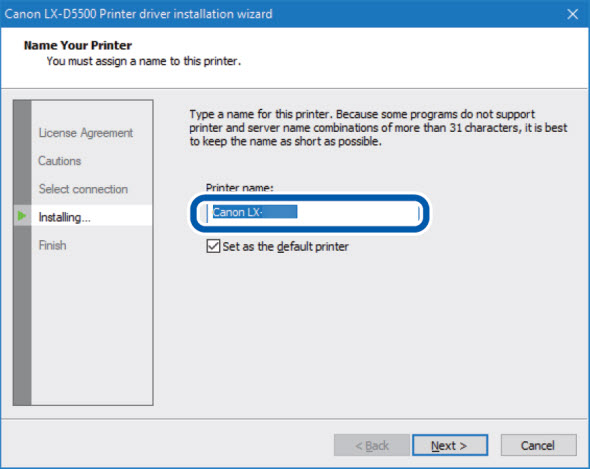
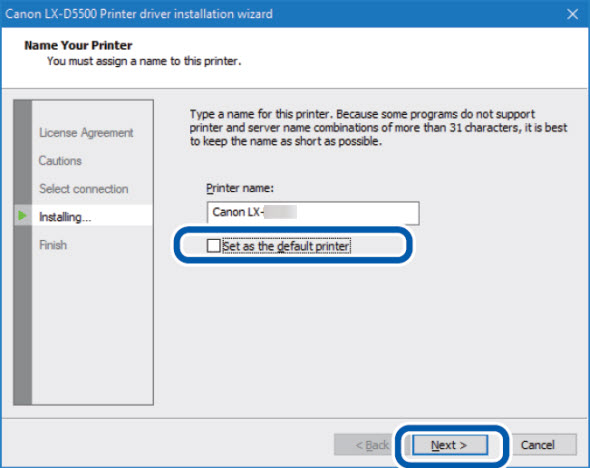
To change the printer name, enter a new printer name in "Printer name."
When this printer is not the default printer, uncheck the checkbox then click [Next].
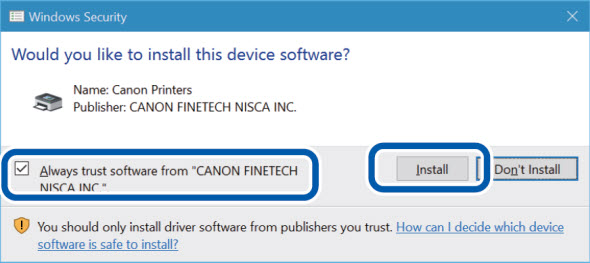
Check [Always trust software from "CANON FINETECH NISCA INC."] checkbox and then click [Install].
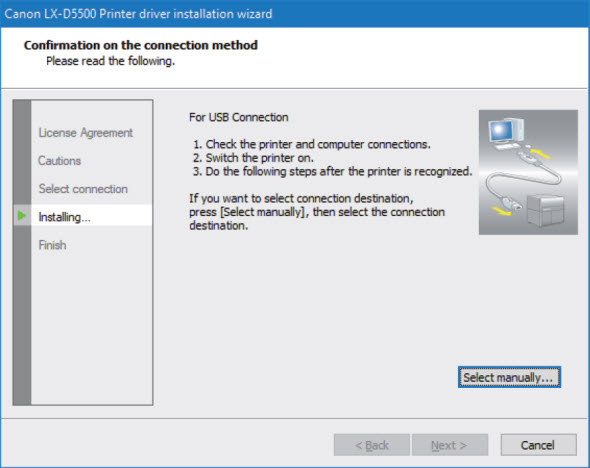
When the next window is displayed, turn the printer on and connect computer and printer with USB cable.
When the printer is recognized, installation will begin.
If the computer, connected to the printer by USB cable, is linked to a network, it may take some time to recognize the printer.
If you would like to select the connection destination by yourself, click [Select manually...] and select the connection port.
The USB cable is hot-swappable. However, it should be noted that the USB cable should not be connected or disconnected in the following cases:
When the computer is being booted (before the desktop appears)
When the printer is printing
When the printer driver is being installed
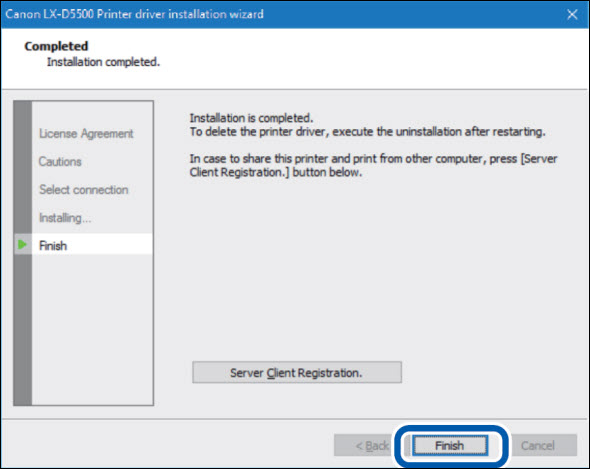
Click [Finish].
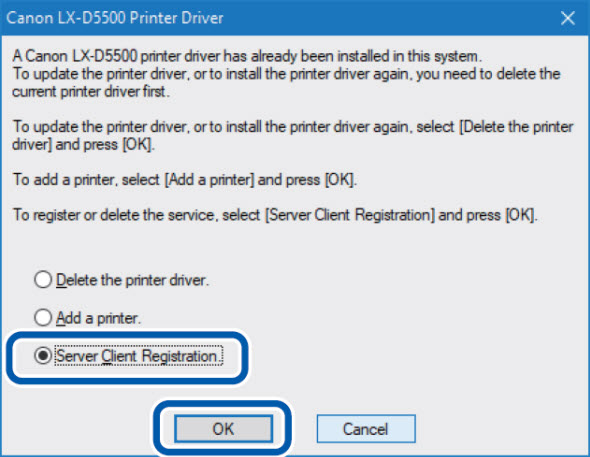
If the printer driver was installed in a computer to be used as a print server, click [Server Client Registration].
The server client can be registered after completion of installation of the printer driver.
Run the installer according to step 4 above.
Select [Server Client Registration].
Click [OK].
To
delete the server client registration, perform the procedure above the server client registration procedure. A confirmation message of the service deletion appears.
When the supplied CD is used, remove it.
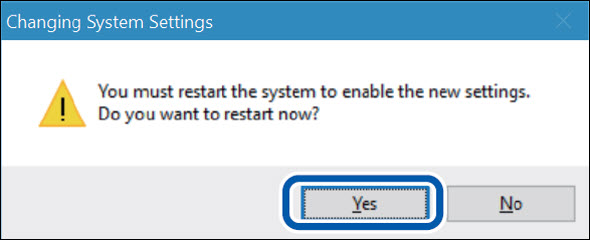
Click [Yes].
The computer wlil reboot.
When [No] is selected, be sure to restart Windows prior to using the printer.
Installation of the printer driver via a USB cable is completed.
An Ethernet cable does not come with this printer. Use a commercially available Ethernet cable that is compatible with your computer.
Use a Category 5e or better twisted pair Ethernet cable.
Connection to a corporate LAN must be made by a network administrator.
If several printers will be connected to the same network, configure the printers one at a time. If several printers are turned on and configured at once, the default IP address assigned to each printer will overlap and will prevent the use of the network.
Check that the printer is powered on.
If the printer is turned off, press the power key to turn the printer on.
Go through steps 3 to 6 of the procedure for using the printer via a USB cable.
Select [Connect via network] and then click [Next].
Click [Next].
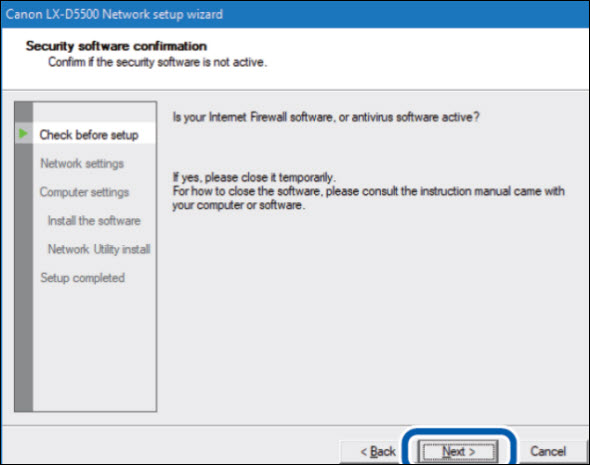
Confirm the instructions regarding the security software which is shown on the screen, and then click [Next].
If the Windows Firewall settings dialog box appears, click [Yes].
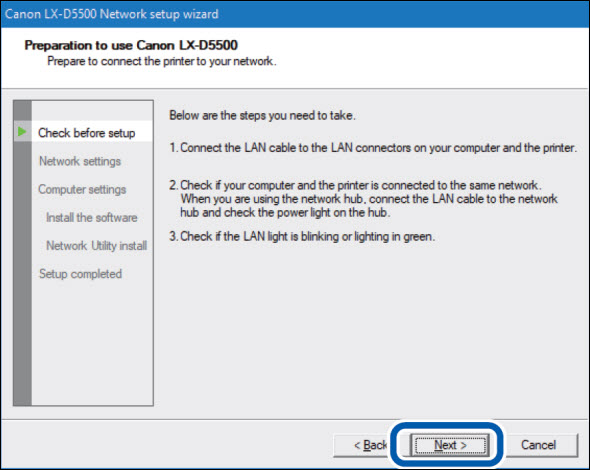
When the window below is displayed, connect the printer to the network with an ethernet cable and then click [Next].
It starts to search for this printer.
When the window below is displayed, select this printer and click [Next].
If no printer name is displayed after printer search:
If no printer name is displayed on this screen, click [Find].
If no printer name is displayed again, there may be a problem in the network environment. Contact the network administrator. Possible causes are as follows:
This printer and the computer are installed on different networks, and therefore the computer cannot find this printer.
If the IP address necessary for network operation is not set, connection to the network could fail.
If no printer name is displayed due to the above reasons, connect this printer and the computer on the same network, and set the IP address. After setting the IP address, click [Find] again.
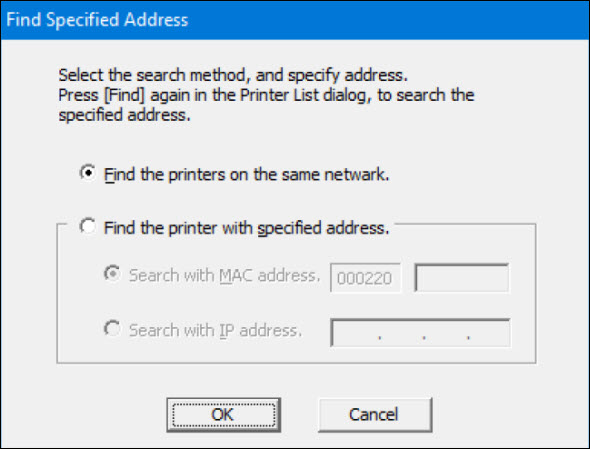
To search for the printer with IP address specified:
Click the [Find with specified address...] button on the screen in step 7.
Select [Find the printer specified address.] radio button on the screen that appears, and then enter MAC address or IP address. The MAC address and IP address* can be confirmed with the output setting value. For more details, refer to "Checking Setting Values" in the User's Guide.
* If the IP address is automatically assigned by a DHCP server, the IP address that is printed when the printer settings are printed and the actual IP address will be different.
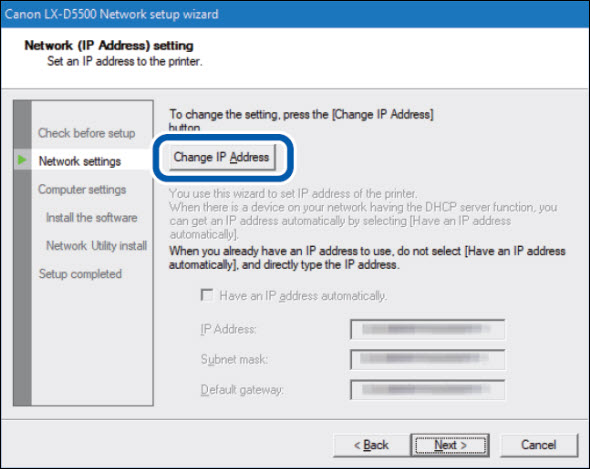
Set the IP address of the printer.
When changing the printer's IP address, contact the network administrator.
To change the IP address:
Click [Change IP Address] to proceed to step 9.
To proceed without changing the IP address:
Click [Next] to proceed to step 11.
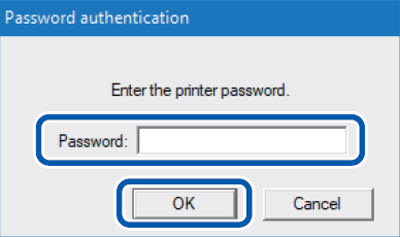
Enter the password and then click [OK].
When changing the IP address, it is necessary to enter a password for the network setup. Contact the network administrator.
The password can be changed with the network utility after completing of installation. (Default password: admin). For more details, refer to "About the Network Utility" in the User's Guide.
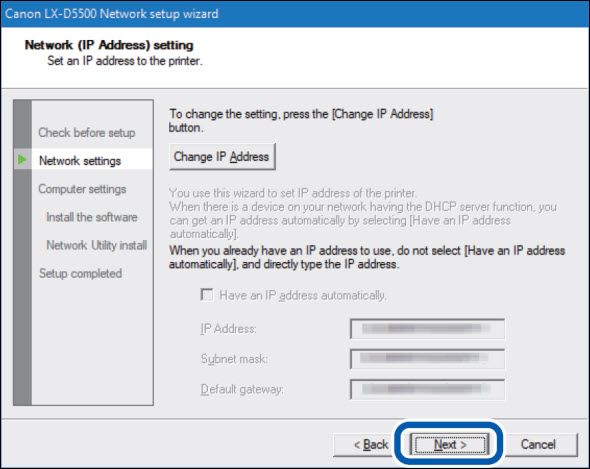
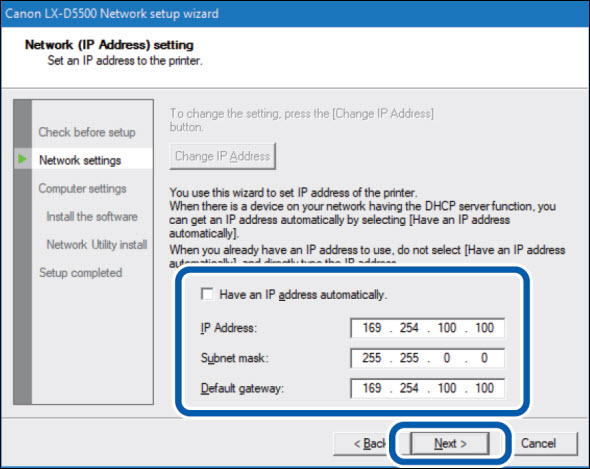
Change the IP address and then click [Next].
The IP address shown now is the default IP address.
When there is a device having DHCP server function on the network, checking "Have an IP address automatically" checkbox gets an IP address for the printer automatically.
When there is no device having DHCP server function on the network, note the following:
If there are two or more identical printers (this printer) on the same network, IP address may be duplicated.
Do not check the "Have an IP address automatically" checkbox.
Change the default IP address to an address of your choice.
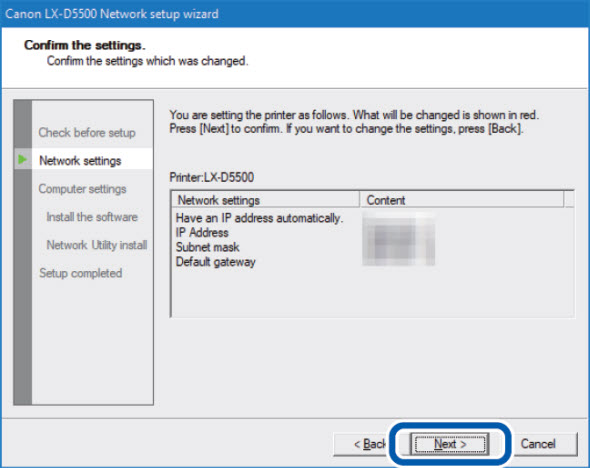
Confirm the network settings which are shown on the screen, and then click [Next].
Click [Next].
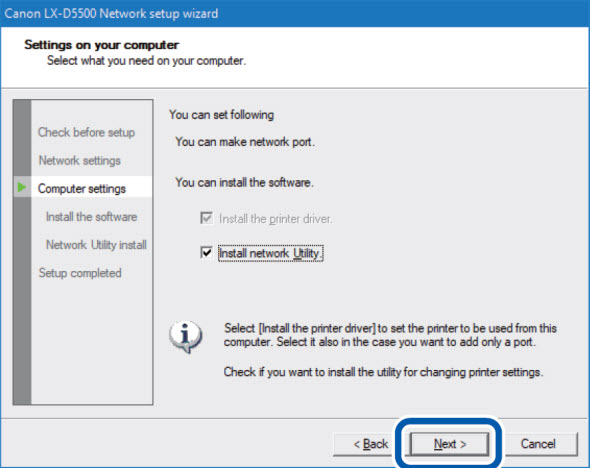
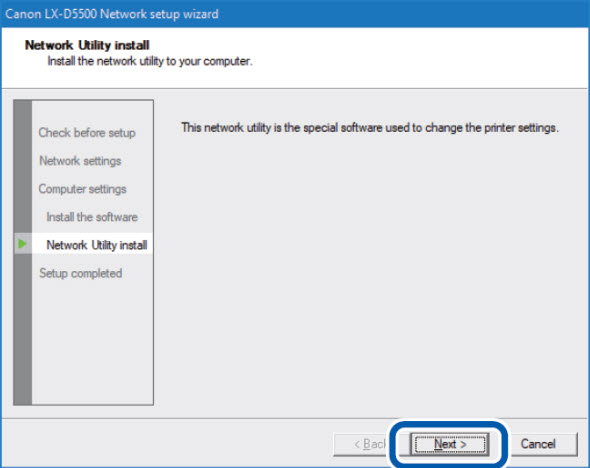
The network utility is a tool for configuring network settings for the printer. The network utility is required when changing the printer's IP address. Be sure to install it (do not uncheck "Install network Utility" checkbox).
For information on how to use the network utility, refer to "About the Network Utility" in the User's Guide.
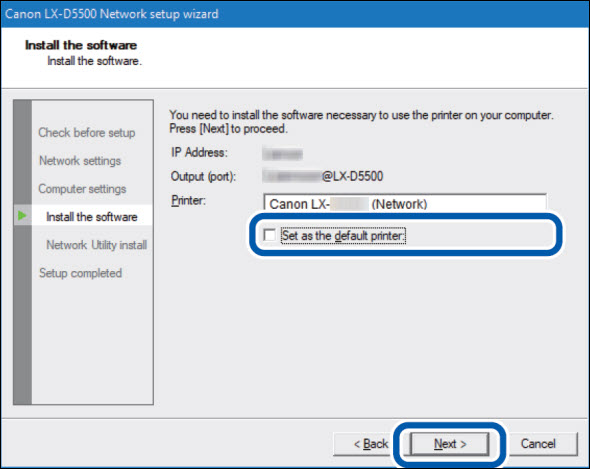
To change the printer name, enter a new printer name in "Printer name."
When not set as the default printer, uncheck the checkbox then click [Next].
Check the [Always trust software from "CANON FINETECH NISCA INC."] checkbox then click [Install].
Click [Next].
The network utility will be installed.
Click [Finish].
The installation of the printer driver will begin.
Click [Finish].
If the printer driver was installed in a computer to be used as a print server, click [Server Client Registration].
The
server client can be registered after completion of installation of the printer driver.
Run the installer according to step 4.
Select [Server Client Registration].
Click [OK].
To delete the server client registration, perform procedure above server client registration procedure. A confirmation message of the service deletion appears.
When the supplied CD is used, remove it.
Click [Yes].
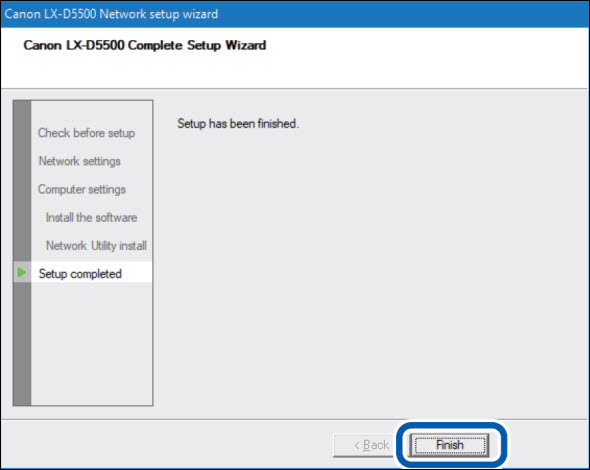
Rebooting of the computer starts automatically.
When [No] is selected, be sure to restart Windows prior to using the printer.
Installation of the printer driver via an ethernet cable is completed.
If your product issue was not resolved after following the steps above, or if you require additional help, please create or log in to your Canon Account to see your technical support options.
Or if you still need help, visit our Canon Community by clicking the button below to get answers:

 A USB cable does not come with this printer. Use a commercially available USB cable that is compatible with your computer.
 A
folder will be created with the same name as the file you have downloaded. This folder will be located in the same location where you saved the file. For example, if you have saved this file in your Downloads folder,
you will find a folder in Downloads with the same name as the file you downloaded from the Canon USA website.
A
folder will be created with the same name as the file you have downloaded. This folder will be located in the same location where you saved the file. For example, if you have saved this file in your Downloads folder,
you will find a folder in Downloads with the same name as the file you downloaded from the Canon USA website.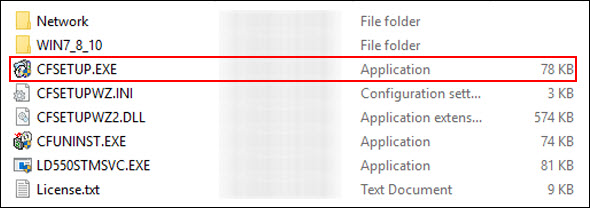


![Select the printer, then click [Next] (circled)](https://support.usa.canon.com/library/CANON/CITS_TECH_SUPPORT/Printers/LX-P5510/Install%20Driver/network_setup_select_printer.jpg)