Adjustment using exposure recalibration switch and Adjusting the copy exposure manually
Solution
Adjusting the Copy Exposure
This copier comes with automatic exposure control model. When this mode is set the copier pre-scans the original and automatically adjusts the copy exposure to the most appropriate level. The auto exposure control may not produce clear copies on the following types of originals: Originals with a shaded or dark background (e.g., newspapers) Light or faint originals (e.g., pencil written work).
Adjustment using exposure recalibration switch
Insert a coin or similar object into the slot in the exposure recalibration switch. This switch has three positions.
To make darker copies, move the switch upward. To make lighter copies, move the switch downward.
If this does not produce the desired results, follow the procedure below.
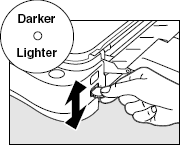
Adjusting the copy exposure manually
When the auto exposure control mode fails to produce a clear copy due to an unusual original type, it may be necessary to adjust the copy exposure manually depending on the original.
Press thekey to switch to manual exposure control mode. The A indicator lamp will no longer be lit.
Adjust the exposure level by sliding the exposure adjustment lever.
To darken the exposure, slide the lever to the right. To lighten the exposure, slide the lever to the left.
Guidelines for exposure level adjustment
Ordinary Originals:
Slide the lever to the center
Originals with a Dark Background:
Lighten the exposure by sliding the lever to the left
Light Originals
Darken the exposure by sliding the lever to the right
The exposure adjustment lever cannot be used while the auto exposure control mode is set.
The level can only be used after the key has been pressed and the A indicator is no longer lit.
When making color copies, lighten the copy exposure manually to avoid the dark shading that appears when color copies are made in the auto exposure mode.

 Originals with a shaded or dark background (e.g., newspapers)
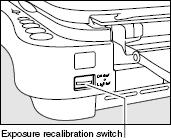
 key to switch to manual exposure control mode.
