
Importing clips from a CF card to the computer (XF200 / XF205)
| Article ID: ART116959 | | | Date published: 05/12/2015 | | | Date last updated: 02/20/2024 |
Description
Importing clips from a CF card to the computer (XF200 / XF205)
Solution
| Importing clips from a CF card to the computer (XF200 / XF205)
ID : 8202091700 _ EN _ 1
|
|
| Solution |
You can import clips from a CF card to a computer using Canon XF Utility. You can import all the clips at once or select which clips to import. You can also select multiple CF cards to import in one go all the clips they contain. Using the auto backup function, whenever a CF card is detected, XF Utility will automatically back up the clips it contains.
Although the example procedure below is shown in Mac OS X, similar procedures can be used in Windows 8/8.1 and Windows 7 environments.
Reading a CF card with the computer 1. Start Canon XF Utility.
2. Insert the CF card into the card reader. When the CF card is correctly recognized*, it will appear in the list of available media in the media panel.
* Only CF cards that were initialized using the camcorder and have the designated folder structure will be correctly recognized.
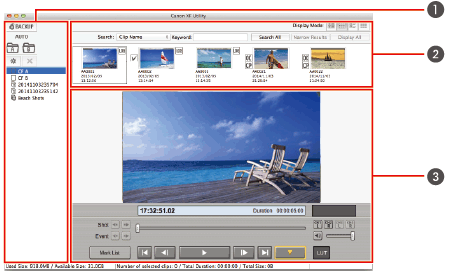  : Media Panel : Media Panel : Clips Panel : Clips Panel : Preview Panel : Preview Panel
Importing all clips from a CF Card at once (Media Backup) You can import all the clips contained in a CF card at once by backing up the CF card. When you back up a CF card, a virtual media is created automatically in a specified folder in the computer. You can even specify a second backup folder to automatically save two backup copies of your recordings.
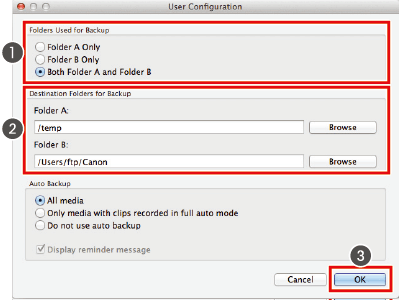
1. To change the backup settings, Click Canon XF Utility -> Preferences.
The Preferences dialog box will appear.
2. Select the Folders Used for Backup (
).
3. Specify the Destination Folders for Backup (
).Depending on your selection in step 2, click Browse and then select the destination folder for Folder A, Folder B, or .
4. Click OK (
) to close the dialog box.Depending on the settings selected, the
 / /  icons will indicate which folder(s) are used for backup. icons will indicate which folder(s) are used for backup.
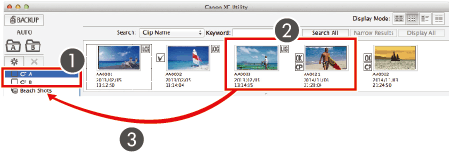
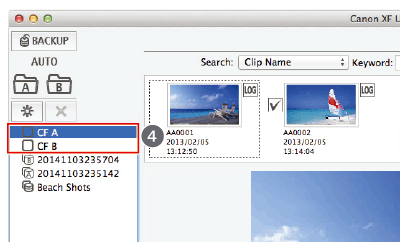
5. To back up the media, In the media panel, select the CF card you want to back up (
 ). ).
6. Click [
 BACKUP (the Back Up Media tool, BACKUP (the Back Up Media tool,  ). ).
7. Only when backing up a CF card that has already been backed up previously, you will be asked to select the type of backup you want to create.

[Full Backup]: Import all the clips again
[Incremental Backup]: Back up only those clips that have not been imported previously.
8. Click [Yes].
9. Click [OK].
Importing selected clips You can select which clips to import to the computer from the clips recorded on a CF card. In such case, you will need to create in advance a virtual media in the local folder on the computer where you want to save the clips.
1. If necessary, create a new virtual media.*
*For more information on the procedure, please refer to the Canon XF Utility Instruction Manual.
2. In the media panel, select the CF card that contains the clips you want to import (
).
3. In the clips panel, select the clips you want to import (
).
Click the desired clips while holding the
 key ( + Click). key ( + Click).(For Windows, click the desired clips while holding the Ctrl key (Ctrl + Click).
Click the first clip and then click the last clip while holding the Shift key (Shift + Click).
To select all clips: Click Edit -> [Select All].
4. Drag the selected clips to the icon of the desired virtual media in the media panel (
).
Auto Backup When the software detects a CF card connected to the computer, you can have the clips in the CF card automatically backed up into a folder in the computer. You can even specify a second auto backup folder to automatically save two backup copies of your recordings.
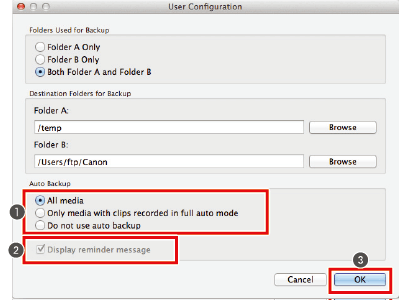
1. Click Canon XF Utility -> [Preferences].
2. Select the Folders Used for Backup and the Destination Folders for Backup as necessary.
3. Select the Auto Backup settings (
).[All media]: Automatically backs up clips every time a CF card is detected.
[Only media with clips recorded in full auto mode]: Automatically backs up clips only if the CF card that was detected contains clips that were recorded using the camcorders full auto mode.
[Do not use auto backup]: Turns off the auto backup function.
4. If necessary, uncheck the Display reminder message box (
).If you uncheck the box, the [Do not use auto backup setting] is automatically selected and the auto backup reminder message will not appear when a CF card is detected.
5. Click [OK] to close the dialog box (
).Depending on the settings selected, the [AUTO] display will indicate if the auto backup function is on (full icon) or off (grayed out icon), and the
 / / icons will indicate which folder(s) are used for backup. icons will indicate which folder(s) are used for backup.
6. Connect a CF card or the camcorder to the computer.
7. Only when backing up a CF card that has already been backed up previously, you will be asked to select the type of backup you want to create.
[Full Backup]: Import all the clips again
[Incremental Backup]: Back up only those clips that have not been imported previously.
8. Click [Yes].
 A virtual media will be created automatically (
) and the clips will be copied to the local folder on the computer.If in step 7 you selected the [Incremental Backup] option, any new clips will be copied to the folder used for the original backup.
Click [Cancel] to interrupt the operation.
When the backup operation is completed, a confirmation dialog box will show the name automatically given to the virtual media. (The name of the virtual media represents the date and time of the backup operation.)
9. Click [OK].
|

 ) and the clips will be copied to the local folder on the computer.
SIMS Doc Id
8202091700