
Printing pictures from a memory card / USB Flash drive MX870
| Article ID: ART106047 | | | Date published: 05/11/2015 | | | Date last updated: 08/15/2015 |
Description
Solution
Printing Photos Saved on the Memory Card / USB Flash Drive
Preview each photo from the memory card or USB flash drive on the LCD, to select and print the desired photo.
This section describes the procedure to print borderless photos on 4" x 6" / 10 x 15 cm photo paper.
For the operation, see the notes and operation procedure described in the reference page.

You need to prepare:
A memory card with saved photos.

A USB flash drive with saved photos.
![]()
Photo paper for printing.

-
Prepare for printing.
(1) Make sure that the power is turned on.
(2) Load paper.Here we load 4" x 6" / 10 x 15 cm photo paper in the Rear Tray.
|
|
(3) Open the Paper Output Tray gently, and open the Output Tray Extension.

-
Insert a memory card or USB flash drive.
Memory card:Insert it WITH THE LABELED SIDE FACING TO THE LEFT into the Card Slot.USB flash drive:Insert it into the Direct Print Port.If the memory card or USB flash memory is inserted when the copy standby screen or fax standby screen is displayed, the photo selection screen in Select photo print will appear.If the photo selection screen does not appearPress the CARD button.If the message appearsIf photos and documents (PDF files) are saved on the memory card or USB flash drive, the message "Photos and documents (PDF) are saved. Which do you want to print?" will appear.Select Print photos to print photos, and press the OK button. The photo selection screen in Select photo print will appear.Select Print documents to print documents (PDF files), and press the OK button.(A) Memory card(B) USB flash drive

|
-
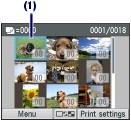
Select photos to print.
(1) Use the ,
,  ,
,  , or
, or  button (Scroll Wheel) (C) to move the cursor to a desired photo.
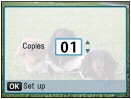
(2) Use the Numeric buttons to specify the number of copies.

|
(3) Repeat the procedures of (1) and (2) to specify the number of copies for each photo.
|
-
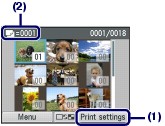
Start printing.
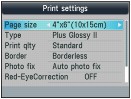
(1) Press the right Function button (E) to select Print settings, and confirm the page size, media type, print quality, etc.
Here we confirm that 4"x6" (10x15cm) is selected for Page size and the type of loaded photo paper for Type.To change the settings, use the
|
(2) Confirm the number of sheets to be used for printing the selected photos.(3) Press the Color button.The machine starts printing photos.
|
Printing a Specified Area (Trimming mode)
You can edit images displayed on the LCD by cropping them.
 Note
Note-
The trimming mode cannot be available depending on the print menu.
-
Crop images after specifying the page size, media type, and bordered or borderless printing in the print settings confirmation screen. If you change the paper settings after cropping, the cropped area may be adjusted to match the paper, or be disabled completely.
-
Select the photo to crop.
-
Display the cropping edit screen.
-
Press the center Function button to display the cropping edit screen..
The Trimming screen is displayed.
-
-
Choose the area to print.

Use the following buttons to crop the area.
 ,
,  ,
,  , and
, and  buttons:
-
Positions the cropping frame.
- Scroll Wheel:
-
Sets the cropping frame size.
Turn the Scroll Wheel clockwise to enlarge the size of the cropping frame or counterclockwise to reduce it
- # button:
-
Changes the aspect ratio of the cropping frame.
* button:
Rotates the cropping frame
To switch the cropping frame between portrait and landscape orientations, press this button.
-
Press the Left Function button to finalize your selection of cropping area.
The area to be cropped is specified, and the original photo is displayed.
Note-
The cropped image cannot be newly saved on the memory card/USB flash drive.
-
The cropping area is displayed only for photos which have been cropped.
-
To change the cropped area once it has been set, display the Trimming screen again.
-
To cancel cropping after cropping has been set, display the Trimming screen again and press the right Function button.
 Changing the Settings
If you press the right Function button to select Print settings on the photo selection screen, the print settings screen will appear.
You can use the ![]() or
or ![]() button (Scroll Wheel) to select the item, such as page size, media type, or print quality, and use the
button (Scroll Wheel) to select the item, such as page size, media type, or print quality, and use the ![]() or
or ![]() button to change the setting.
button to change the setting.
|
|
|
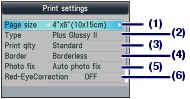
(1) Page sizeSelect the page size of the paper to print: 4"x6" (10x15cm), A4, etc.(2) Type (Media type)Select the media type of the paper to print: Plus Glossy II, Glossy, etc.
|
(3) Print qlty (Print quality)Select the print quality: High or Standard.(4) BorderSelect bordered or borderless print: Bordered or Borderless.
|
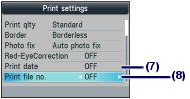
(5) Photo fixCorrect photos: Auto photo fix or Manual correction. The photo can be also printed without correction.When Manual correction is selected and the right Function button is pressed to select Advanced, brightness, contrast, color balance, etc. can be adjusted.(6) Red-EyeCorrectionCorrect red eyes in portraits caused by flash photography.(7) Print datePrint a photo with shot date.(8) Print file no.Print a photo with file number.
|