Print Head Alignment (Mac OS X)
Print Head Alignment adjusts differences in the print head position and corrects horizontal and vertical shifts when printing graphs, lines, and text.
Note: - After confirming that the cable connects the printer to the computer and the printer is powered on, follow the procedures below. - After confirming that printing is not being performed, launch the IJ Printer Utility.
- Launch IJ Printer Utility.
Note: In versions of Mac OS X older than 10.4, open the IJ / BJ Printer Utility from the Library>Printers>Canon>BJPrinter>Utilities folder.
- In the Apple menu select System Preferences
- Open Print & Fax.
- Make sure the correct printer is selected and, depending on OS version, click 'Open Print Queue...' or 'Print Queue...'.
- Click the Utility icon.
- Select the printer, then click 'Maintenance'.
- Make sure that the printer is turned on.
- Load three or more sheets of Letter-sized plain paper in the Cassette.
- Open the Paper Output Tray and extend the Output Tray Extension.
- In the pop-up menu, select 'Test Print'.
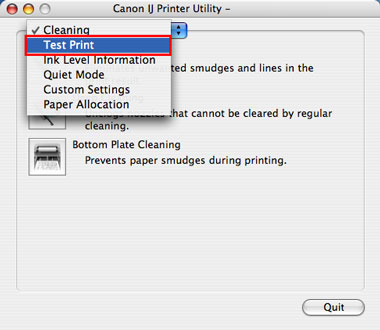
- Click 'Print Head Alignment'.
- Click the 'Print Head Alignment' button.
Note: If you click 'Check Setting', the printer prints out the current setting and the display goes back to Canon IJ Printer Utility. To see the current setting first, load a sheet of plain paper in the auto sheet feeder and click 'Check Setting'.
- Printing will start. Do not perform any other operations until the printing is completed.
- The patterns will be printed.
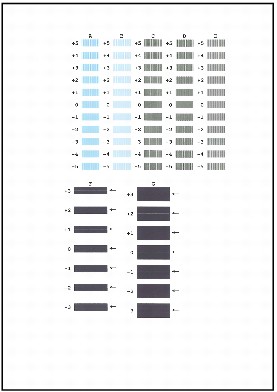
- Refer to the printed sheet, and enter the numbers on the Print Head Alignment window.

15-1. Select the pattern with the least amount of visible, vertical streaks in the field for Column A.
Note: If it is difficult to pick the best pattern, pick the setting that produces the least noticeable vertical white streaks.
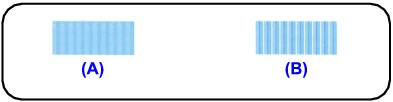
(A) Less noticeable vertical white streaks.
(B) More noticeable vertical white streaks
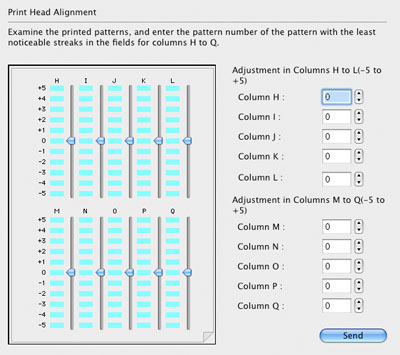
15-2. Enter the pattern number of the selected pattern in the Column A box displayed in the right side of the screen.
15-3. Similarly, enter the numbers of the selected patterns in the Column B to G boxes and click 'OK'. For column F and G, pick the setting that produces the least noticeable horizontal streaks.

(C) Less noticeable horizontal white streaks
(D) More noticeable horizontal white streaks
15-4. When all the numbers are entered, click 'Send'.
- Now, print the second pattern sheet. Set one sheet of letter size plain paper in either of the paper sources selected at the <Paper Feed Switch>, then click 'OK'.

- Printing will start. Do not perform any other operations until the printing is completed.
- The patterns will be printed.

- Refer to the printed sheet, and enter the numbers on the Print Head Alignment window in the same way as step 15.
- After entering all the numbers, click 'Send'.
If it is difficult to pick the best pattern, pick the setting that produces the least noticeable vertical white streaks.
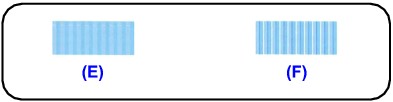
(E) Less noticeable vertical white streaks
(F) More noticeable vertical white streaks
- Print the third pattern sheet. Set one sheet of letter size plain paper in either of the paper sources selected at the Paper Feed Switch, then click 'OK'.
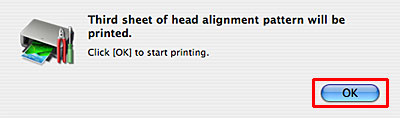
- Printing will start. Do not perform any other operations until the printing is completed.
- The patterns will be printed.

- Examine the printed sheet, and enter the pattern numbers of the most even pattern for each column in the Print Head Alignment window.

- After entering all the numbers, click 'Send'.
If it is difficult to pick the best pattern, pick the setting that produces the least noticeable horizontal streaks.
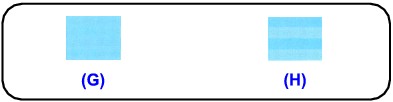
(G) Less noticeable horizontal white streaks
(H) More noticeable horizontal white streaks
Performing Print Head Alignment is completed.
