Compatible remote controllers and switches - EOS 7D Mark II
Article ID: FAQ100422
|
Date published: 11/08/2017
|
Date last updated: 11/30/2017
Answer
Compatible controllers and switches
You can connect the following remote controllers or switches to your camera:
Canon Remote Controller RC-6
Canon Timer Remote Controller TC-80N3
Canon Remote Switch RS-80N3
Canon Wireless Controller LC-5
EX-series Speedlite with a remote-release function
Any EOS accessory with an N3-type terminal
See the Supplies & Accessories page of the Canon website for more information on these products.
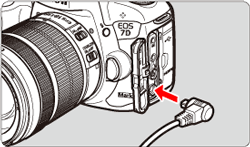
Connect a controller or switch
Open the terminal cover.
Connect the plug to the remote control terminal.
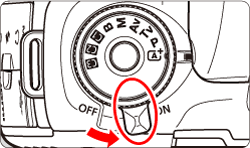
Shooting with a remote control
Switch <ON> the camera.
Press the < DRIVE AF > button.
Look at the LCD panel or through the viewfinder and turn the <> dial to select < >(10-sec. delay) or < >(2-sec. delay).
Point the remote controller toward the cameras remote control sensor () and press the transmit button.
Once focus is achieved, the self-timer lamp lights up and a picture is taken.
Good to know
Fluorescent or LED lighting may trigger the shutter inadvertently. Try to keep the camera away from such light sources.
Other remote controllers that use infrared, such as one for a TV, could operate the camera unintentionally.
You can use Remote Controller RC-6 (sold separately) to start and stop the movie shooting if the drive mode is <> or <>. Set the shooting timing switch to <2> (2-sec. delay), then press the transmit button. If the switch is set to <> (immediate shooting), the camera shoots a still photo.
If [ / ] or [ / ] is set, you can start/stop the movie shooting by pressing the shutter button completely or by using Remote Switch RS-80N3 or Timer Remote Controller TC-80N3. However, with [ / ] or [ / ] set, still photo shooting is not possible.


 > dial to select <
  >(10-sec. delay) or <
  >(2-sec. delay).
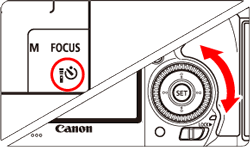
 ) and press the transmit button.
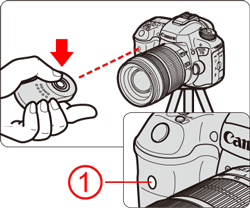
 > (immediate shooting), the camera shoots a still photo.
 /
/  ] or [
  /
/