|
|
Loading Paper CX-G6400
| Article ID: ART169467 |
| |
Date published: |
| |
Date last updated: 03/15/2018 |
Description
test purposes
Solution
Loading Paper
The procedure of loading paper is described below.
For details of paper and how to get paper, contact your place of purchase.
![]()
- Make sure the power lamp is on.
If the power lamp does not stay lit or it is not blinking, press the power key.
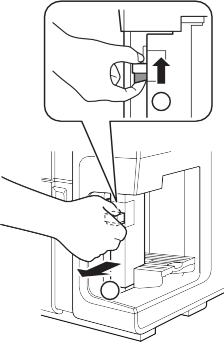
- While raising the side guide lever, move the side guide fully to the front side.
- Prepare paper.
- For business card/card/postcard/envelopes
- When loading envelopes, press down on all four corners and edges of the envelopes to flatten them.

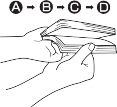
- As shown in the figure, flip through the four sides (
   ) of the paper to separate the sheets. ) of the paper to separate the sheets.
- Check the curl.
As shown in the figure, if the paper is placed with the printing surface facing up and the paper
is curled upward (Fig.1), fix the curl so that the paper is flat.
(Fig.1)
If the paper is curled downward (Fig.2), flatten the paper so that the curl does not exceed 2 mm.
(Fig.2)
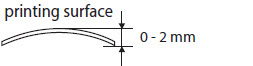
Paper that is curled upward can cause paper jams or printing surface rubbing. If the paper is curled, bend in the direction opposite to the curl in order to flatten it.
- For plastic card
- Flip through the two short sides ( ) of the card to separate the cards.
 
 Note: Note:
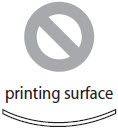
- When flipping through the card, do not touch the printing surface with your fingers.
- Flip through the two short sides of the card thoroughly. If you have difficulty flipping
through the card, do it in small amounts.
- Setting the card after flipping through it will prevent multiple cards from being fed at once.
- Check the curl.
As shown in the figure, if the paper is placed with the printing surface facing up and the paper
is curled upward (Fig.1), fix the curl so that the paper is flat.
(Fig.1)
If the paper is curled downward (Fig.2), flatten the paper so that the curl does not exceed 0.5 mm.
(Fig.2)

- load the paper in the feeder lift tray according to the paper type of the paper.
 Important: Important:
- Align the edges before loading. Otherwise, printing may be slanted, or a paper jam may occur
- The capacity of the feeder lift tray is as follows:
Business card (Thickness: 0.245 mm (9.64 mil) or less): 500 sheets
Postcard (Thickness: 0.245 mm (9.64 mil) or less): 500 sheets
Special heavy paper (Thickness: 0.76 mm (29.92 mil)): 100 sheets
Plastic card: 100 sheets
Envelope: 100 sheets
- Check that the height of the paper stack does not exceed the load limit mark. If a paper feed error occurs, reduce the number of sheets loaded in the tray.
- When using business card, card or plastic card
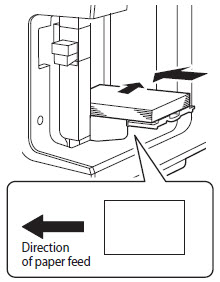
Load the paper in the feeder lift tray as shown in the figure.

- When using postcard
- Pull out the auxiliary tray of the feeder lift tray.

- Load the paper in the feeder lift tray as shown in the figure.
- When using envelopes
- Pull out the auxiliary tray, and open the folded tray.
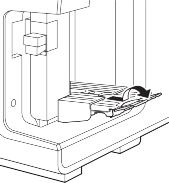
- Load the envelopes with the flap closed and with the front facing up as shown in the figure.

Important: Do not print on the back of the envelope. A printing failure or other problems may result.
- While raising the side guide lever, slowly move the side guide until it stops against paper.

Important: Do not press the side guide against the paper stack too strongly. A paper jam can result.
- Press the TRAY key.
The feeder lift tray rises automatically. Wait until it stops rising.
Caution: Do not touch the feeder lift tray while it is in operation. In addition, do not insert your
finger or any object under the tray. An injury or failure can result.

- Set the each part on the delivery area according to the paper form of the paper.
Information about Paper
Types of paper that can be used with this printer are as follows:
- Matte Coated Paper
- Glossy paper
- Plastic card
- Postcard
- Envelope
For details of paper and how to get paper, contact your place of purchase.
Important
- Do not use incompatible paper in order to avoid paper jams and printer malfunctions.
- Use plastic cards for inkjet printers. Printing is not possible to other types of plastic cards.
- If the printer will not be used for a long period of time, remove paper from the printer to prevent it
from discoloring and curling. Put the removed paper in the supplied plastic bag or box, and store it in
a place which is not exposed to high temperature, high humidity, or direct sunlight.
- It is recommended that unpacked paper be used up first.
- Do not print outside the printable area of the dedicated paper.
- Do not print on the back of the envelope. A printing failure or other problems may result.
- To print on both sides of paper, use paper suited for duplex printing. Moreover, print the side with
less pictures and characters (e.g., front side) first.
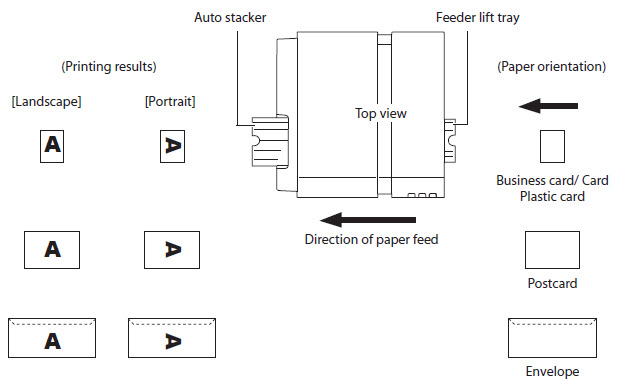
Paper Feed Direction and Image Orientation
On this printer, paper is fed from the feeder lift tray located to the right and ejected to the auto stacker located to the left. Note that the paper loading direction and image orientation dier depending on the type of paper. Image orientation can be set on the [Page Setup] sheet in Printing Preferences dialog box of the printer driver.
Note
- The set print orientation is shown in the preview window on [Page Setup] sheet.
- Some types of application software determines the print orientation on its own accord. Be sure to
carry out test printing to confirm the print orientation. For more details, refer to the documentation
supplied with your application software.
|


