How to print to a BJ Direct compatible printer with the EOS 1D Mark II, EOS 1D Mark II N, and EOS 1Ds Mark II.
| Article ID: ART158412 |
| |
Date published: 06/09/2015 |
| |
Date last updated: 08/18/2015 |
Description
How to print to a BJ Direct compatible printer with the EOS 1D Mark II, EOS 1D Mark II N, and EOS 1Ds Mark II.
Solution
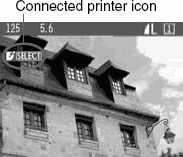 |
1. Select the image to be printed.
- Check that the <
 > icon is displayed on the upper left of the LCD monitor. > icon is displayed on the upper left of the LCD monitor.
|
2. Press the <SELECT> button.
- The print setting screen will appear.
|
|

|
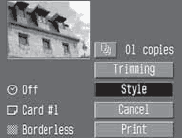 |
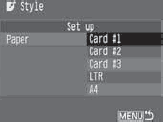
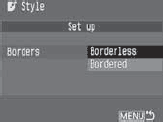
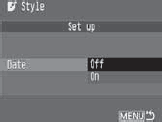
3. Select [Style].
- The Style screen will appear.
|
| |
4. Set the options. |
|
[Paper]
[Borders]
[Date]
|
| |
- [Paper] is for setting the size of the paper loaded in the printer.
- Check the [Borders] and [Date] settings and set them if necessary.
- When you are done, press the <MENU> to return to the print setting screen.
|
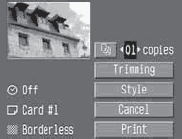 |
5. Set the number of copies and trimming.
|
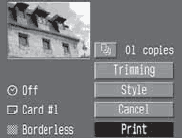 |
6. Print the image.
- Select [Print].
- The printing will start.
- When the printing ends, the screen will return to step 1.
- To stop the printing, press the <SELECT> button while [Stop] is displayed, then select [OK].
|
If you set [Bordered], certain printers may print the date on the border.
|
- If [Date] is set to [On], the recorded date will be imprinted on the lower right of the print.
- If you select [Stop] during the printing, the picture being printed will stop printing and the paper will be discharged.
- If a problem occurs during printing, an error message will appear on the camera's LCD monitor. Select [Stop] or [Continue]. If you select [Continue] and the printer does not resume printing, it will resume automatically after you resolve the problem.
- If you are using a BJ printer equipped with an operation display panel, the error No. will be displayed if an error occurs. To resolve the respective error, refer to the BJ printer's instruction manual.
|
