|
|
EOS R10: White Balance
| Article ID: ART182708 |
| |
Date published: 05/11/2023 |
| |
Date last updated: 08/30/2023 |
Description
White Balance
Solution
|
White Balance
-
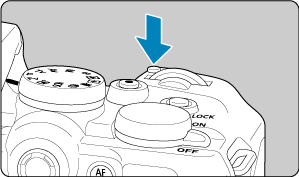
Press the  button ( button ( ). ).
- With an image displayed on the screen, press the button.
-
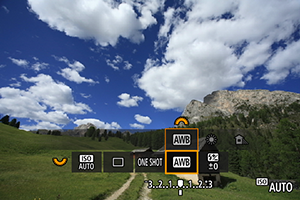
Select the white balance item.
- Turn the
 dial to select the white balance setting item. dial to select the white balance setting item.
-
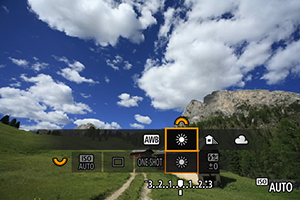
Select a white balance setting.
- Turn the
 dial to make a selection. dial to make a selection.
Applicable with Speedlites having a color temperature transmission function. Otherwise, it will be fixed to approx. 6000K.
White Balance
The human eye adapts to changes in lighting so that white objects look white under all kinds of lighting. Cameras determine white from the color temperature of lighting and, based on this, apply image processing to make color tones look natural in your shots.
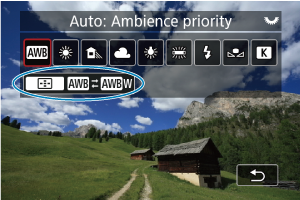
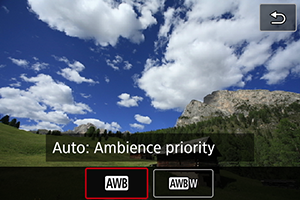
[ ] Auto White Balance ] Auto White Balance
With [] (Ambience priority), you can slightly increase the intensity of the image's warm color cast when shooting a tungsten-light scene.
If you select [ ] (White priority), you can reduce the intensity of the image's warm color cast. ] (White priority), you can reduce the intensity of the image's warm color cast.
-
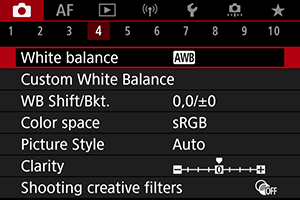
Select [ : White balance]. : White balance].
-
Select [].
- With [] selected, press the
 button. button.
-
Select an option.
[ ] Custom White Balance ] Custom White Balance
With custom white balance, you can manually set the white balance for the specific light source of the shooting location. Make sure to perform this procedure under the light source at the actual location of the shoot.
Registration from an image on a card
-
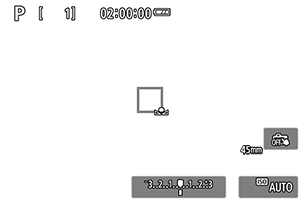
Shoot a white object.
- Aim the camera at a plain white object, so that white fills the screen.
- Set the camera to manual focus () and shoot so that the white object has standard exposure.
- You can use any of the white balance settings.
Caution
- Correct white balance may not be obtained if the exposure of your image differs greatly from standard exposure.
- These images cannot be selected: images captured with the Picture Style set to [Monochrome], images from multiple-exposure or RAW burst shooting, images that are cropped or have a Creative filter applied, or images from another camera.
-
Select [: Custom White Balance].
-
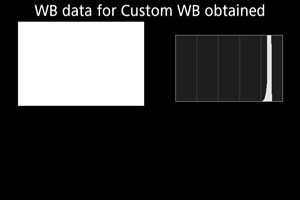
Import the white balance data.
- Turn the dial to select the image captured in step 1, then press the
 button. button.
- Select [OK] to import the data.
-
Select [: White balance].
-
Select the custom white balance.
- Select [].
Shooting and registering white balances
-
Press the button.
-
Select the white balance item.
- Press
 up or down for selection. up or down for selection.
-
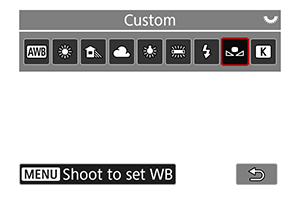
Select [Shoot to set WB].
- Turn the dial or press left or right to select [], then press the
 button. button.
-
Shoot a white object.
Caution
- Correct white balance may not be obtained if the exposure of your image differs greatly from standard exposure.
Note
- Instead of shooting a white object, you can also shoot a gray card or standard 18% gray reflector (commercially available).
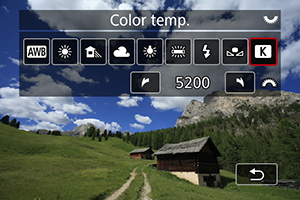
[ ] Color Temperature ] Color Temperature
A value can be set representing the white balance color temperature.
-
Select [: White balance].
-
Set the color temperature.
- Select [].
- Turn the dial to set a color temperature, then press the button.
- The color temperature can be set from approx. 2500K to 10000K in 100K increments.
Note
- When setting the color temperature for an artificial light source, set the white balance correction (magenta or green bias) as necessary.
- When setting [] to a value measured with a commercially available color temperature meter, take some test shots in advance and adjust the setting as needed to compensate for any difference between the color temperature meter and the camera.
|
SIMS Doc Id
1679067152941126857
|