Removing paper jams MP960
| Article ID: ART127342 |
| |
Date published: 05/12/2015 |
| |
Date last updated: 08/14/2015 |
Description
Removing obstructions, foreign objects and paper jams from the printer.
Solution
If [Paper output slot - The paper is jammed. Clear the paper and press OK] appears on the LCD, follow this procedure to clear the paper jam
-
Turn off the printer.
-
Remove paper from the ASF.
-
Gently pull the jammed paper out.
-
-
If paper is visible from the ASF, use hands to pull the paper out slowly.
-
If paper is visible from the paper output slot, use hands to pull the paper out slowly.
-
If the paper tears and a piece of that remains inside the printer, open the scanning unit (printer cover) and remove the paper from inside the printer.
Note : Be careful not to touch the components inside the printer.
-
Turn on the printer and confirm that the Alarm light is off.
(If the jammed paper remains in the printer, the paper may be automatically ejected.)
-
Load paper back into the ASF.
-
Press <OK> to clear the message and continue printing. If you are printing from an application software, follow the instructions displayed on your computer.
-
Turn off the printer and disconnect the power cord and USB cable.
-
Remove the jammed paper slowly using the following procedure.
-
-
Open the rear cover to check if the paper is jammed.


-
Pull out the cassette and check if the paper is jammed inside the cassette area.
-
Stand the printer with the rear side down, holding the document cover.
-
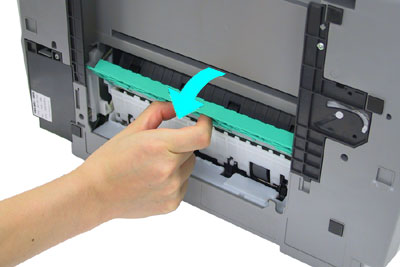
Press the tabs together and pull the green cover toward you.
-
Check if the paper is jammed.
(If you were not doing Duplex printing, you do not have to follow this procedure.)
-
Close the green cover and place the printer back to a normal position.
-
Reconnect the power cord and power on the printer. Confirm the Alarm light is off.
-
Load paper back into the ASF or cassette.
-
Press <OK> to clear the message and continue printing. If you are printing from an application software, follow the instructions displayed on your computer.
Credit card-sized and 4" x 6" sized paper must be loaded properly. If this media is not loaded properly, it will feed into the printer and will not exit. Credit card-sized paper should only be loaded in the ASF and in portrait orientation. 4" x 6" sized paper can be loaded in the ASF or cassette. But must be loaded portrait orientation.
If credit card-sized paper was loaded in landscape orientation in the ASF and did not eject (exit), please follow this procedure.
- Turn off the printer.
- Load the same paper type that is jammed inside the printer in portrait orientation.
- Power on the printer.
The paper stock in the ASF will automatically feed the jammed paper from the printer.
- To resume printing, load the paper in portrait orientation.
If 4" x 6" sized paper was loaded in landscape orientation in the cassette and did not eject (exit), please follow this procedure.
- Turn off the printer.
- Open the rear cover.
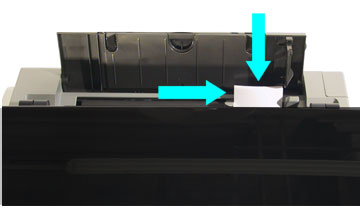
- Fold in four a piece of letter-sized plain paper.
- Push in the folded paper until it hits the jammed paper.
- If the jammed paper is visible from inside the printer area, pull it out and proceed to step 7.
- If the jammed paper cannot be pulled out, push in the folder paper from the rear so the jammed paper is in between the feed rollers.
- Pull out the folded paper and close the rear cover.
- Power on the printer and confirm that the Alarm light is off.
The jammed paper should automatically eject.
- To resume printing, load the paper in portrait orientation.
