Borderless Copying
This feature enables you to copy color images so that they fill the entire page without borders.
- You can use this feature only when the paper is set to [Photo Plus Glossy], [Matte Photo Paper], [Glossy Photo Paper] or [Photo Paper Pro].
- When using this feature, load the document on the Platen Glass.
- You can only copy in color with this feature.
- The copied image may need to be enlarged to fit onto the selected paper size when making borderless copies. Some cropping may occur.
- When borderless copying is selected, the LCD will display the setting with the symbol +, such as [95%+], [100%+], etc.
- Confirm that the printer is powered on. The paper output tray will open automatically when copying.
- Load paper in the auto sheet feeder or the cassette.
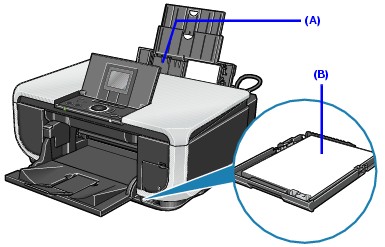
* Auto sheet feeder: Load paper with the print side facing up and short- side down.
* Cassette: Load paper with the print side facing down.
- Lift the document cover and set a document on the platen glass.
Memo:
- Regardless of the document size, set it with the long-side toward you.
- Place the original face down on the platen glass.
- Align the document with the alignment mark <1> (shown by the arrow) on the lower right corner of the platen glass.
Note: The machine cannot scan the area approximately 3 mm from the front and right edges of the platen glass.
- Close the document cover gently.
- Press the <HOME> button (A).
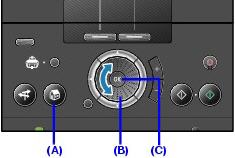
- Use the Easy-Scroll Wheel (B) or press the right or left arrow to select [Copy], then press the <OK> button.
- Press the left Function button to display the Special copy screen.
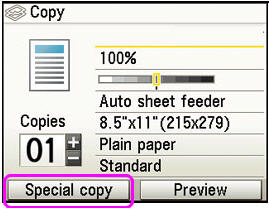
- Use the Easy-Scroll Wheel or press the right or left arrow to select [Borderless copy], then press <OK>.
- Change the copy settings as desired. Click here for details.
The selectable items are as follows.
- Press the + or - button to specify the number of copies.
- Press the <Color> button for color copying, or the <Black> button for black & white copying.
The machine starts copying.
Note: To cancel copying, press the <Stop/Reset> button.
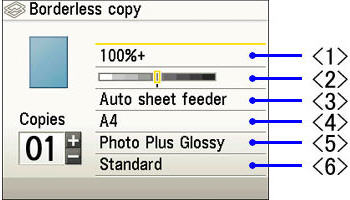
Change the copy settings
Use the Easy-Scroll Wheel or press the up or down arrow to select the item to set, then press <OK>.
<1> Magnification: Specify the reduction or enlargement method from the following: 100 %, Preset ratio, Zoom ( 25 - 400 % ) or Fit-to-page.
- Use the Easy-Scroll Wheel or press the up or down arrow to select the preferred option, then press <OK>.
- If Zoom ( 25 - 400 % ) is selected, change the magnification by using the Easy-Scroll Wheel or press the right or left arrow. Alternatively, you can skip to the target magnification by holding down the right or left arrow.
- If Preset ratio is preferred, you can select from the following options: 400%+ MAX, 214%+ 4"x6" -> 8.5"x11, 171%+ 5"x7" -> 8.5"x11, 103%+ A4 -> 8.5"x11, 100%, 25%+ MIN.
Note: When Fit-to-page is selected, the size of some documents may not be correctly detected. In this case, select Preset ratio or Zoom (25 - 400 %).
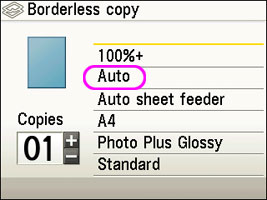
<2> Intensity: Specify the intensity for copying.
- Use the Easy-Scroll Wheel or the right / left arrow to increase or decrease the intensity.
- Press the right Function button to select Auto intensity. When selecting Auto intensity, "AUTO" will be displayed instead of the intensity slide bar.
<3> Paper source: Specify the appropriate paper source, Auto sheet feeder or Cassette.
<4> Page size: Specify the paper size for copying. Select from the following sizes: A4, 4"x6"(101.6x152.4), 5"x7"(127x177.8), Credit card or 8.5"x11"(215x279).
Note: Credit card sized paper can be selected only when the auto sheet feeder is selected as the paper source.
<5> Media type: Specify the media type for copying. Select from the following types: Photo Paper Pro, Photo Plus Glossy, Matte Photo Paper or Glossy Photo Paper
<6> Print quality: Adjust print quality for copying. The print quality options are: Standard or High (quality-priority).
Click here to return to step 10.
